I) Revision of the project duration (NCE)
II) Revision of the budget
III) Revision of the Overview tab
IV) Revision of the Log Frame tab
OneGMS Focus: How to deactivate an outcome/output/indicator/activity during a project revision
V) Revision of the Workplan tab
VI) Revision of the People Targeted tab
VII) Revision of the Programming tab
VIII) Revision of the Cash tab
IX) Revision of the Implementation tab
X) Revision of the Subgrants tab
XI) Revision of the Locations tab
XII) Revision of the Bank info
XIII) Revision documents tab
XIV) Submit the project revision
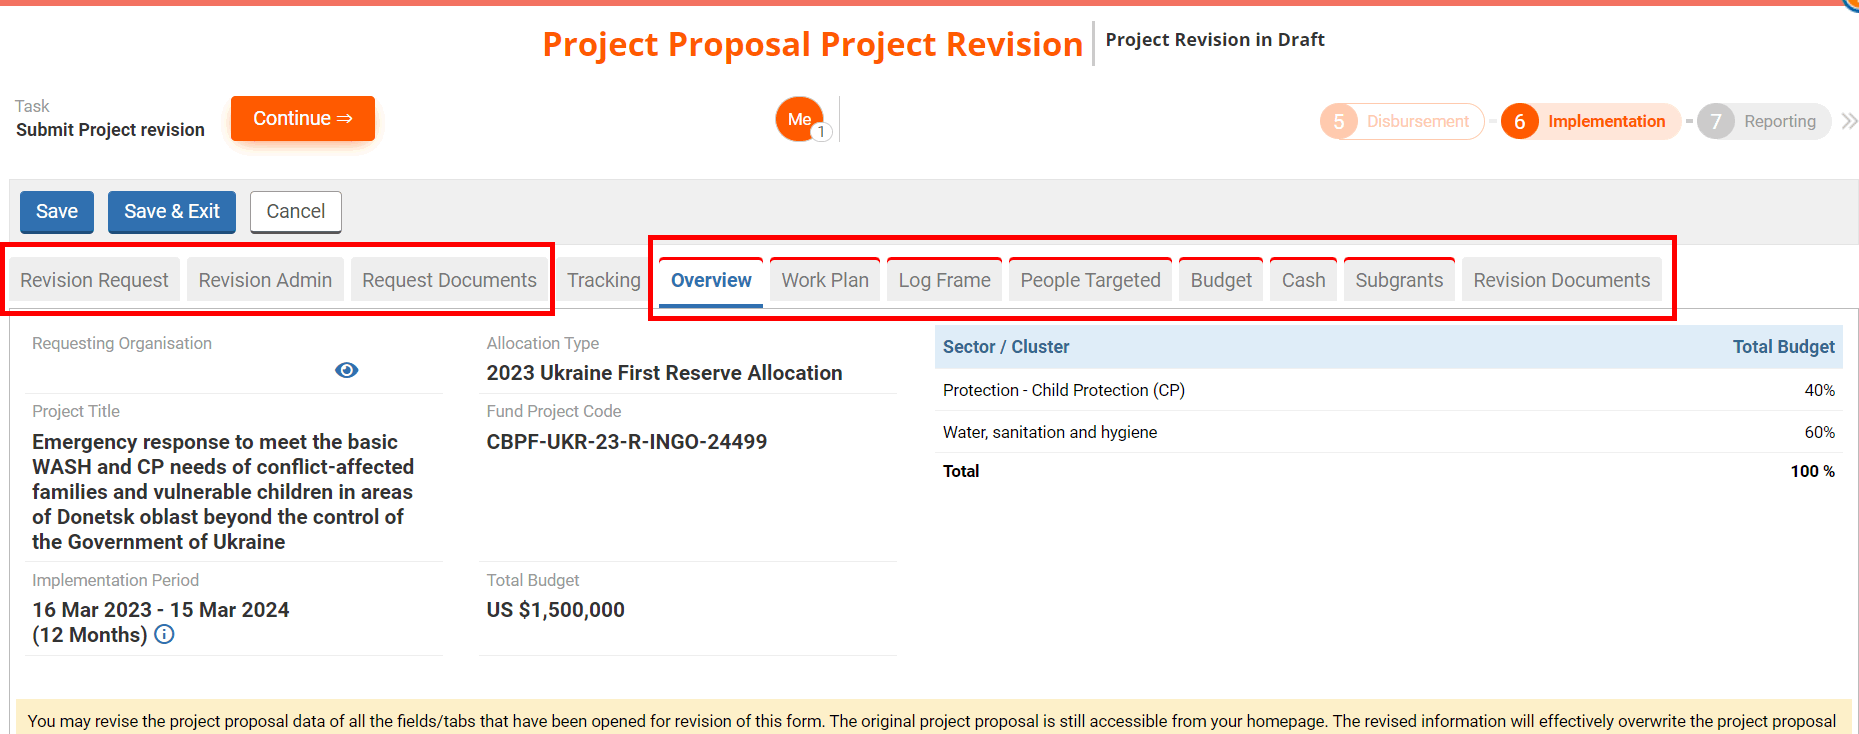
Once the HFU has approved the revision request and configured the project revision template, you will be able to access the project revision from your home page in the ‘Revision’ section. To open it, click on this icon 

You will see the revision request’s tabs on the right side and the tabs open for revision on the left side.
I) Revision of the project duration (NCE)
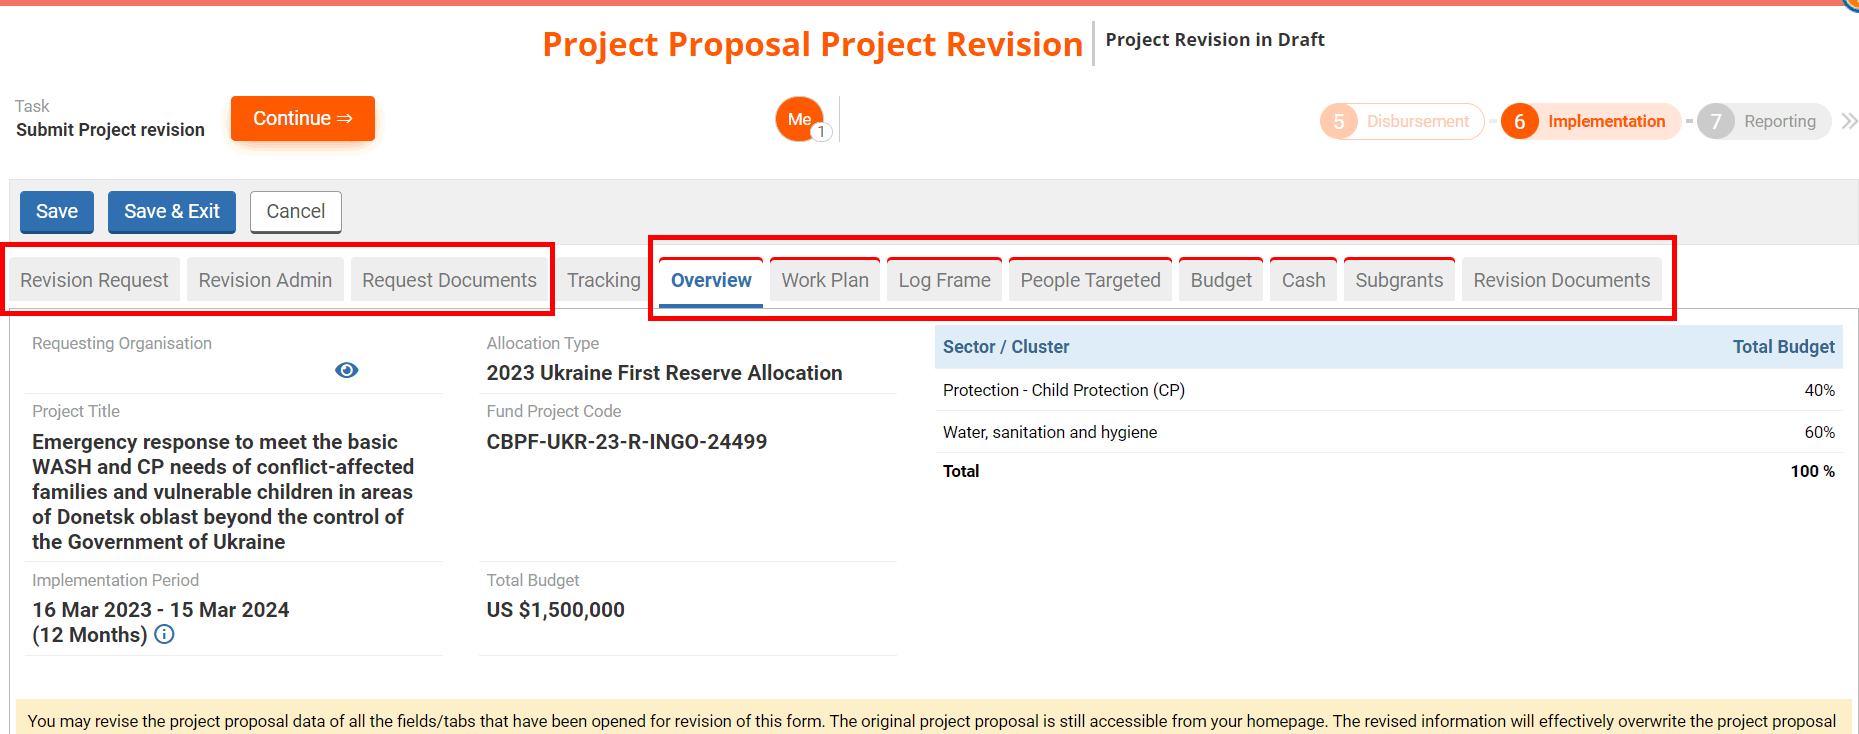
After the HFU has approved the Partner’s NCE request and activated the “NCE” section, the partner will be able to access the ‘Overview’ and Workplan’ tabs of the project proposal. Do not forget to save your update for each tab, as the system will not automatically save it.
Overview tab
On this tab you will be able to modify the project end date and duration.
-
Project Overview
1.7 Actual Start date/ Actual End Date (NCE)
This section provides you with the start date of the project and the initial project end date before revision. The revised end date is automatically displayed based on the information previously provided, but you can edit it by selecting a new date from the calendar.

1.8 Project Duration
You can see here the current duration (i.e., the project duration before revision) and the updated project duration based on the revised end date.

Workplan tab
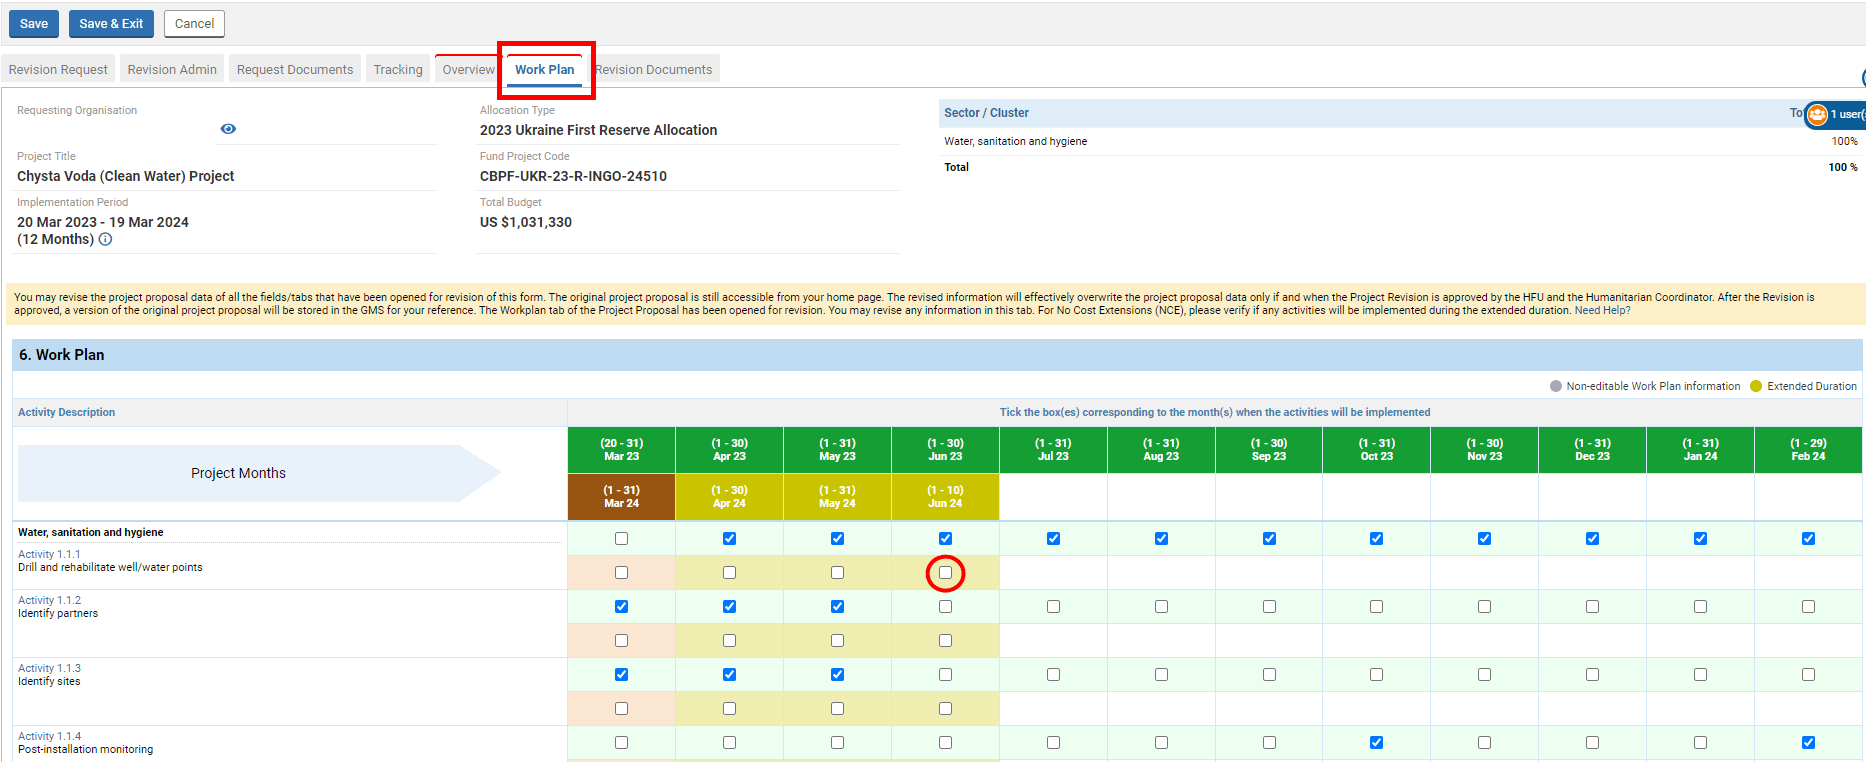
In the Workplan tab, indicate the activities which will be implemented during the extended period. The extended duration is represented in light green.
If you requested a budget revision, you will be able to edit the ‘Budget’ and the ‘Subgrants’ tabs.
Budget tab
If you requested a budget revision without a cost extension, you will not be able to increase or decrease the total amount of the budget. If you requested and were granted a Cost Extension, you are allowed to increase your current total budget amount by a maximum of 30%. The variance across budget categories and the allowed extended amount are indicated below the header.
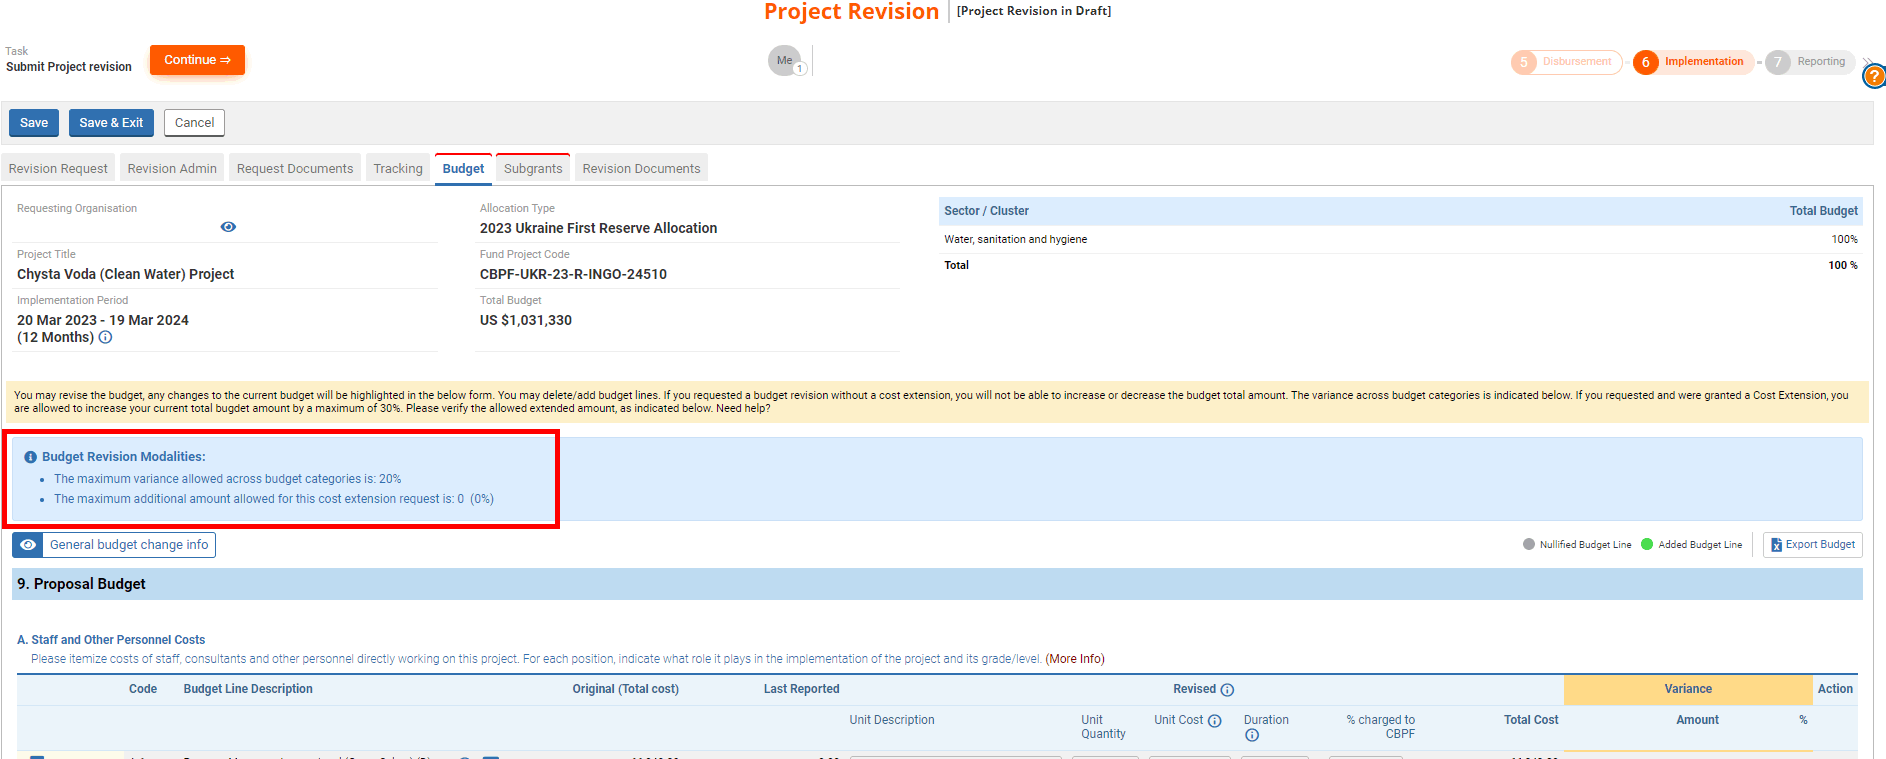
To revise a budget line, you can edit it or deactivate it by setting the cost to 0. Budget lines that are nullified will be highlighted in grey.

You can also add budget lines. To do so, click on [Add New Row] at the end of the budget section.
 Newly added lines will be highlighted in green. Once you save the tab, you will be able to delete them by clicking on

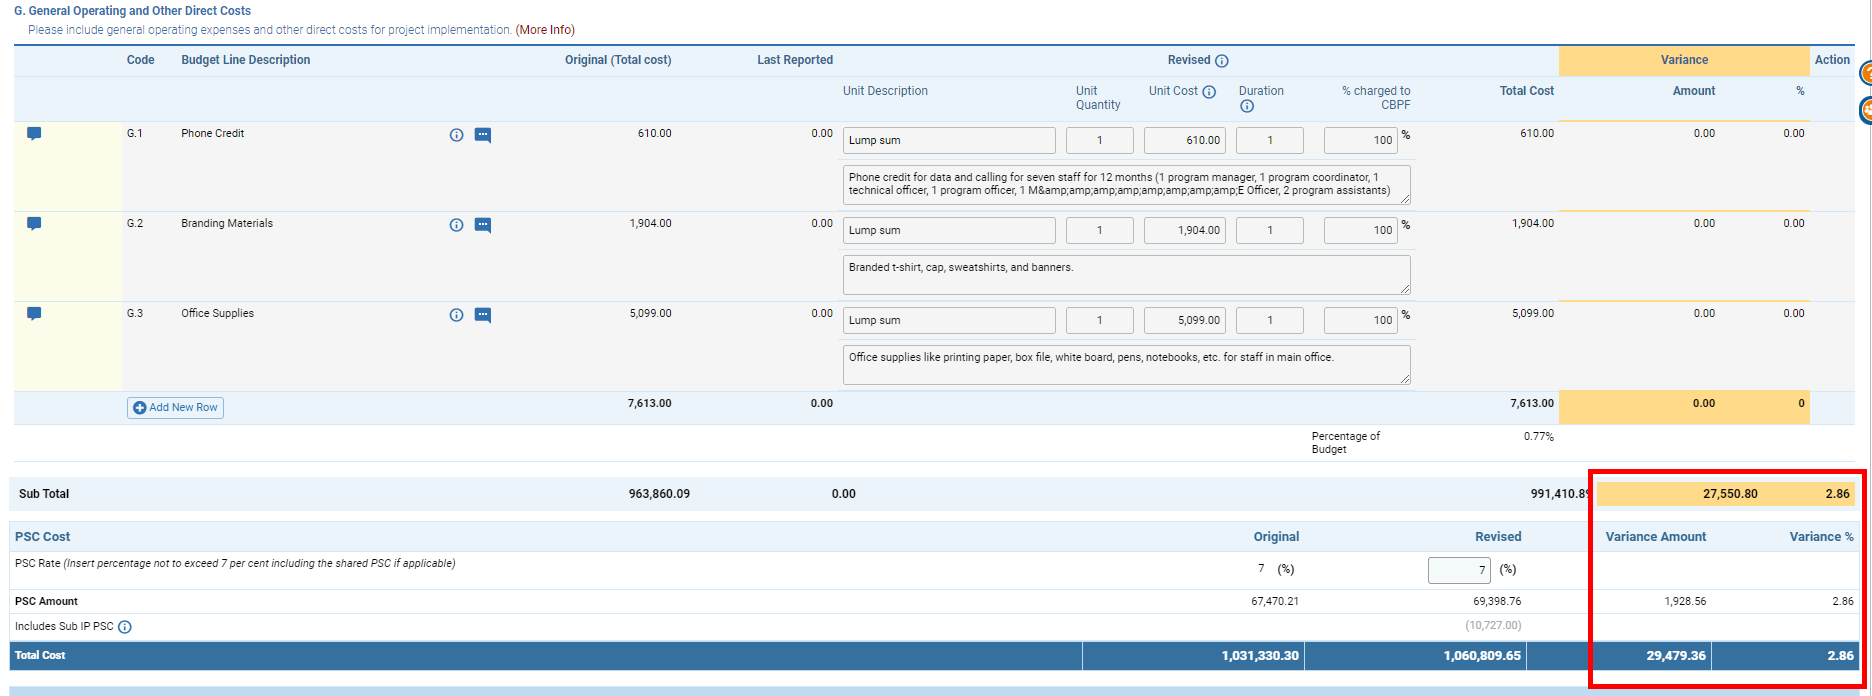
Thanks to the variation column, you can track the amount and percentage variation of budget lines that you have added or edited.

The variance indication is available at budget line and category level, but also at total budget level.
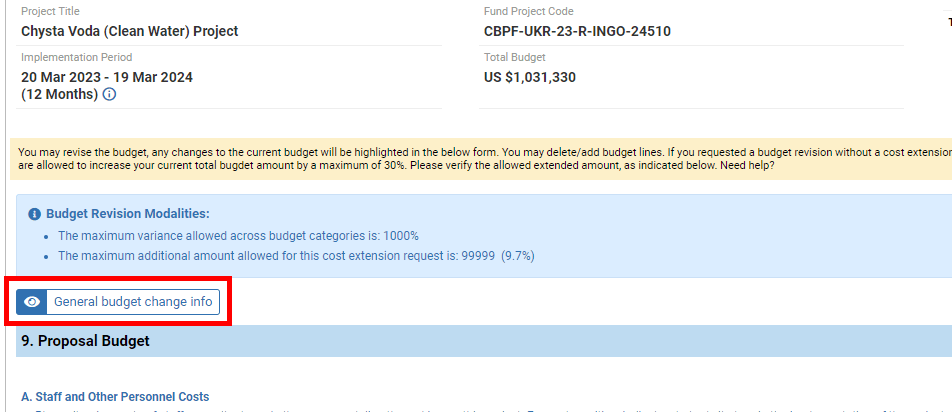
Once you have saved the ‘Budget’ tab, you can click on [General budget change info] to display a summary of the changes you made.
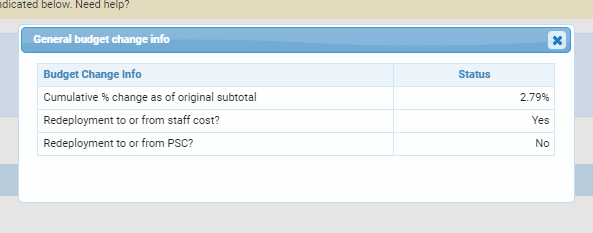
On the pop-up window, you will see information on the cumulative percentage change and if the budget was redeployed to or from staff cost or PSC.
Subgrants tab:
As the budget granted to a sub-implementing partner is integrated to the project budget, you may revise the ‘Subgrants’ tab if you were granted a budget revision.
To know how to edit and fill in the ‘Subgrants’ tab, please click here.
III) Revision of the Overview tab
The overview tab allows you to edit the project duration (in case of an NCE), the project title, summary, emergency type, HRP and focal points. To know how to edit the overview tab in case of a project duration extension please click here. If you wish to read more on how to edit the other fields of the ‘Overview’ tab, please click here.
IV) Revision of the Log Frame tab
In the Log Frame tab, the partner will be able to:
- Edit the project objective.
- Add a new cluster and HRP objective, but not edit the initial one(s).
- Edit outcomes, outcome indicators, outputs, output indicators and activities.
- Add new outcomes, outcome indicators, outputs, output indicators and activities.
- Deactivate an outcome, output, indicator and activity
To edit outcome, outputs, indicators and activities, click on this icon 

You can click on these icons to add new outcomes, outputs, indicators and activities.

Newly added sections will be highlighted in green. You can click on this icon ![]() to delete an entry or this one
to delete an entry or this one ![]() to edit it.
to edit it.
Please note: if you are adding a new activity, do not forget to update the ‘Workplan’ tab.

If you wish to read more on how to fill in the Log Frame tab, please click here.
|
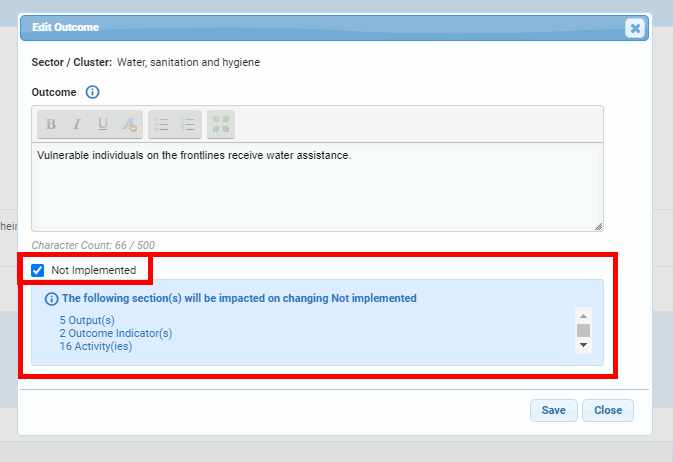
OneGMS Focus: How to deactivate an outcome/output/indicator/activity during a project revision The system does not authorize users to delete or edit elements of the Log Frame. However, it is possible to deactivate them by “nullifying” and indicating that they will not be implemented. If you deactivate an outcome, all the indicators, outputs and activities linked to it will be automatically deactivated. If you deactivate an output, all output indicators and activities will be deactivated. Deactivating only activities or indicators will not impact other data. However, you will not be able to save the tab if there is not at least one outcome, outcome indicator, output, output indicator and activity. To deactivate an item, click on this icon
On the pop-up window, tick the box ‘Not implemented’. If you are deactivating an outcome or an output, it will be displayed below the list of sections that will be impacted by this change.
Items that are deactivated will be indicated at the beginning of the line
Activities that have been deactivated from the ‘Log Frame’ tab will be automatically removed from the ‘Workplan’ tab. |
V) Revision of the Workplan tab
This tab allows you to indicate when each activity will be implemented. Each activity should be linked to at least one month, and each month should be linked to at least one activity.
Please note: you will not be able to tick/untick a past month.
If a project month box is in red, it means that no activities have been linked to this month. Extended durations are in light green. If you have added a new activity to the ‘Log Frame’ tab, it will be highlighted in red until you assign it to a month.

VI) Revision of the People Targeted tab
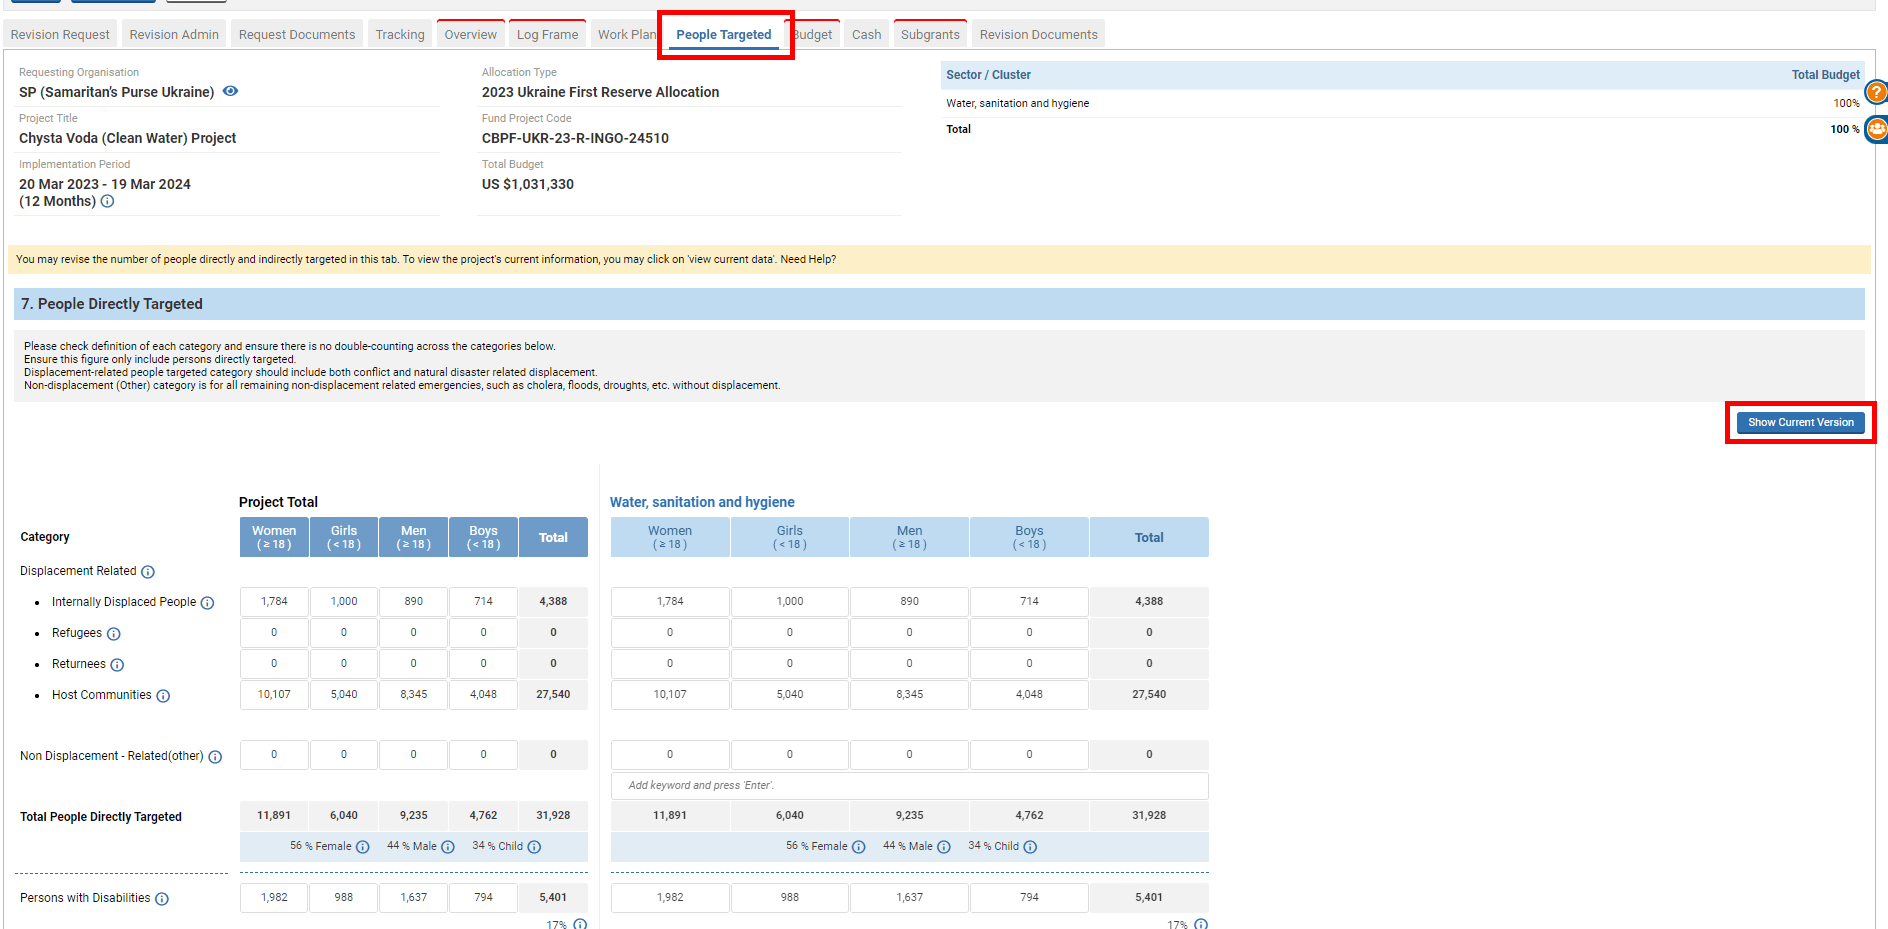
You can edit the data of people directly and indirectly targeted. To know how to fill in this tab, please click here.
To edit the number of people directly targeted, you can directly edit the table. If you have already submitted a narrative report before the revision, you can click on [Show Current Version] to display the number of people reached.
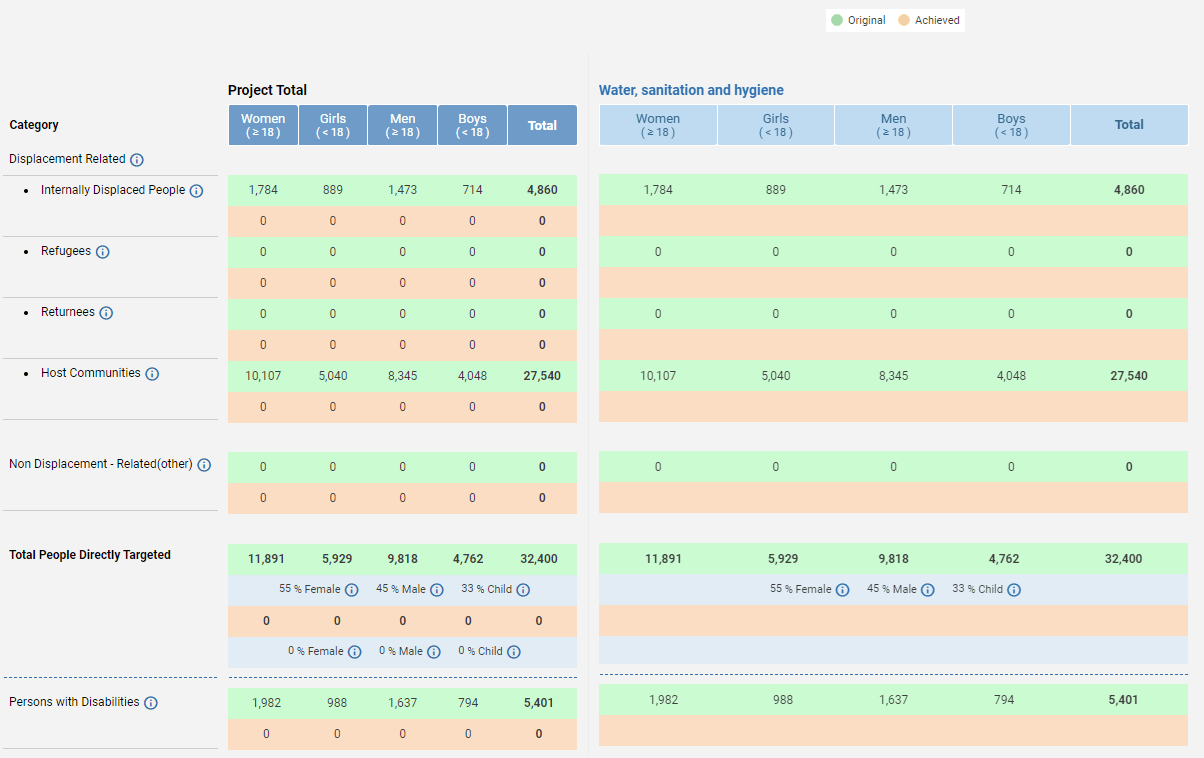
For each category and sector, the number of people reached as indicated in the narrative report will be highlighted in orange, while the initial number of people targeted will be highlighted in green.
Please note: the original number of people targeted does not take into account the revised data.
In the People Indirectly targeted section, clicking on [Show Current Version] will show you the data registered before the revision.

VII) Revision of the Programming tab
This tab allows you to edit all fields pertaining to the effectiveness of humanitarian programming, including all pillars of protection, gender equality and persons with disabilities. To know how to fill in this tab, please click here.
You can click on [Show Current Version] to see the data currently registered before the revision.

VIII) Revision of the Cash tab
You can revise all CVA information from this tab.
Please note: if you have already submitted a narrative report, the system will not allow you to revise the value of cash below what you have previously reported in a narrative report.
If you want to read more on how to add or edit a CVA and fill in this tab, please click here.
All newly added CVA type will be highlighted in green. You can click on [Show Current Version] to display the initial data registered for this tab.
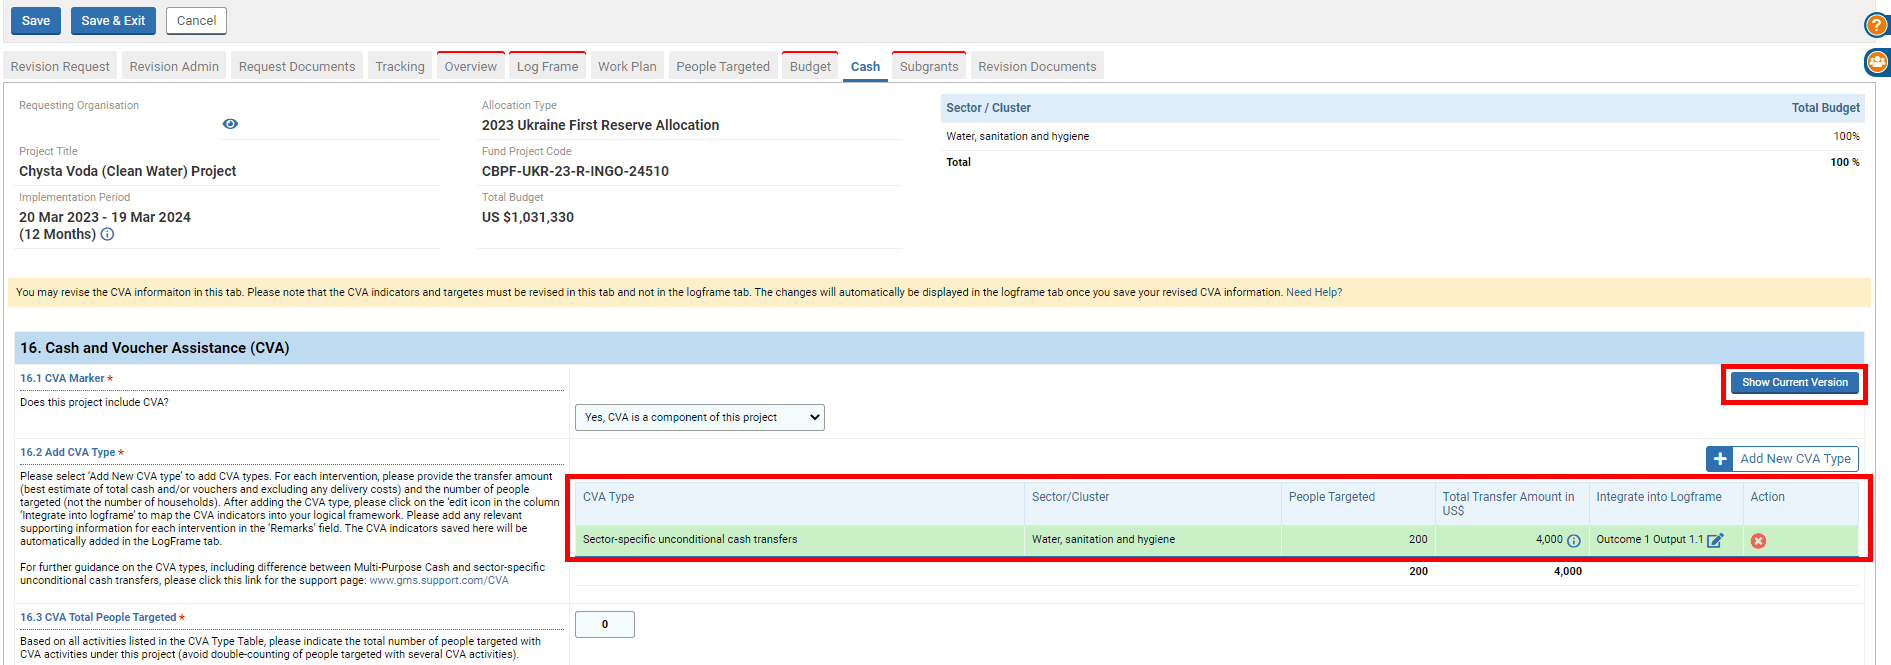
The current version not overwritten by the revision yet will be displayed at the top.

Once you have edited the tab, do not forget to save it.
IX) Revision of the Implementation tab
This tab allows you to edit all the implementation and coordination measures of the project. To know how to fill in this tab, please click here.
You can click on [Show Current Version] to see the data currently registered before the revision.

X) Revision of the Subgrants tab
On this tab you will be able to add, delete or edit any sub-implementing partner (Sub-IP) you have added. To know how to edit and fill in this tab, please click here.
If you have deactivated activities linked to a (Sub-IP) from the ‘Log Frame’ tab, it will be indicated here.
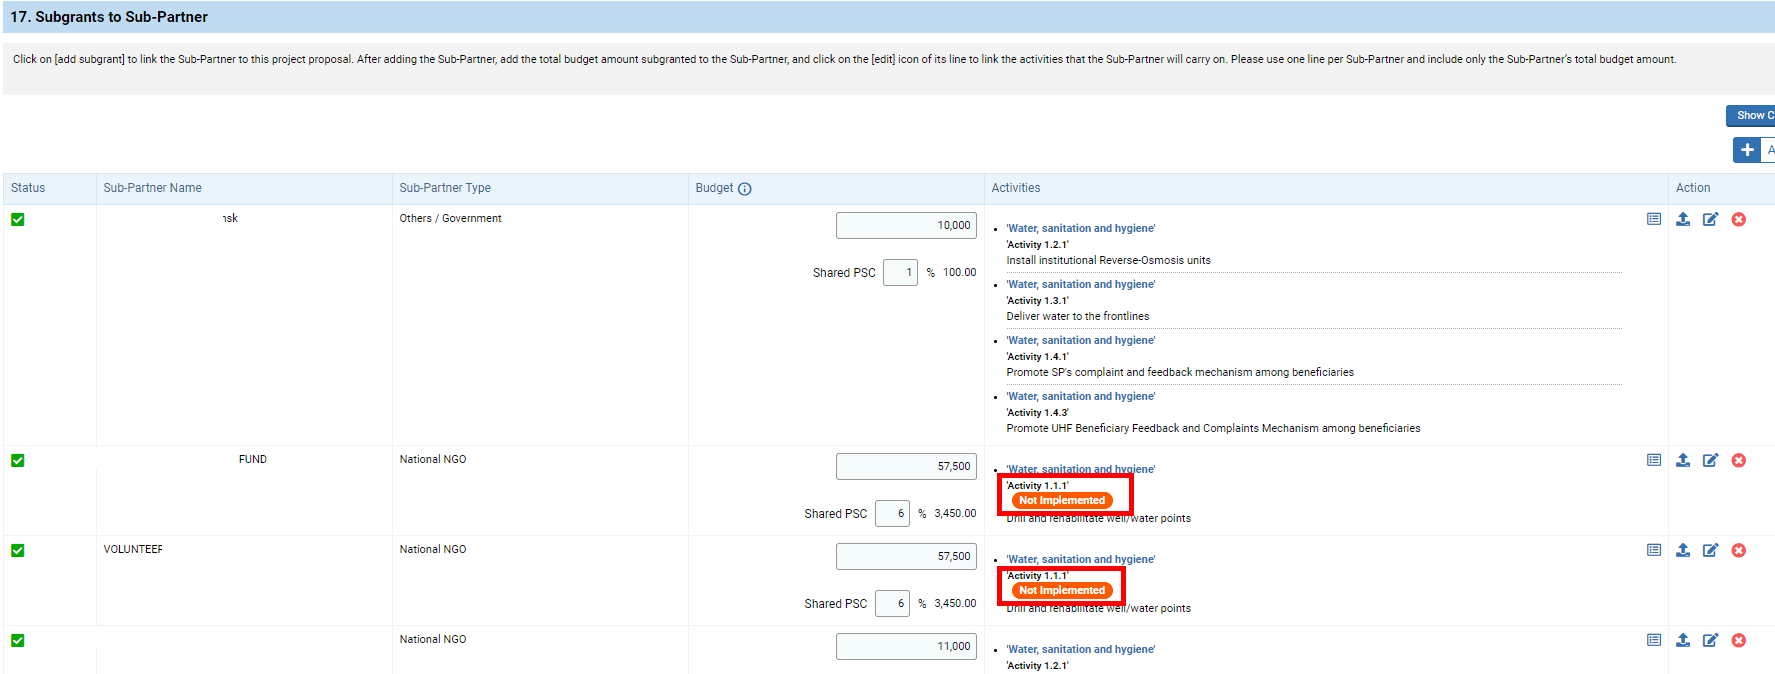
If all the activities of a Sub-IP are deactivated, you will have to delete this sub-partner by clicking on ![]() or setting the budget to 0. If you have deleted a sub-partner by mistake, you can edit its budget to undo the cancellation.
or setting the budget to 0. If you have deleted a sub-partner by mistake, you can edit its budget to undo the cancellation.

If only one of the sub-partner's activities was cancelled, you will have to untick this activity. To do so, click here  to open the activities.

On the pop-up window, all activities are listed. Those canceled are in blue. Untick the box of the activity you would like to unlink.
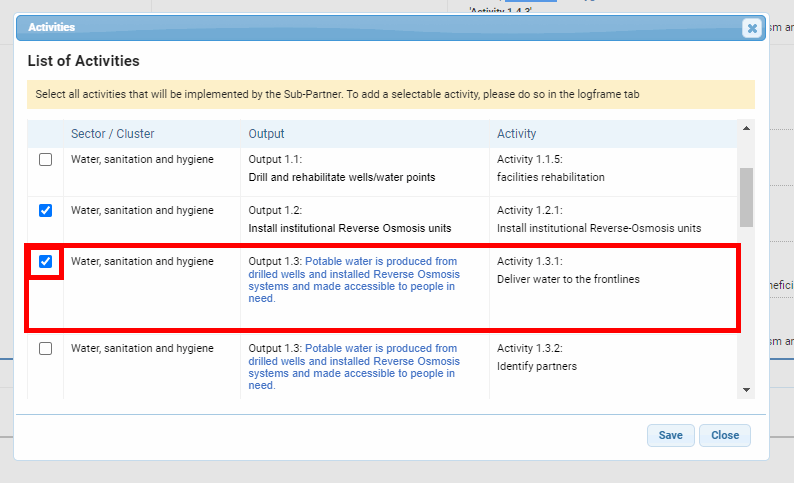
Do not forget to save the tab once all the updates are completed.
XI) Revision of the Locations tab
On this tab you will be able to add, delete or edit any location you have added. To know how to edit and fill in this tab, please click here.
You can click on [Show Current Version] to see the data currently registered before the revision.
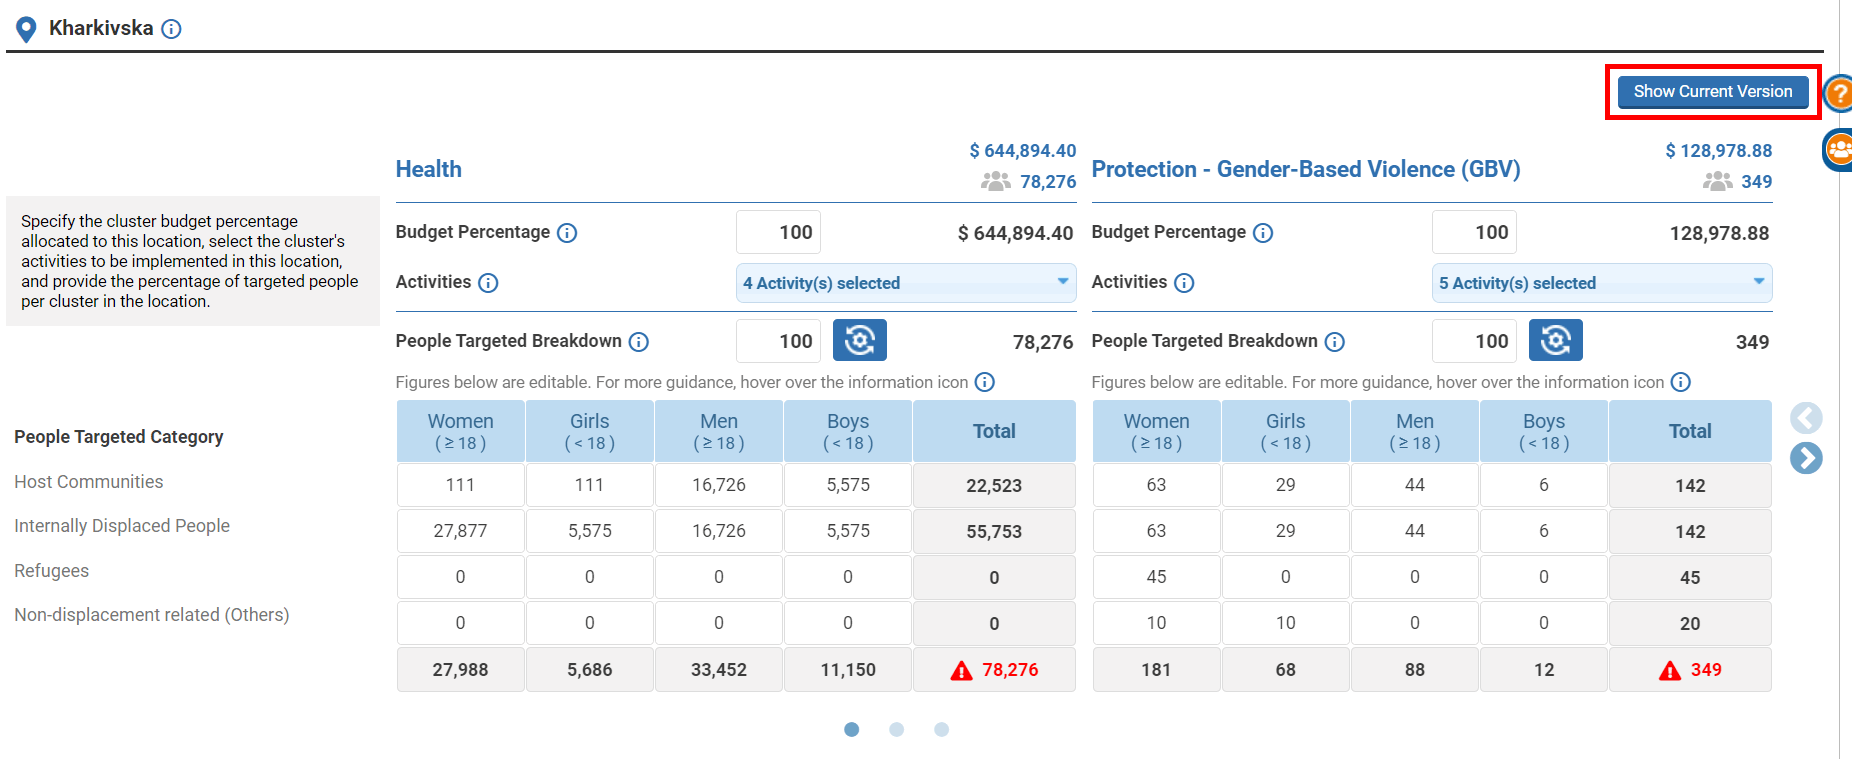
If you have added a new location, it will be highlighted in green, as you can see in the snip below.

If you have decided to delete a location, it will be highlighted in grey.

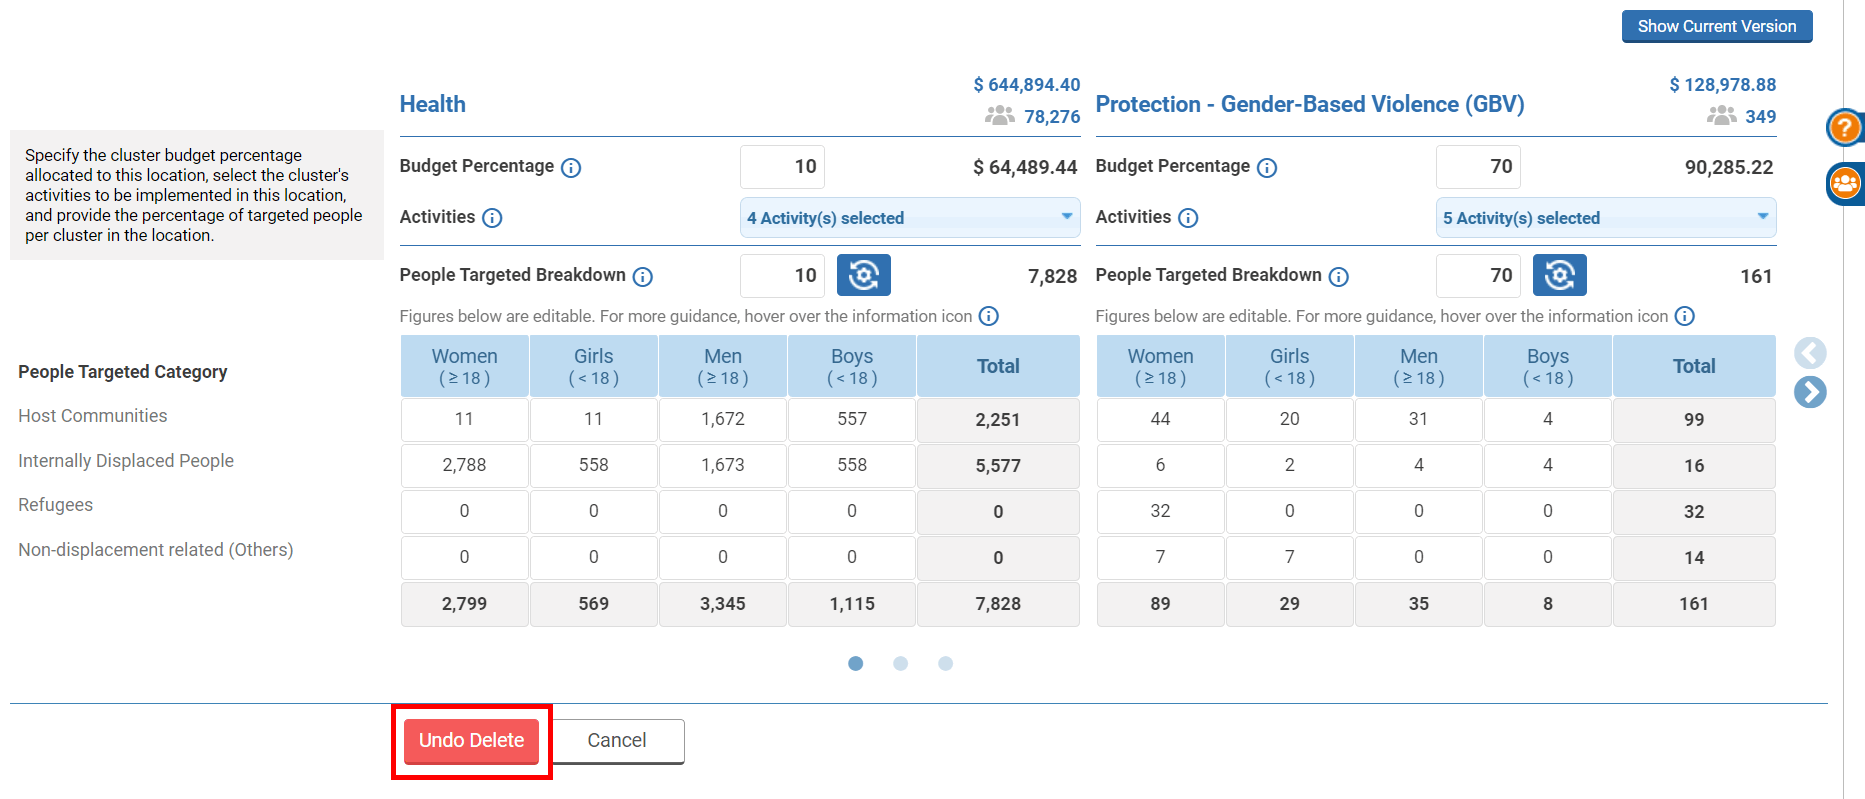
If you delete a location by mistake, you have the possibility to undo this action. To do so, click on the edit icon

Then click on [Undo Delete]
XII) Revision of the Bank info
You may change the bank account on which you wish to receive OCHA’s next funding tranche for this project. To change the bank information, select a different bank in the drop-down list and click on [Save].
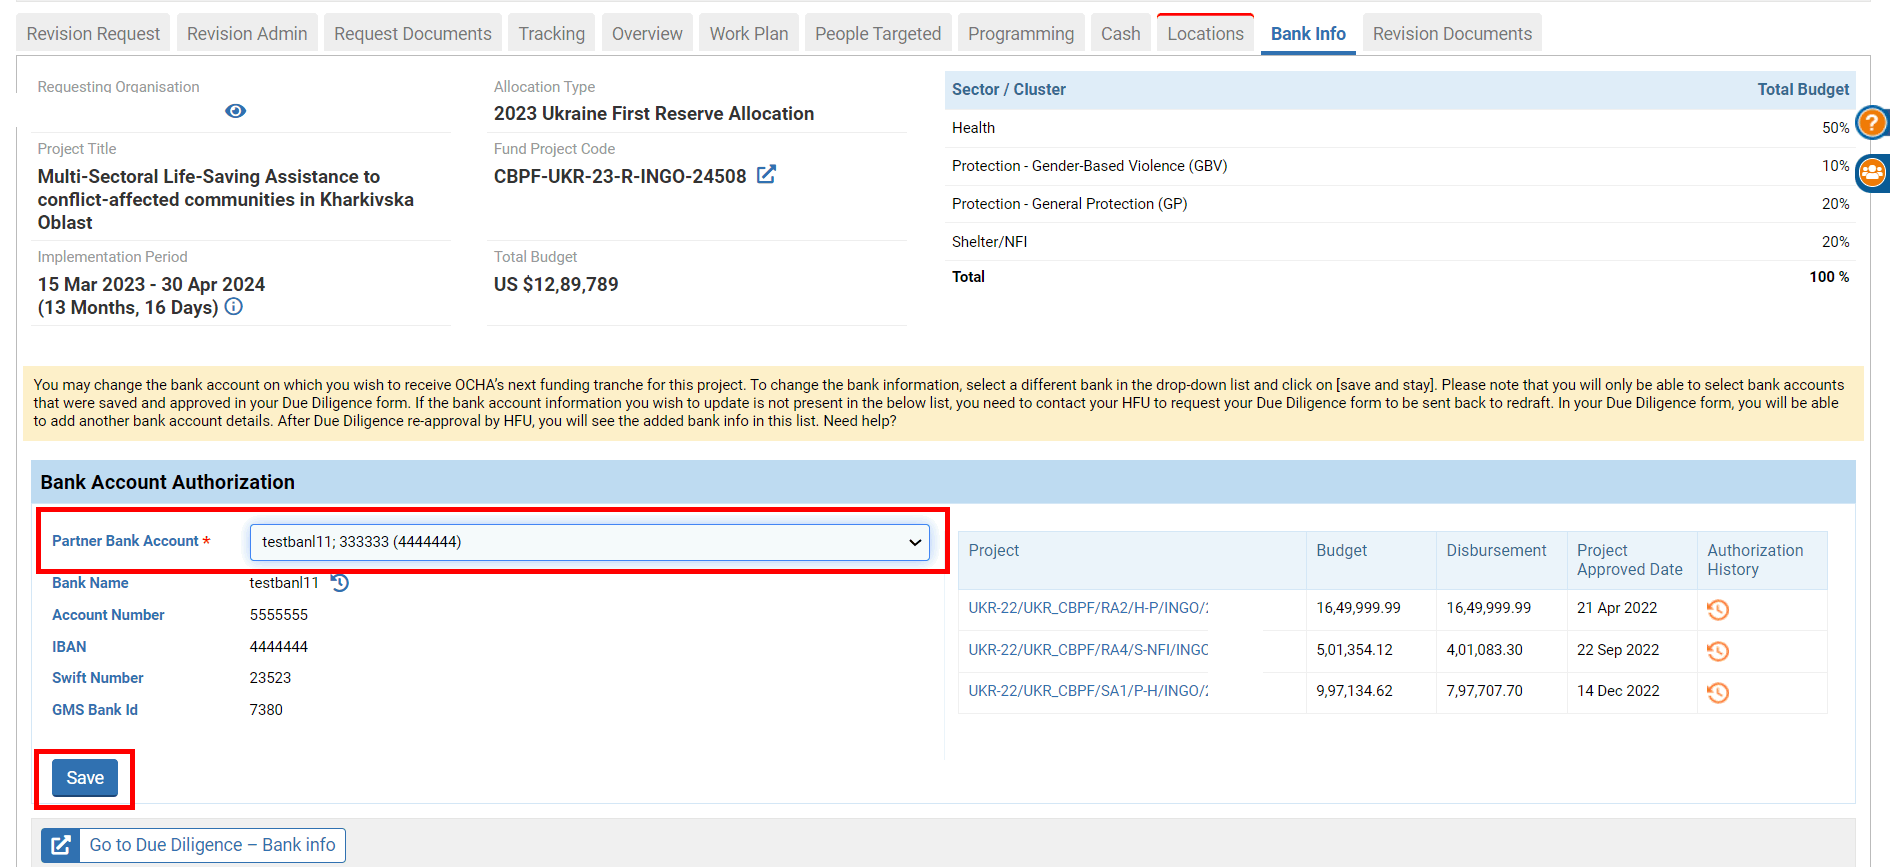
Please note: you will only be able to select bank accounts that were saved and approved in your Due Diligence form. If the bank account information you wish to update is not present in the below list, you need to contact your HFU to request your Due Diligence form to be sent back to redraft to add another bank account details. After Due Diligence re-approval by HFU, you will see the added bank info in this list.
If the HFU has sent you the Due Diligence form back for correction, you can access it from this tab by clicking on [Go to the Due Diligence – Bank Info].

You can click here if you wish to read more on the Due Diligence.
At any point during the project revision, users can download and upload documents.
This tab shows you all documents uploaded relating to the sub grant budget, GA amendment and Revision. You can hover over this icon  to display information on when the document was uploaded and by whom.
 You can download a single document by clicking on this icon
  or all the documents saved in this tab by clicking on [Download All]

If you wish to upload a new document, click on [Add Document]

Select from the drop-down list the category of the document and click on [Choose File] to select a document from your computer. You may leave a comment if needed and click on [Upload] to upload the document.
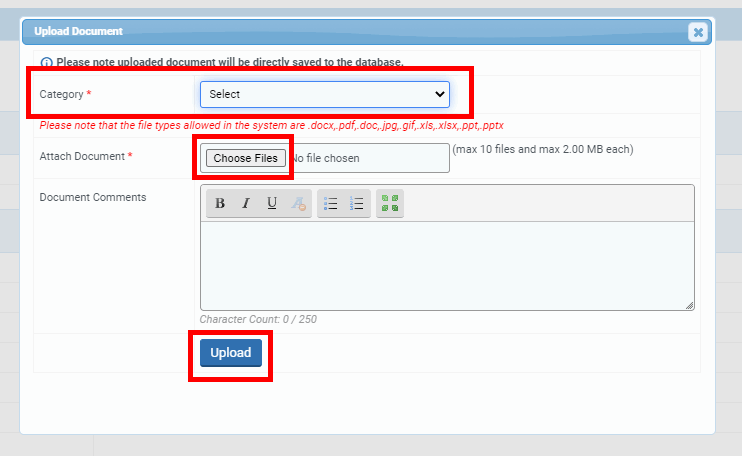
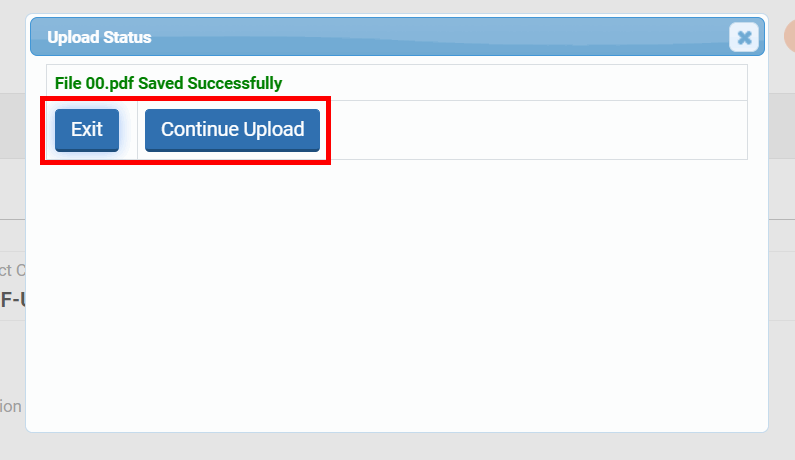
Upon clicking on [Upload], a pop-up window will be displayed. You can click on [Exit] if you do not have any other documents to upload or on [Continue Upload] to upload more documents.
You are able to edit the title and comments of all documents you have added. To do so, click on this icon
 You will be able to edit the name of the document and the comment section. You can click on this icon
  to disregard the updates or on
  to save your updates.

XIV) Submit the project revision
Once you have revised all the necessary data, you can click on [Continue] to submit to the HFU your project revision.

Once on your task page, click on [Submit Project Revision].

You can leave a comment pertaining to the task if necessary and click on [Save & Finish] to submit the project revision to the HFU.


