I) Search for a contact
II) Add a new contact
III) Edit a contact
1) The contact status is approved/active
2) The contact status is draft/inactive
a) You can find the contact in the Contact List
b) You do not find the contact in the Contact List
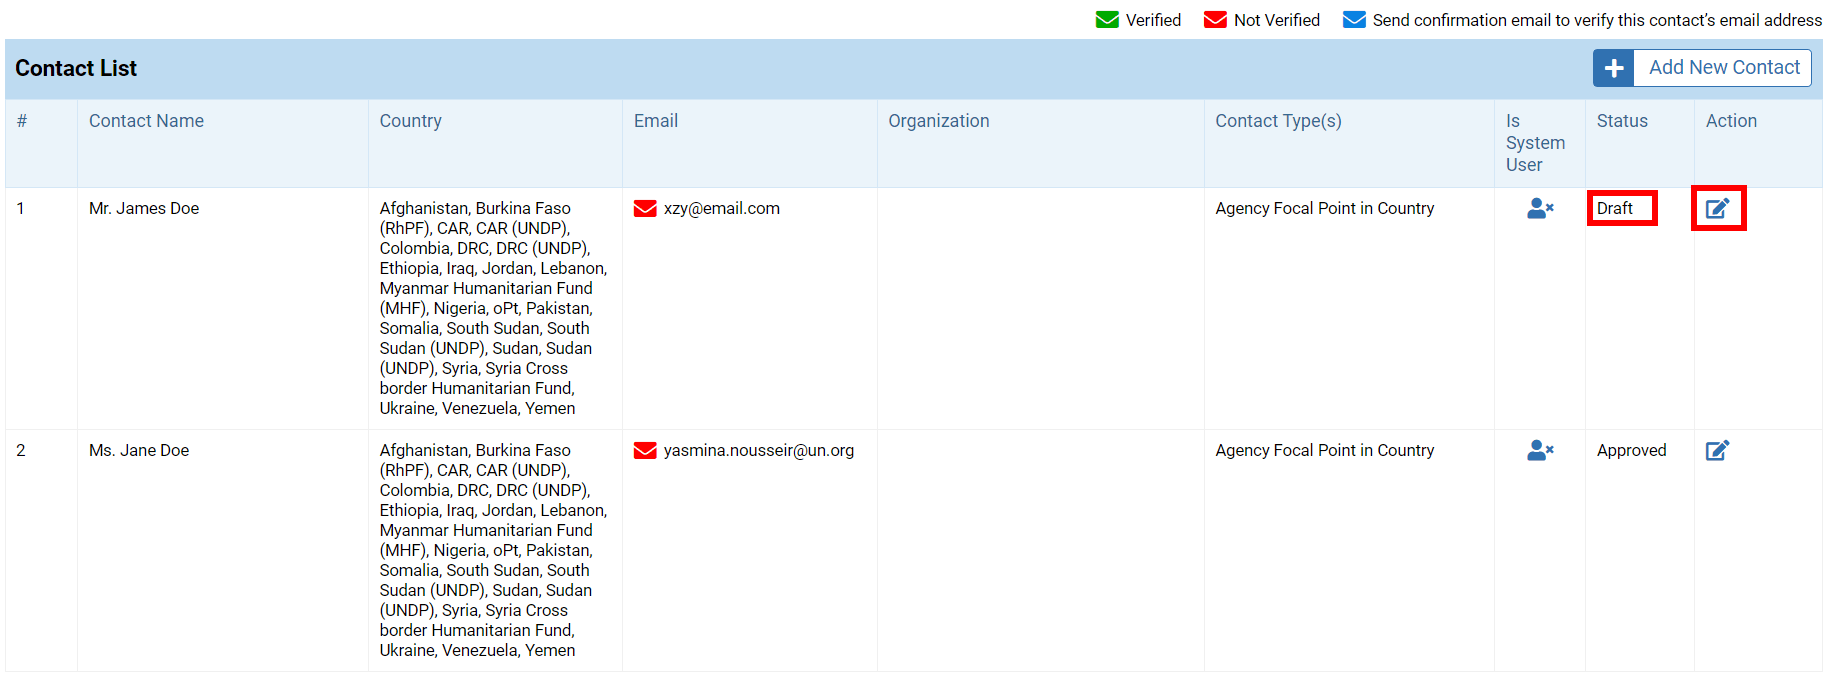
The Contact Management page contains the list of contacts saved in the country you have access to.
A contact is a person whose information is saved in the system for communication purposes. They do not necessarily have access to the OneGMS. Conversely, a registered user is a person who can log into the OneGMS and edit/review/access modules of the OneGMS, depending on their user role’s right. A OneGMS user is also not automatically a contact person. They need to register themselves as a contact to become the focal point of a project.
As an agency, you will only be able to add or edit focal points. If the focal point wishes to gain access to the OneGMS as a registered user, they should contact the HFU.
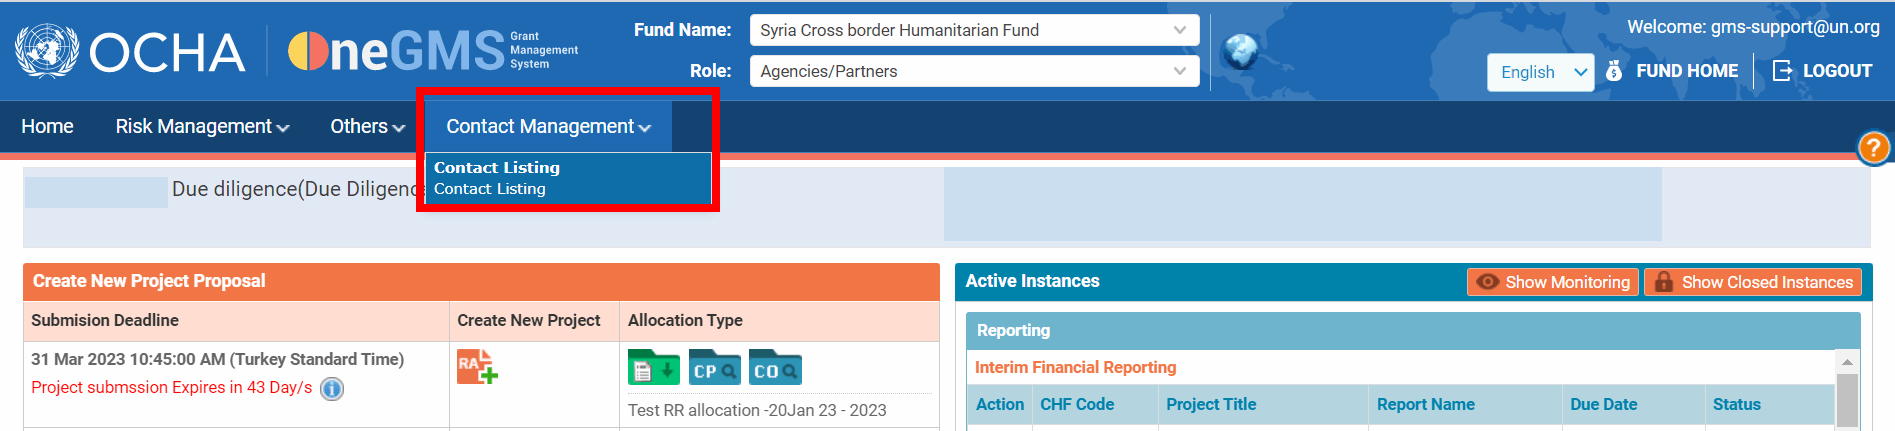
You can access the Contact Management page by following this navigation: Contact Management --> Contact listing.
You can use the filters and click on [Search].
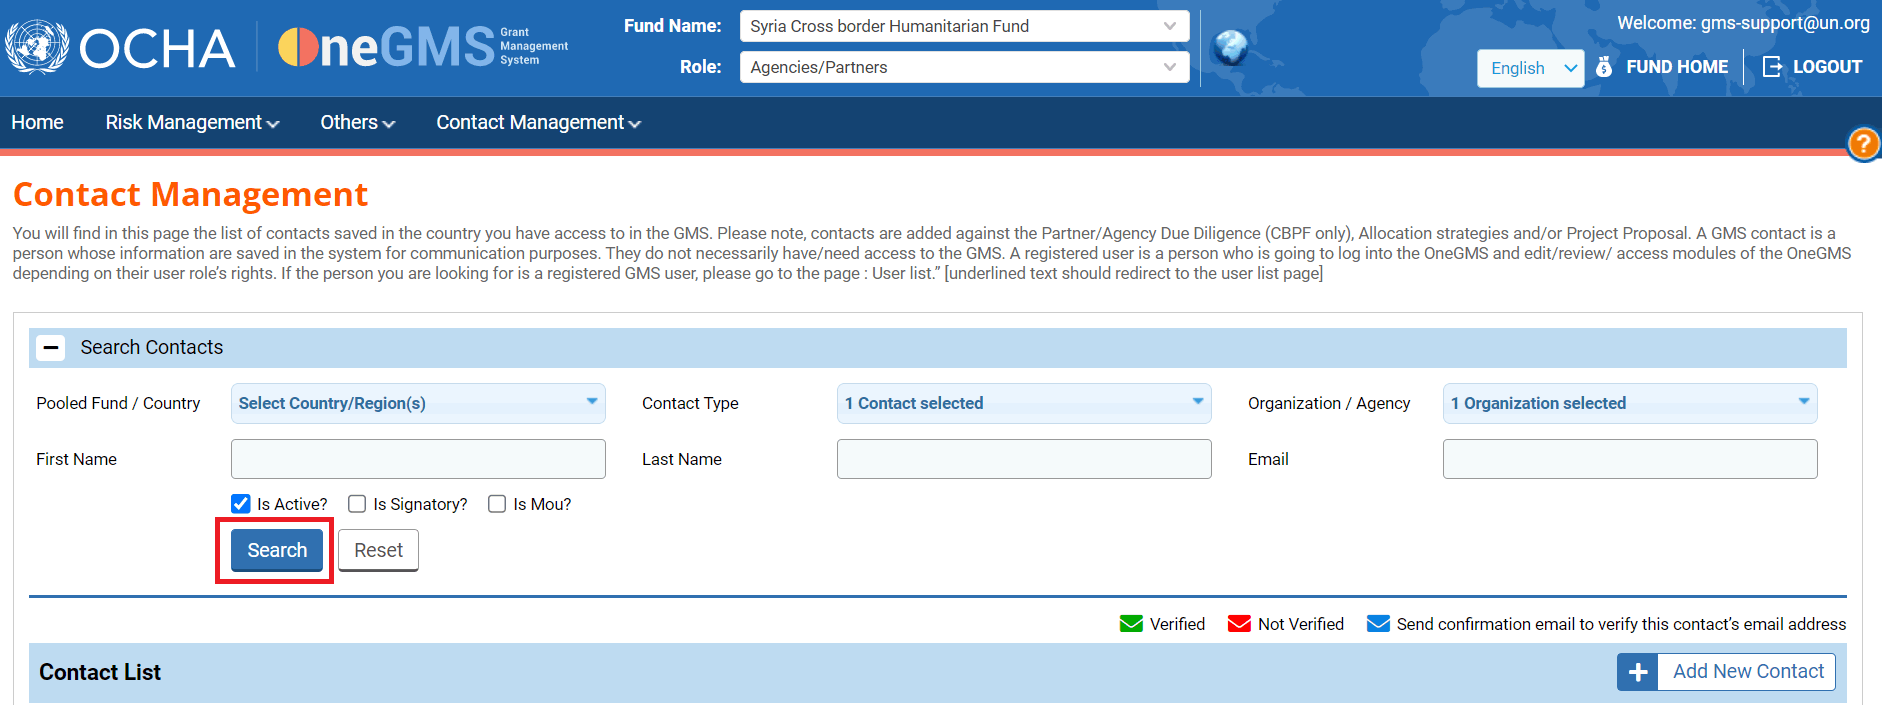
Filters description:
Pooled Fund/Country: select the pooled fund. Only the pooled funds you have access to will be displayed.
Contact type: select the contact type. By default, the contact type is Agency Focal Point in country.
Organization / Agency: select the organization. Only the organization(s) you are registered in will be displayed.
First Name: you can search by using the first name of the focal point.
Last name: you can search by using the last name of the focal point.
Email: you can search by using the email of your contact.
Is Active?: tick this box to only display active focal points
Is Signatory: tick this box to only display focal points that have signatory rights.
Mou: tick this box to only display Mou focal points.
The result will be displayed in a table below.
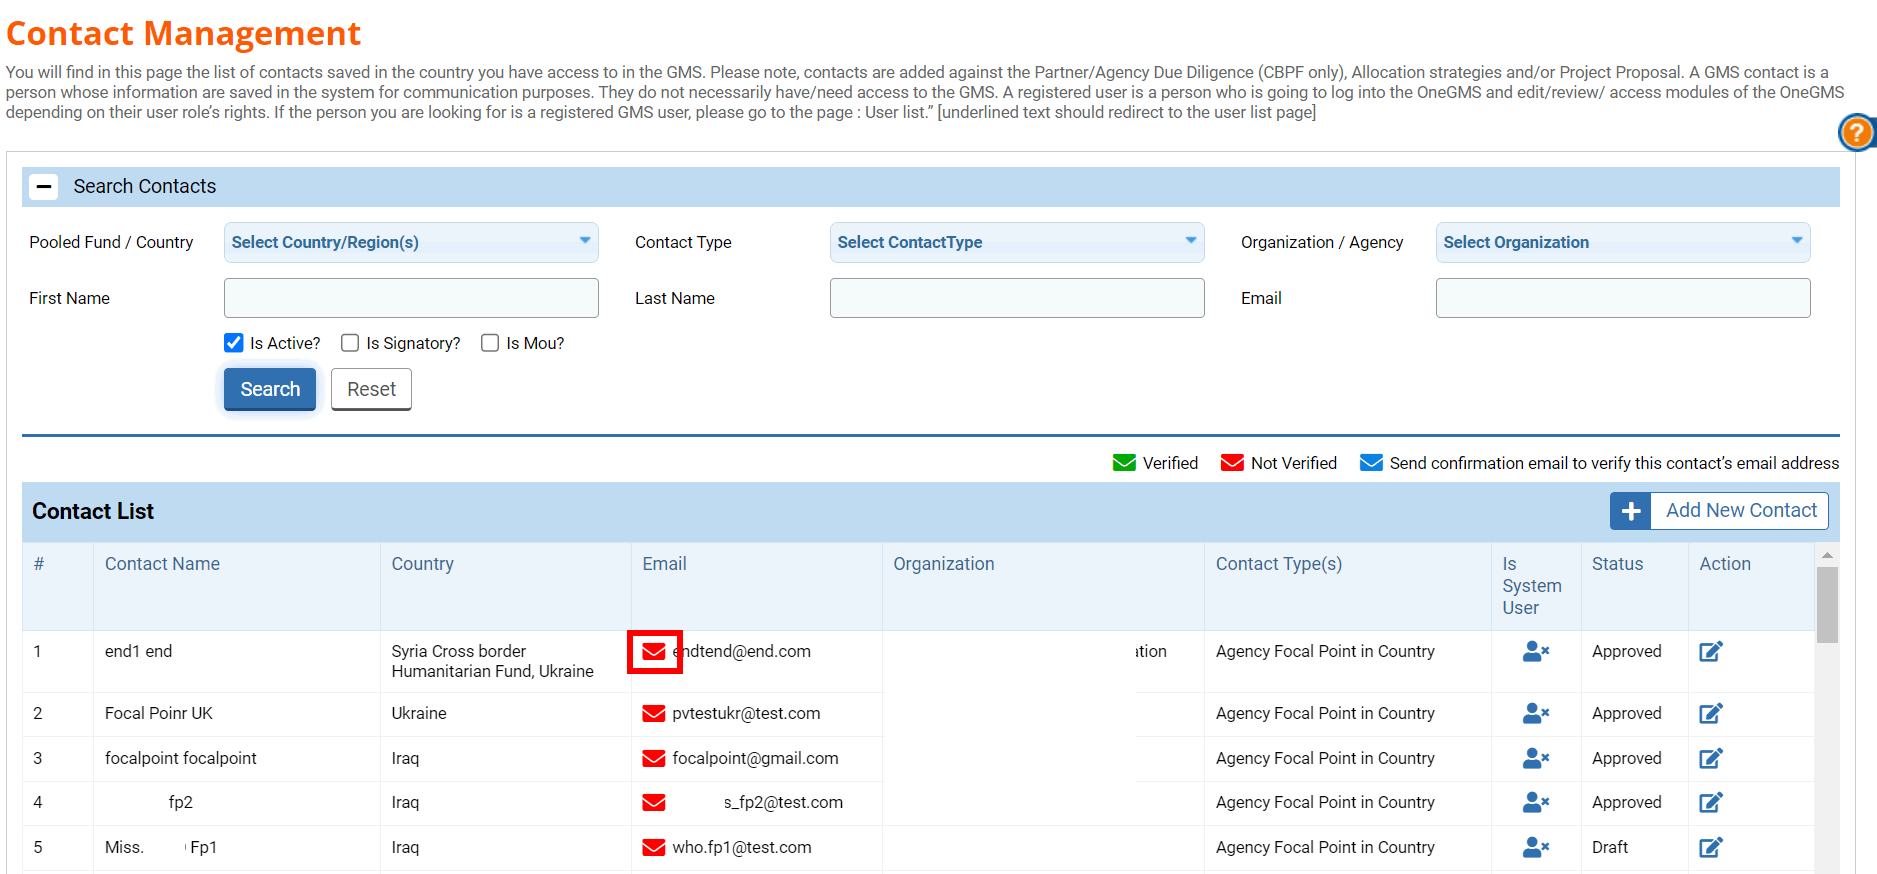
Columns Description:
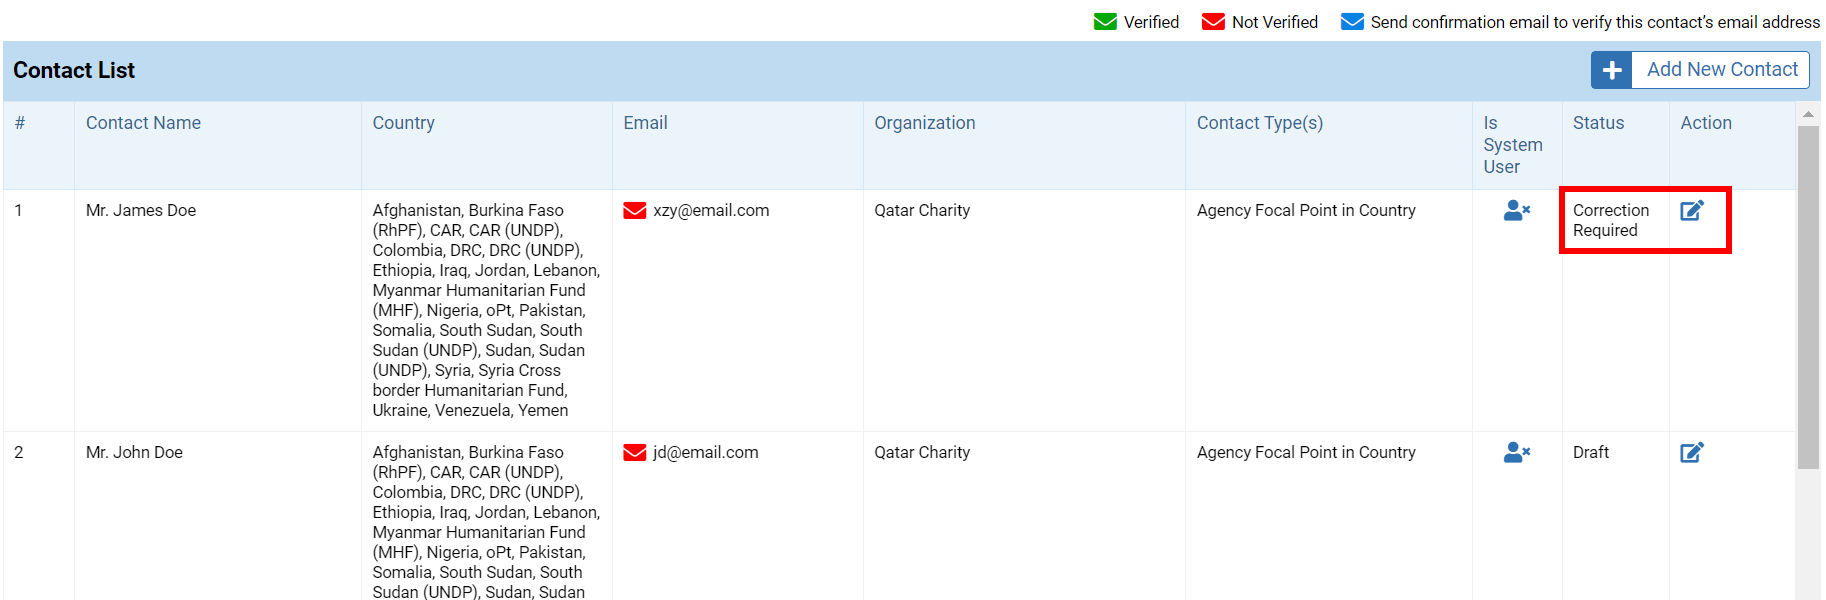
- Contact Name: the name of the contact.
- Country: the country in which the contact is registered. Contacts can be registered in multiple countries.
- Email: the contact's email. Each contact’s email must be verified to be able to validate the contact. In doing so, an automatic email will be sent to the contact who will have to click on a link to verify its email. In the email column, a letter icon will give you the status of this email verification.
- A green letter
 means that the email has been verified.
 - A red letter
 means that the email has not been verified.
 - You can click on the blue letter
 to send a verification email to the contact.
 - Organization: the organization to which the contact is linked.
- Contact Type(s): the type of the contact. As a partner, you can only add and have access to partner focal points.
- Is System User: this icon
 means that the user is a registered user who can log into the OneGMS. Conversely, this icon
  means that the user is not a registered user and cannot log into the OneGMS.
 - Status: the status of the contact.
- Action: click on this icon
 to edit the contact.
The Contact Management page allows you to add a new focal point. Before adding a contact, please ensure that the contact you wish to add is not already in your contact list.
There are two ways to access the Manage Contact page from which you will be able to add a contact:
-
From the Contact Management page, we presented above, click on [Add New Contact].
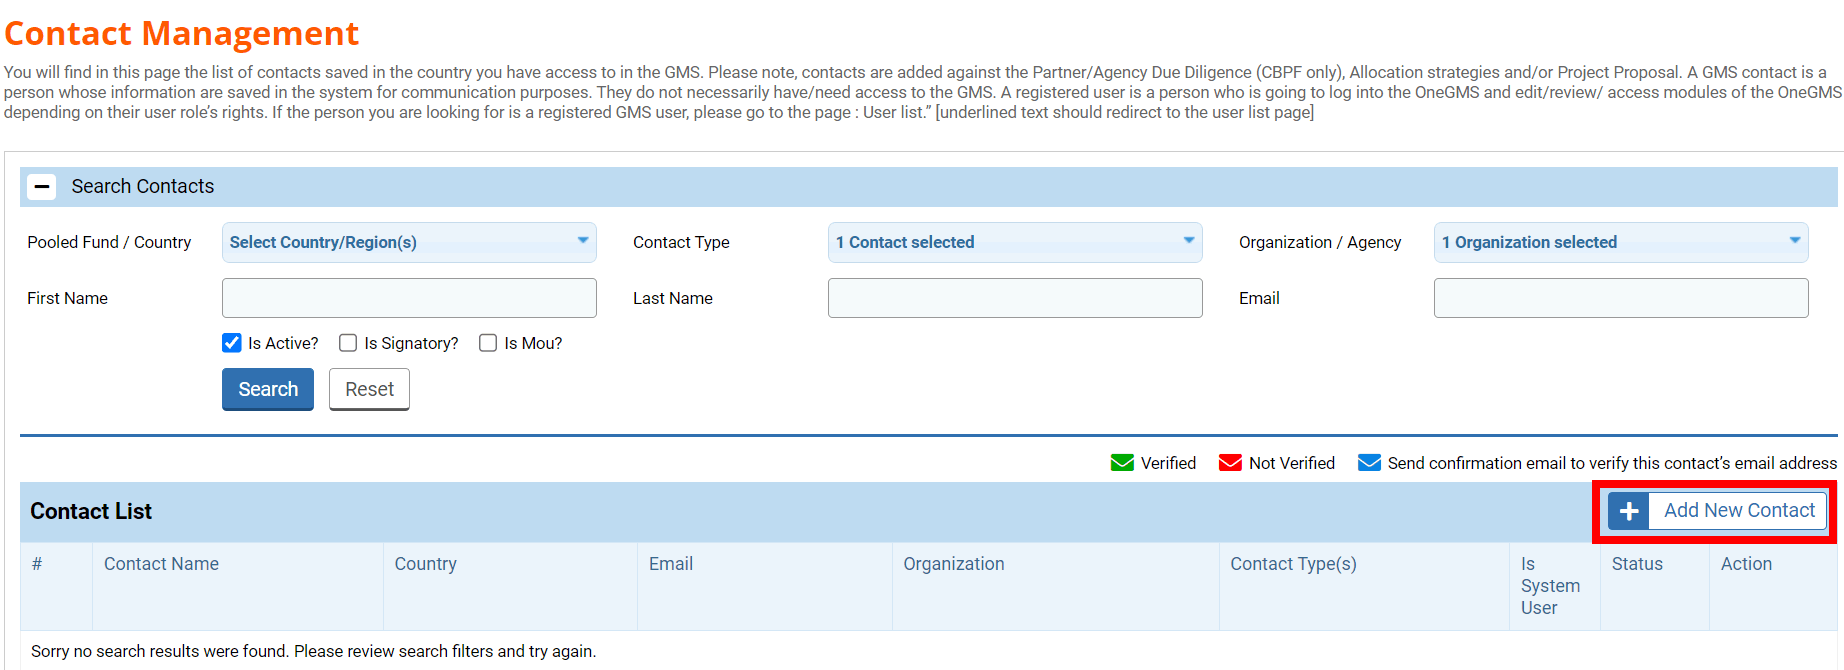
-
From the 'Overview tab of the project proposal. Indeed, in case you do not find your focal point during proposal drafting in the system, you can click on the hyperlink ‘Add a new contact here’. To know all the steps to add a focal point from the ‘Overview’ tab, click here.
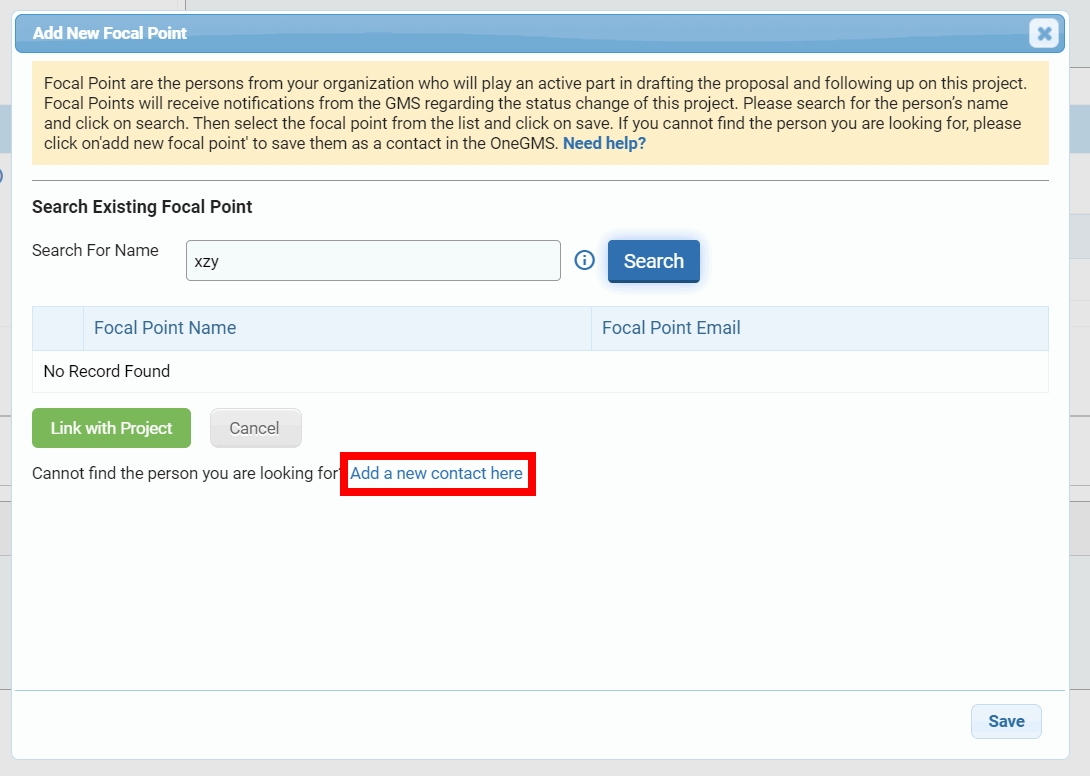
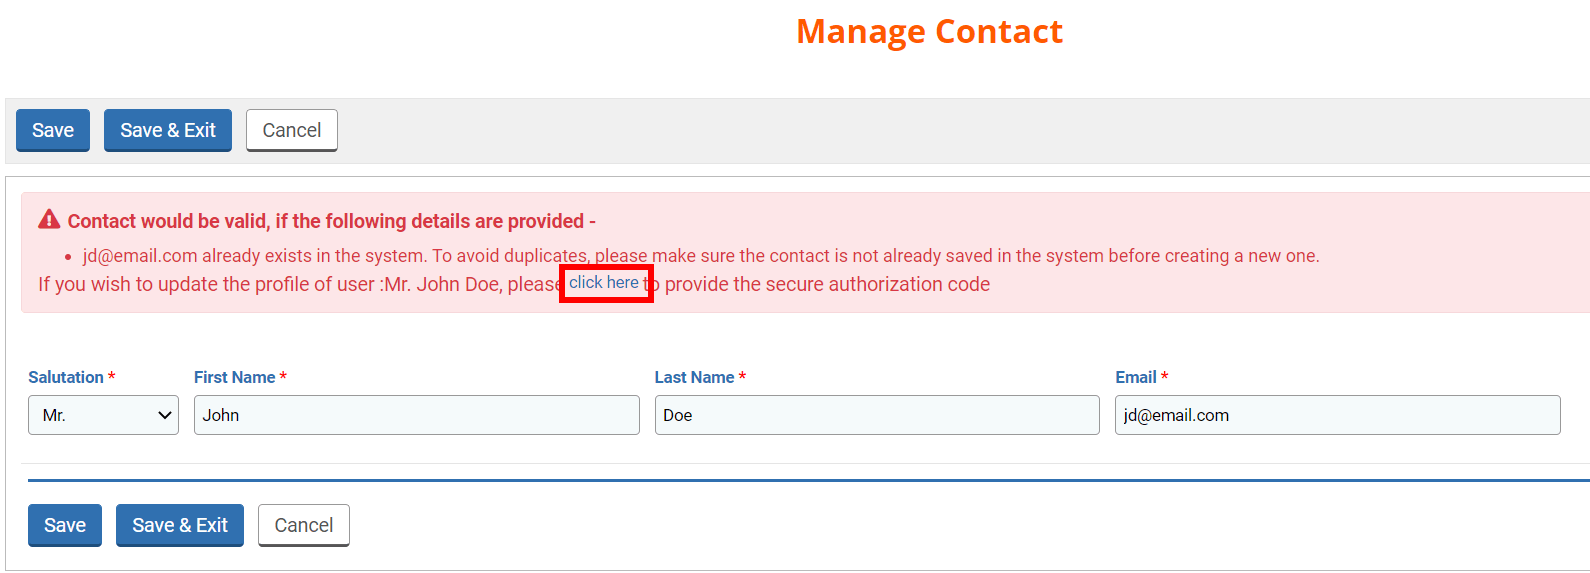
Whether you add a contact using the first or the second option, you will land on the Manage Contact page. From there, complete all mandatory fields marked by a red asterisk * and click on [Save].

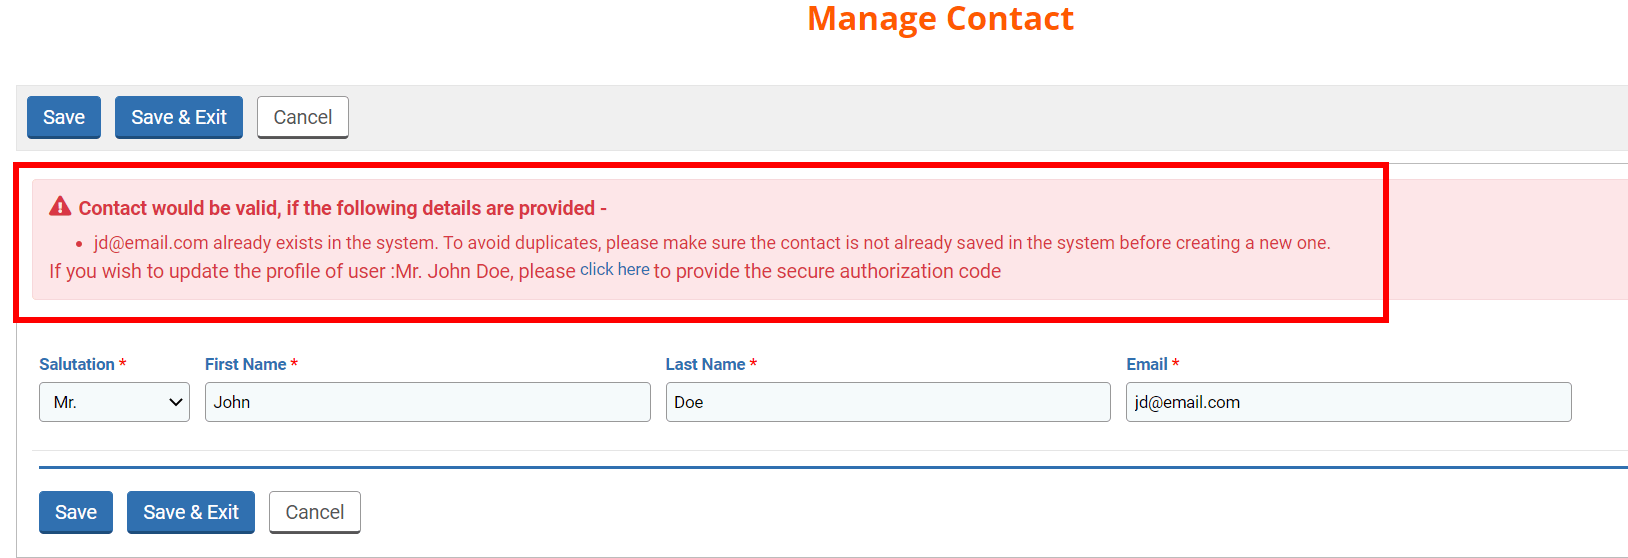
If you get an error message, it means that the contact you are trying to add is already registered in the system. Please click here to see how to edit it.
You will now be able to provide more contact details on the focal point.
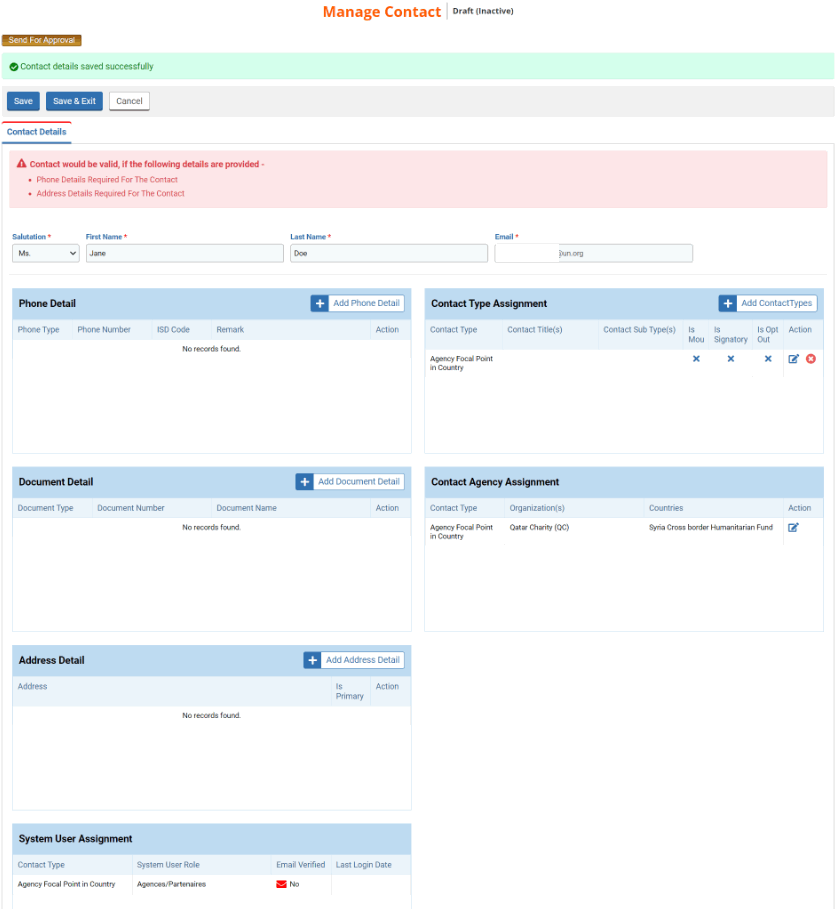
Phone Details (mandatory)
It is mandatory to add the phone details of your focal point. To do so, click on [Add Phone Detail]
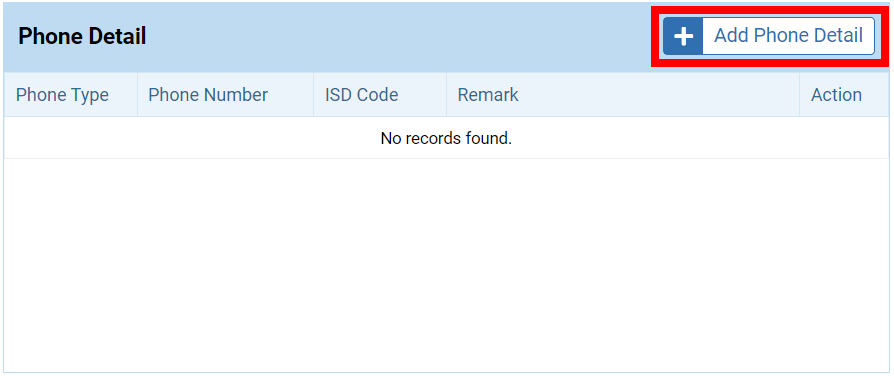
On the pop-up window, fill in all mandatory fields marked with a red asterisk * and click on [Save Phone Detail]
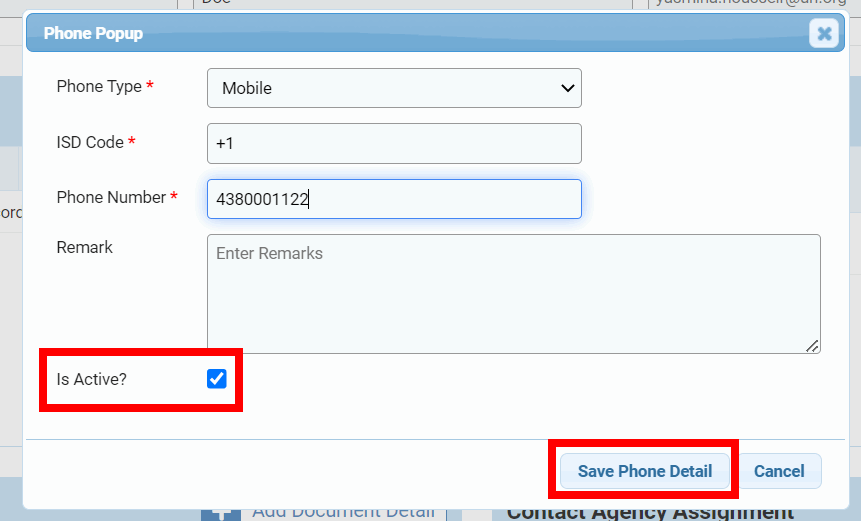
Fields Description:
- Phone Type *: select from the dropdown list whether you are adding a mobile phone or a fixed-line phone number.
- ISD Code *: enter the International Subscriber Dialing code that is the country code to call a telephone or mobile subscriber from outside of the country.
- Phone Number *: enter the phone number.
- Remark: you can add any remark or comment you deem necessary.
- Is Active?: do not forget to tick this box or your contact information will be deemed inactive.
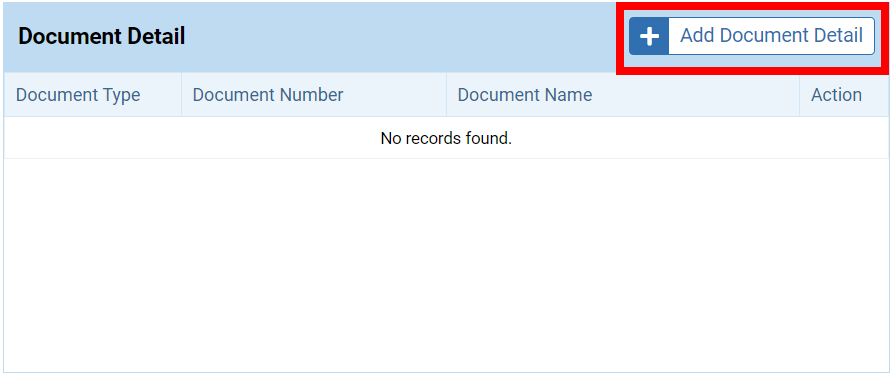
Document Detail (optional)
You can add an ID document. To do so, click on [Add Document Detail].
On the pop-up window, fill in all mandatory fields marked with a red asterisk * and click on [Upload].
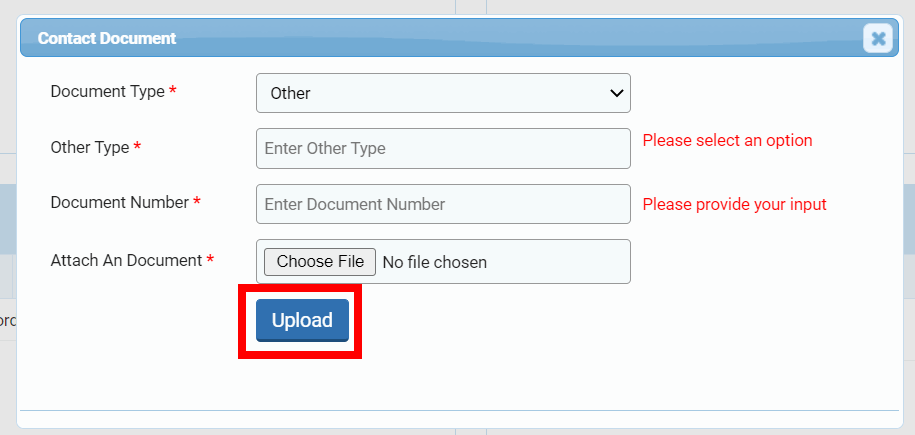
Fields Description:
- Document Type *: select from the drop-down list the type of the ID document you wish to upload. If you select ‘Other’ an additional field will be displayed (as shown in the snip hereinabove).
- Other Type * (only for the Document Type ‘Other’): enter the type of the document.
- Document Number *: enter the document number.
- Attach a Document *: click on [Choose File] to upload the document.
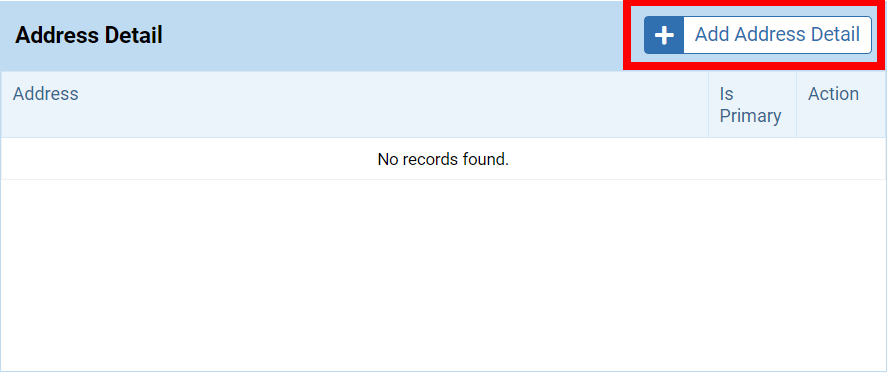
Address Detail (mandatory)
It is mandatory to provide at least one address for the focal point. To do so, click on [Add Address Detail].
On the pop-up window, fill in all mandatory fields marked with a red asterisk * and click on [Save Address Detail].
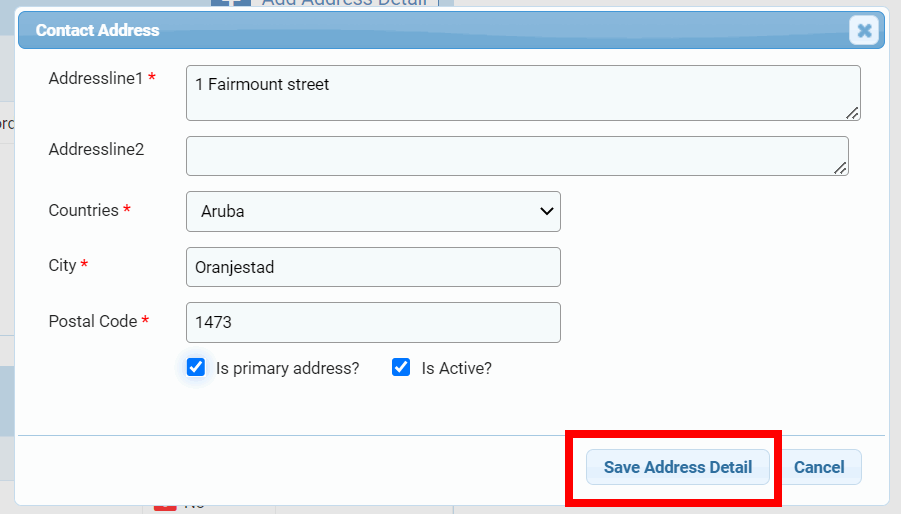
Fields Description:
- Address line 1 and 2 *: enter the address of the focal point.
- Country *: enter the country.
- City *: enter the city.
- Postal code *: enter the postal code.
- Is primary address?: tick this box if the address is the primary one. It is mandatory to have at least one primary address.
- Is Active?: please do not forget to tick this box or this address will be deemed inactive.
Contact Type Assignment (mandatory)
It is mandatory to link your contact to a contact type. As a partner, the only type of contact you can add is an agency/partner. To do so, click on [Add Contact Types].
Please note: if you are adding a contact from the ‘Overview’ tab, this section is automatically filled. However, you will still be able to edit some fields.
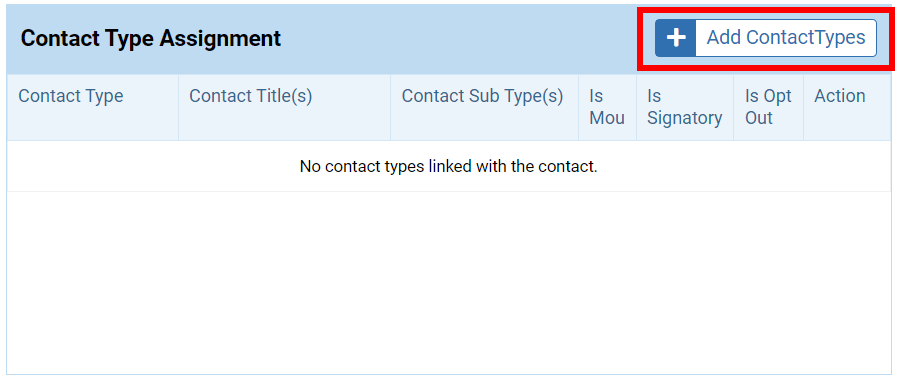
On the pop-up window, fill in all mandatory fields marked with a red asterisk * and click on [Save Contact Type].

Fields Description:
- Contact Type *: select from the drop-down list the contact type.
- Contact Title(s): This field is not required for CBPF.
- Contact Sub type(s): this field is not required for CBPF.
- Is Mou: the ‘MoU’ box should be ticked if the contact is the legal signatory of the Grant Agreement and the project’s reports. Signatory contacts will be generated in the Grant Agreement upon projects’ approval.
- Is Signatory: the ‘Signatory’ box should be ticked if the contact is the legal signatory of financial reports of the project.
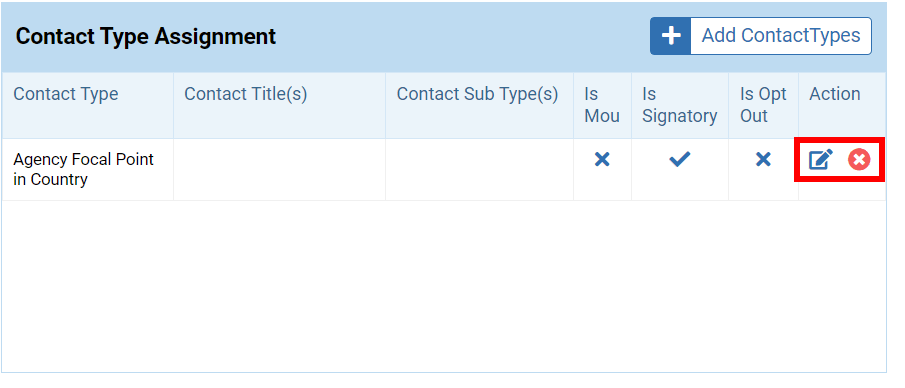
To delete a contact type, click on this icon ![]() to delete the contact type and on this icon
to delete the contact type and on this icon ![]() to edit it. However, once your contact is linked to a project you will not be able to delete it.
to edit it. However, once your contact is linked to a project you will not be able to delete it.
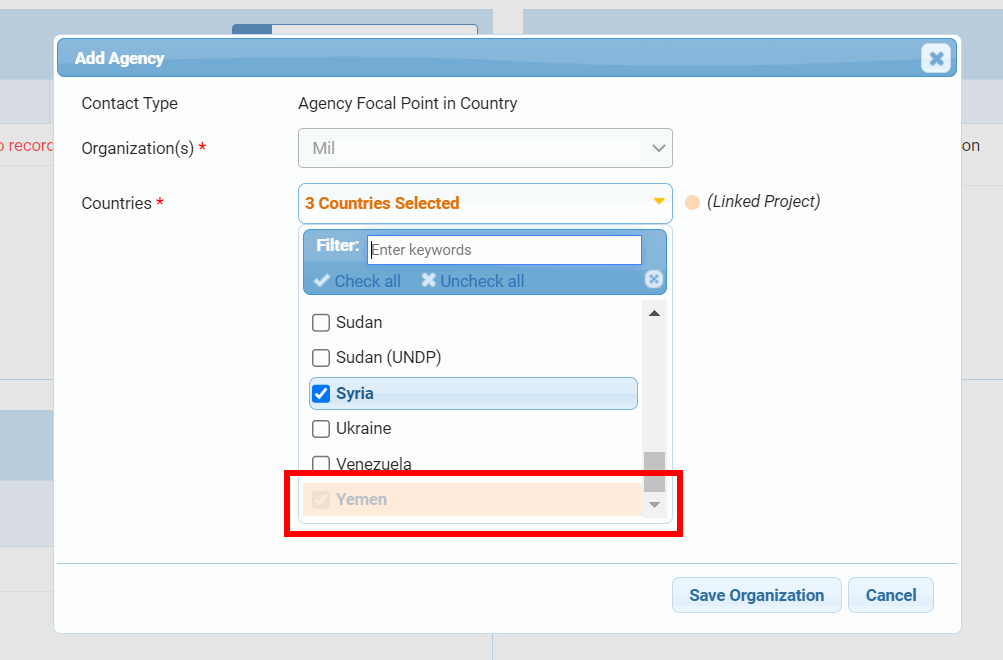
Once you have added your contact type, a new section, ‘Contact Agency Assignment’ will be displayed. It shows the country(ies) and the organization linked to the contact type. The organization is automatically displayed. Indeed, it corresponds to your organization. You can add or delete countries by clicking on ![]() .
.
Please note: if you are adding a contact from the ‘Overview’ tab, this section is automatically filled. However, you will still be able to edit some fields.
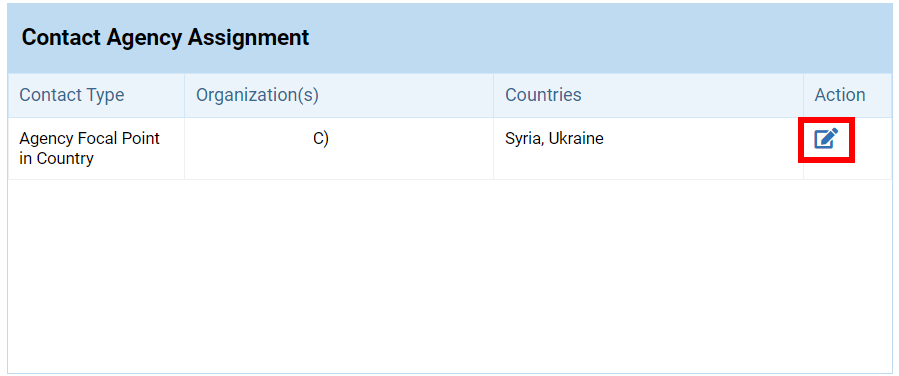
On the pop-up window, select the country(ies). The countries displayed are the funds you have access to. You can link the focal point to one or several funds you are linked to. Then click on [Save Organization].
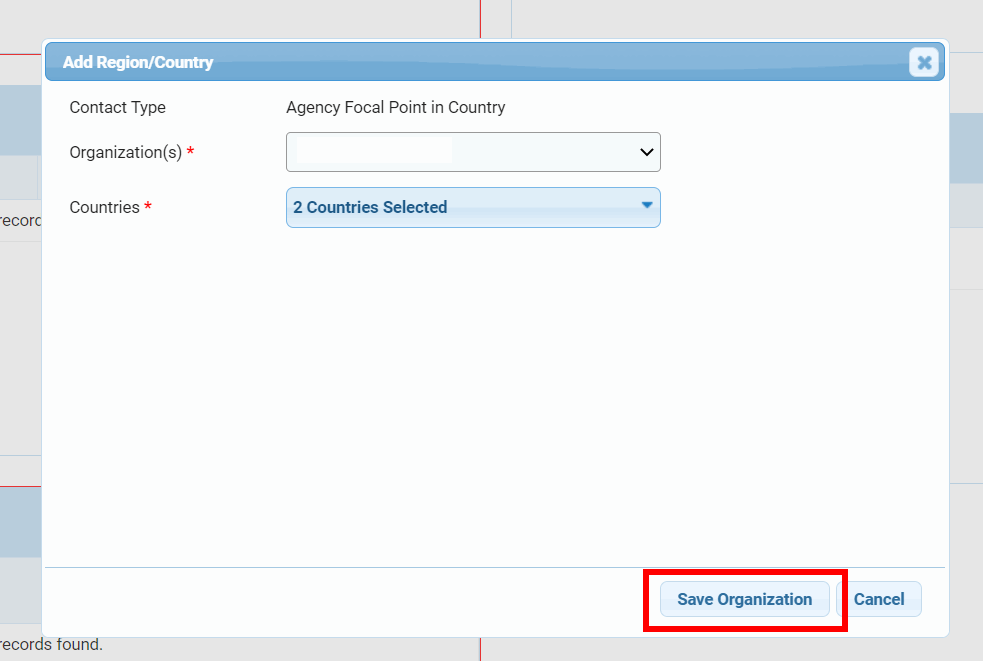
If you are trying to edit the focal point’s country(ies) and you see a country highlighted it means that the focal point is already linked to an ongoing project in this country. As a result, you will not be able to remove this focal point from this country.
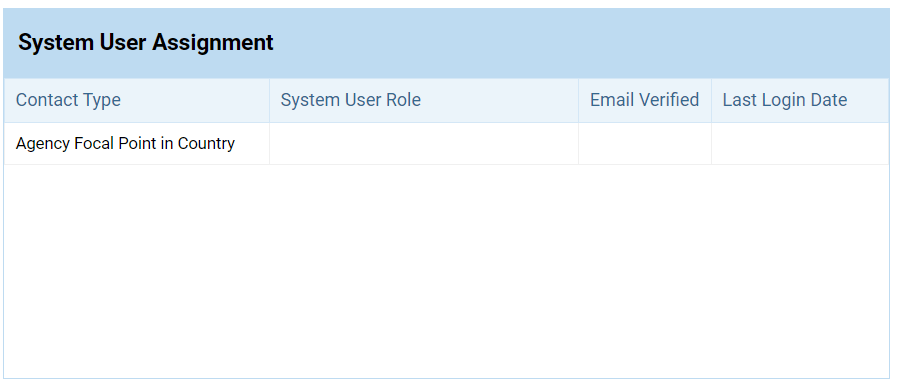
System User Assignment (read only)
At the bottom of the page, you will find the ‘System User Assignment’ section. Once the contact is registered, this section will provide information on the contact: the system user role, if the email was verified (to read more on email verification, please click here) and the last login date.
Once you have filled in all the fields, you can click on [Save] to approve your focal point.
Please note: once approved, the only way you will have to edit the contact is to send an email to your HFU to ask them to send it back for correction.

To find out how to edit a contact, you can either watch our video tutorial or continue reading this article.
The way to update a contact depends on its status:
1) The contact status is approved/active
To edit an approved contact, you will have to contact your HFU and ask them to send it back to you for correction. You will then be able to find your contact from the Contact Management page and edit it. Its status will be ‘Correction Required’. Please click here to find out how to search for a contact.
All members of the same organisation that have a OneGMS access can edit a focal point’s contact details linked to this same organisation.
Please note: once a contact is linked to a project, you will not be able to edit the Contact Agency Assignment section.
2) The contact status is draft/inactive
From the Contact Management page, search for your contact using the filters and click on [Search].
From there you can face two scenarios: a) You find your focal point in the Contact List or b) You do not find your focal point in the Contact List.
a) You can find the contact in the Contact List
The results will be displayed in the Contact List. If you find the contact you wish to edit, ensure that its status is ‘Draft’ and click on this icon ![]() to edit it.
to edit it.
Once you have edited the necessary fields, do not forget to save your contact details.
b) You do not find the contact in the Contact List
In case you do not find your contact in the Contact List, it means that either a draft was created, but the focal point was not linked to a Contact Type or that the contact was never created. To know which scenario applies to you, click on [Add New Contact].
Fill in all mandatory fields and click on [Save].
If you are redirected to the Manage Contact page, it means that this email address was never registered. You can now add your focal point. To know how to fill in this form please click here.
If you get this error message, it means that a draft was created with this email address, but the focal point was not linked to a Contact Type.
If you wish to update the profile, you must click on the ‘click here’ hyperlink.
Clicking on this hyperlink will open a pop-up window that will allow you to send to your focal point a one-time password to the email address registered. To do so click on the hyperlink ‘Send GMS Auth Code’.
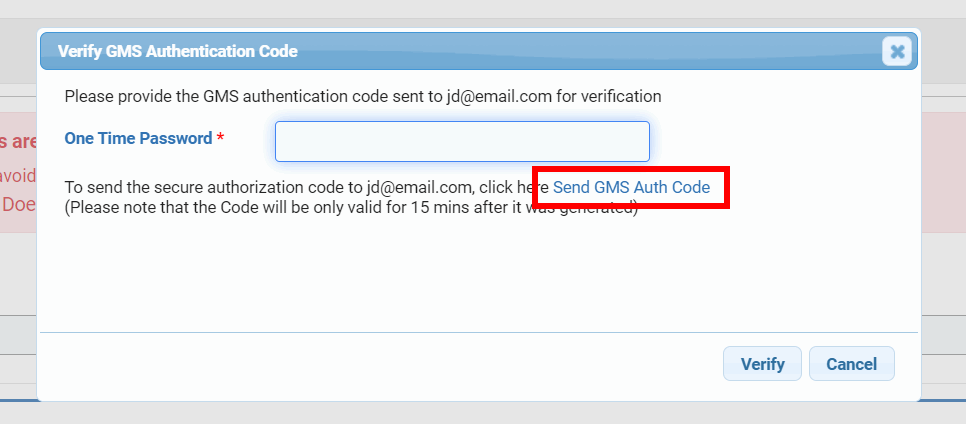
This one-time password will be valid for 15minutes. Your focal point will have to communicate you this password and you will be able to enter it on the pop-up window. Then click on [Verify].
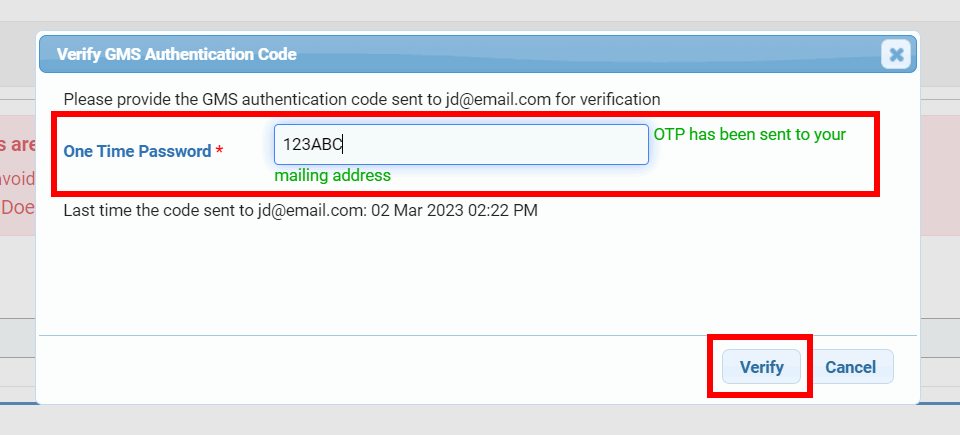
Upon clicking on [Verify], the Manage Contact page will open. There, you will be able to edit and save your focal point. To know how to fill in this page, please click here.