- What is Project Revision?
- How to request a Project Revision (Revision Request – Step 1)

- How to activate the Revision Request (HFU)
- How to fill out Project Revision Request (IP)
- How to review and approve the Revision Request (HFU)
- How to set up the Revision parameters (HFU)
- How to change the Revision’s settings after activation
- Adding Documents to the Revision Request
- What is the Revision Request Tracking Tab?
- How to fill out and submit a Project Revision – Step 2 (IP)
- Accessing the Project Revision Form
- Revising the Project duration (No Cost Extension)
- Revising the Project budget
- Revising the Logical Framework
- Revising the Affected Persons and Locations tab
- Revising the Project bank details information
- Revising the Work Plan
- Revising the Narrative fields - Additional Information tab
- Revising the GAM/Sub Implementing Partner's information - Other Info tab
- Revising the Cash Tracking Information
- Adding Documents to the Revision
- How to submit a Project Revision
- How to Review and Approve a Project Revision (HFU, CC, FSC Finance)
- How to cancel a Project Revision
- GMS Tip : how to access the previous version of the project after it has been overwritten by the revision?
What is Project RevisionTop
A Project Revision is triggered when the Implementing Partner (IP) requests for a change in the terms set as per the original approved project proposal.
Please note, when a project is under revision, reporting functions are automatically blocked: no reports can be generated by the IP, and no second or subsequent disbursements can be requested. If an IP requests a revision in proximity of a report or while a report is active, the HFU should discuss with the IP whether they want to do a revision before reporting, or vice versa. The first option is preferable when the IP wants to report against the amended project/budget, while the second option is preferable when the IP prefers to receive the disbursement soon, and the revisions are not major/would not affect the reporting.
If the IP reported a certain amount spent/beneficiary numbers achieved, the revision cannot go below the numbers reported.
A project revision involves two steps:
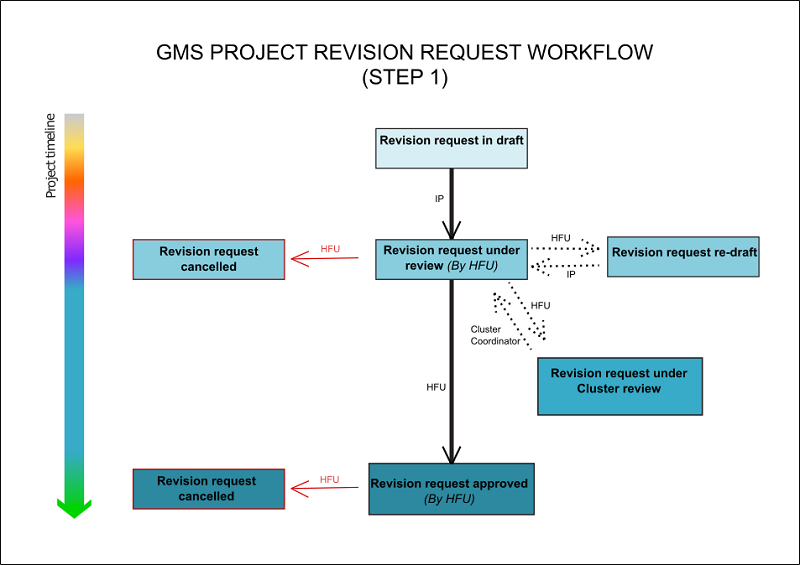
Step 1- Project Revision Request
Step 2- Project Revision workflow
How to request a Project Revision (Revision Request – step 1) Top
HOW TO ACTIVATE THE REVISION REQUEST (HFU)
To activate the Revision Process, the Implementing Partner (IP) must request a project revision offline, via email sent to the Humanitarian Financing Unit (HFU). Following the offline request by the IP, the HFU activates the Revision request for the requested project in the GMS through the Project Admin tab.
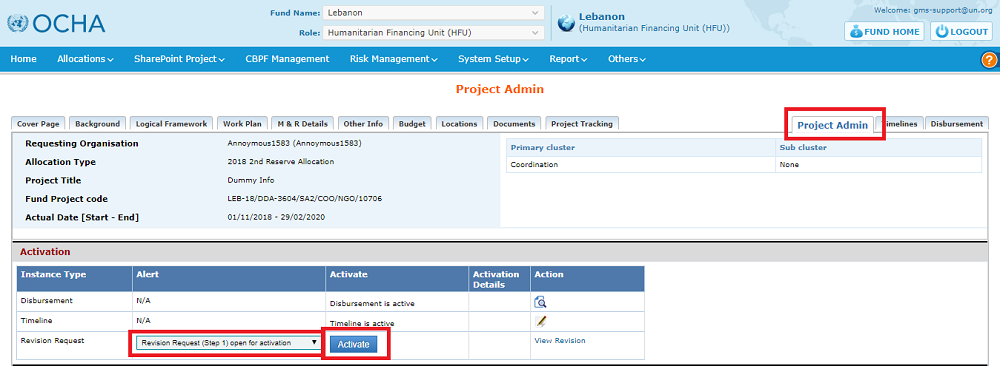
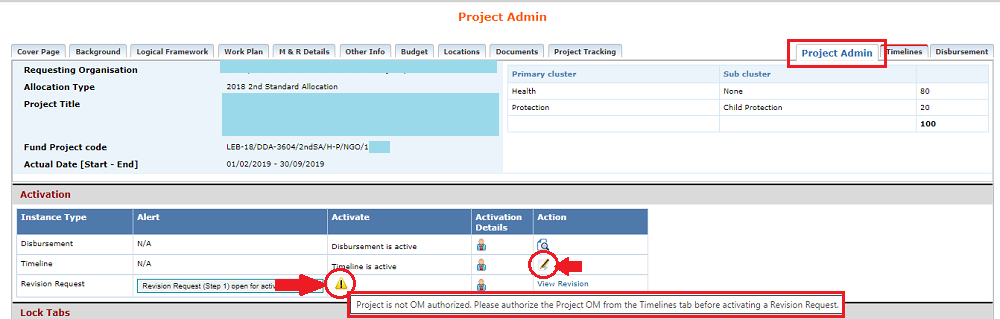
HFU can activate the Revision request in the ‘Activation section’ of the Project Admin tab. In the Revision line, select the required alert message to be sent from the ‘Select Alert’ drop down box (so that the IP will be notified automatically) and click on [Activate].
* Please note, if the [activate] button is not available, and its status says: 'Revision active', it means that a revision is already ongoing. There cannot be two revisions activated at the same time for the same project.
|
GMS Focus: Error icon preventing the activation of the Revision Request There can be two reasons why the [Activate] button is not available, and replaced on the system by an error icon
This means that the Legal Signatories of the Grant Agreement and project's reports have not been authorized by the Partner/the HFU in the Project Authorization page. To learn how to authorize the Legal signatories in the Project Authorization page, please refer to this guidance by clicking HERE.
This means that the HFU did not authorize the project's Timelines. In this case, the HFU is required to fill in the Timelines' tab, according to the applicable Operational Modalities. The Fund Manager or Programme Officer Business Role must then authorize them. To do so, go to the Timelines’ tab of the project, either by clicking on the edit icon To learn how to create and authorize the Timelines, please refer to this article of the help portal, by clicking HERE. |
 .
.
HOW TO FILL OUT THE PROJECT REVISION REQUEST (IP)
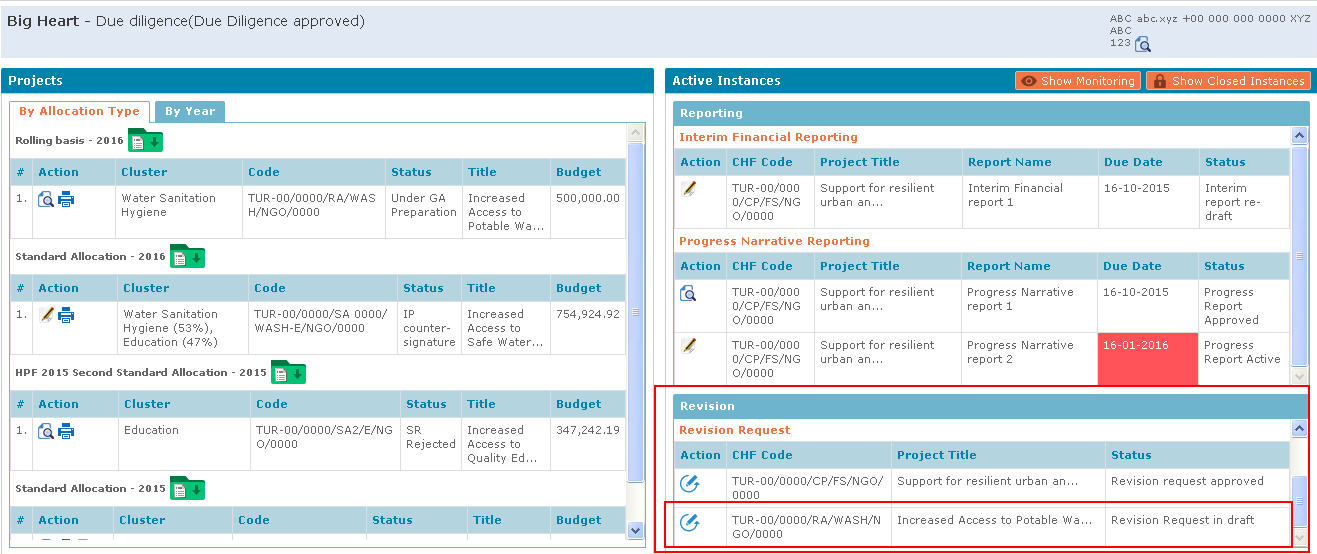
After the Revision request has been activated by the HFU, the corresponding project appears on the IP's GMS Home Page, under 'Active Instance – Revision – Revision Request'.
Click on the Revision Request edit icon .
.
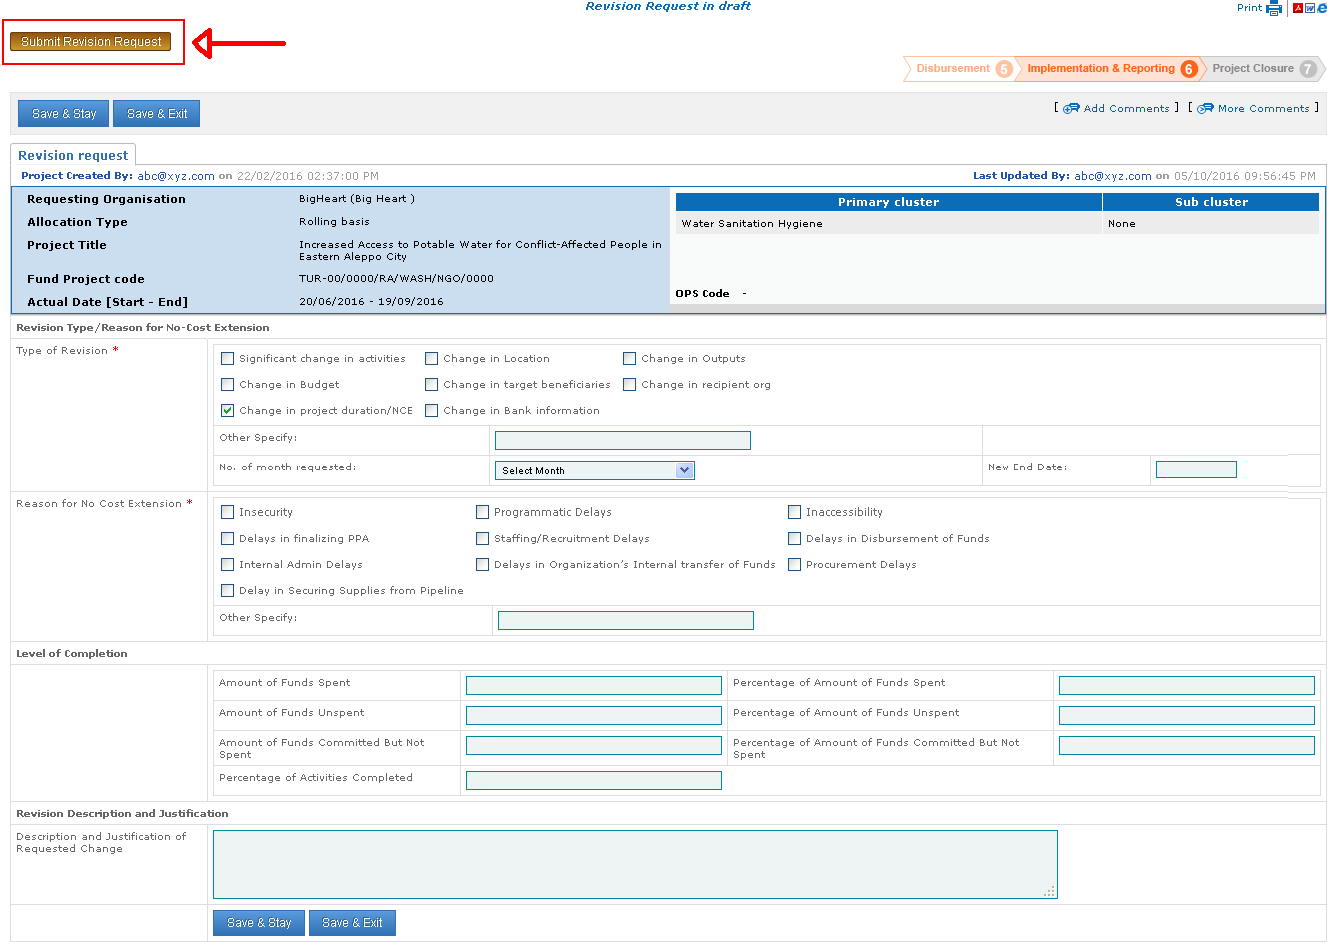
Once in the “Revision Request” page, the IP needs to fill in the type of revision and other details pertaining to the revision request.
Then, click on the [Submit Revision Request] button to send the revision request to the HFU.
How to request a No Cost Extension (NCE)?
NCEs requests are considered on a case-by-case basis, depending on the reasons justifying the request and evidence of progress collected through narrative and financial reports, or through field monitoring visits and financial spot checks.
When filling in the revision request (step 1) for a NCE, the IP must do the following:
- Type of revision: tick the ‘Change of project duration / NCE’ box
- New end date: enter the new expected end date of the project
- Reason for No-Cost Extension: tick the boxes that justify the NCE. If none applies, please leave a comment in the dedicated field ‘Other Specify’
Then, click on [Save and Stay].
* Please Note: only the end date can be changed.

Then, click on [Submit Revision Request] to send the revision request to the HFU.
HOW TO REVIEW AND APPROVE THE REVISION REQUEST (HFU)
Accessing the revision request
The HFU can view the revision request in the Revision Task List in their GMS Homepage, under the ‘Revision’ Task List. You need to click on the DATE link to access the revision request, and not the project code link, which would redirect you to the project proposal page.

Reviewing and Approving the Revision Request:
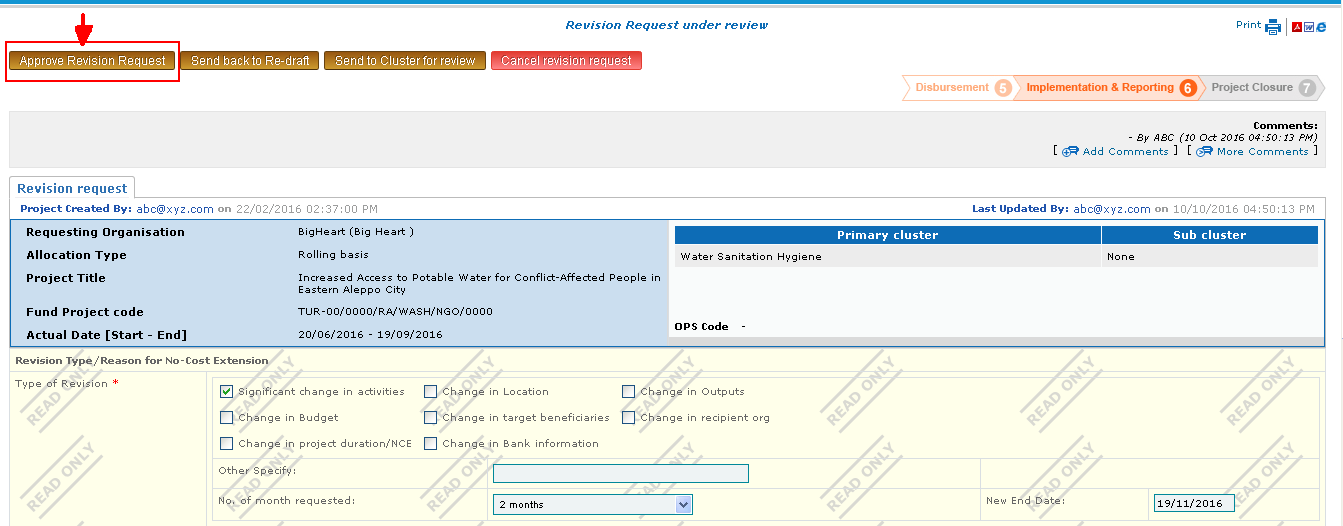
After reviewing the revision request submitted by the IP, the HFU has several options to proceed on GMS:
- Approve the revision request;
- Send it back to the IP for re-draft;
- Send it to Cluster’s Review; or
- Cancel the revision request.
To move forward with the revision process, click on [Approve Revision Request].
SETTING UP THE REVISION'S PARAMETERS
Once the revision request (Step 1) is approved in the GMS, a new tab: ‘Revision Sections’, appears.
In this tab, the HFU needs to select the sections of the original proposal that will be open for editing during the project revision (Step 2).
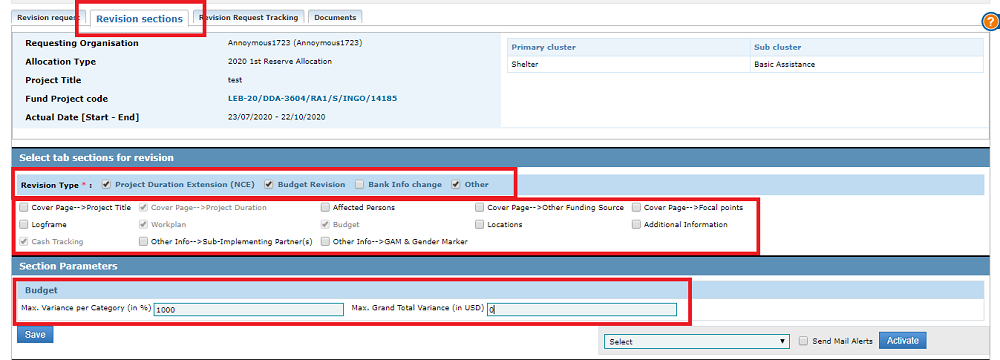
HFU needs to select the 'Revision Type', and then check the boxes below it. Checking the boxes will unlock the corresponding tabs of the project proposal template that the IP will revise.
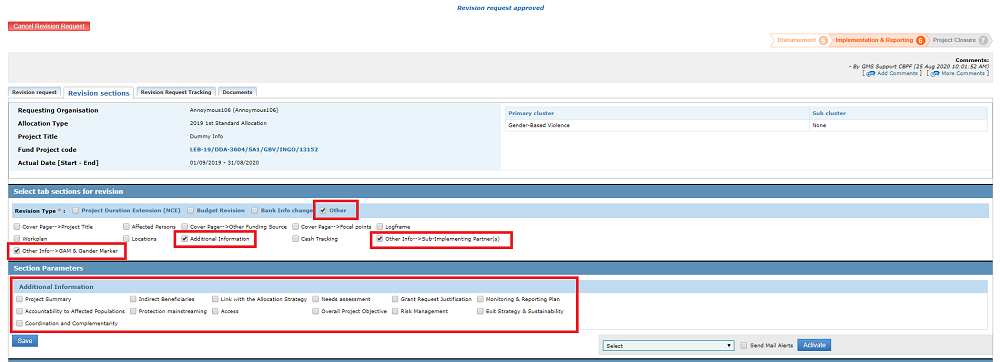
*Please Note, in case the Partner is requesting a revision of either any of the narrative boxes from the original Project Proposal, OR/AND a revision of the GAM and Sub-implementing Partner information, 1/ the HFU should tick the box ‘Other’ in the Revision Type’ Section,
then 2/ tick the relevant boxes in the section below: Additional Info; Other Info (Sub-Implementing Partner); Other Info (GAM and Gender Marker).
This will trigger a different section underneath, in the ‘Section Parameters’: ‘Additional Information’.
In this section, 3/ tick the boxes corresponding to the partner’s request.

Once the boxes are checked, and all necessary data inserted, click on the [Save] button (1 in the screenshot below).
In the same tab, select from the drop-down list the alert message to be sent to the IP, and click on [Activate] (2 in the screenshot below).
This will activate the Project Revision page. The system will also send an email to the IP, informing them that the project revision has been activated for their submission.

HOW TO CHANGE THE REVISION'S SETTINGS AFTER ACTIVATION? (HFU)
The HFU has the possibility to unlock other tabs from the project proposal form, other than the tabs selected during the revision activation phase. By unlocking these tabs, they will become editable to the Partner and part of the revision. To do so, select the additional tabs you wish to unlock, and click on [Update Revision].

Please note, it is not possible to lock tabs that were previously selected and unlocked for the Partner. If you wish to lock such tabs, you will need to reset the Revision by clicking on [Reset revision].
*Please Note: by clicking on the [Reset revision] button, you delete and remove all the changes made so far to the revision and it goes back to the draft stage. Make sure the IP hasn’t started to draft anything in the project proposal before clicking on the Reset button.

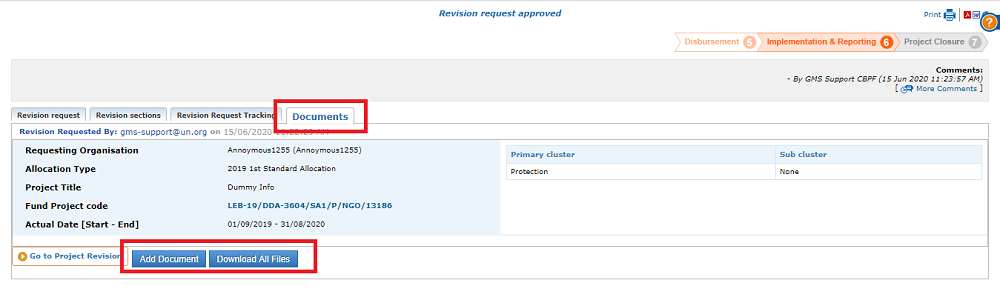
ADDING DOCUMENTS TO THE REVISION REQUEST
At any point during the Revision request (Step 1), users, HFU and IP alike, can add documents pertaining to the revision request. To do so, go to the Documents’ tab of the revision request, and click on [Add documents].
You can also download all documents by clicking on [Download All Files].
WHAT IS THE REVISION REQUEST TRACKING TAB?
The Revision Request tracking tab allows users to track the who, what, when, pertaining to the Revision Request. This tab shows all the steps of the revision request workflow, including the dates when the revision request’s status changed, and the user who pushed it to the next stage.
![]()
How to fill out a Project Revision (Step 2) (IP)Top
ACCESSING THE PROJECT REVISION FORM
After the Project Revision has been activated by the HFU, the project revision page appears in the IP's GMS Home Page under 'Active Instance – Revision – Project Revision'.

Click on the Project Revision icon  . The tabs of the project proposal that were approved for project revision by the HFU will appear as editable to the IP.
Provided that the HFU unlocked tha tab during the revision request step, you can revise the following: (click on the link to access the section):
- Revising the Project duration (No Cost Extension)
- Revising the Project budget
- Revising the Logical Framework
- Revising the Affected Persons and Locations tab
- Revising the Project bank details information
- Revising the Work Plan
- Revising the Narrative fields – Additional Information Tab
- Revising the GAM/ Sub Implementing Partner’s information – Other Info Tab
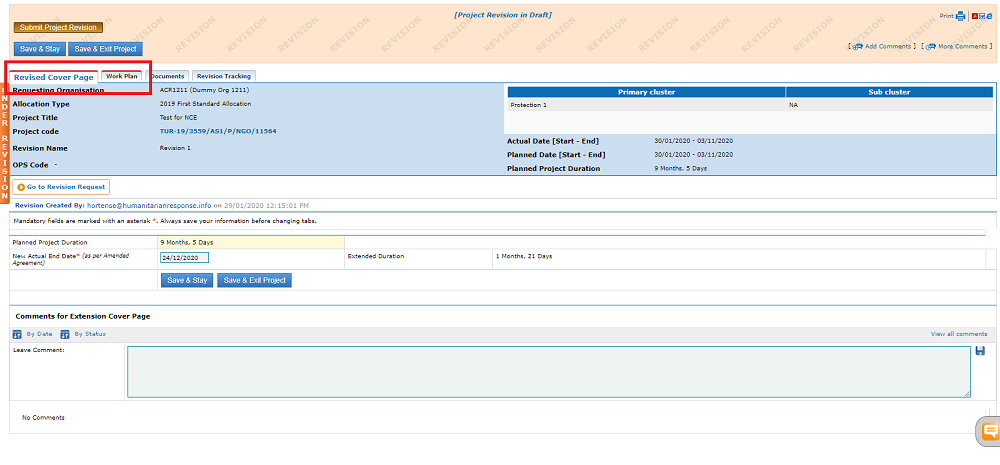
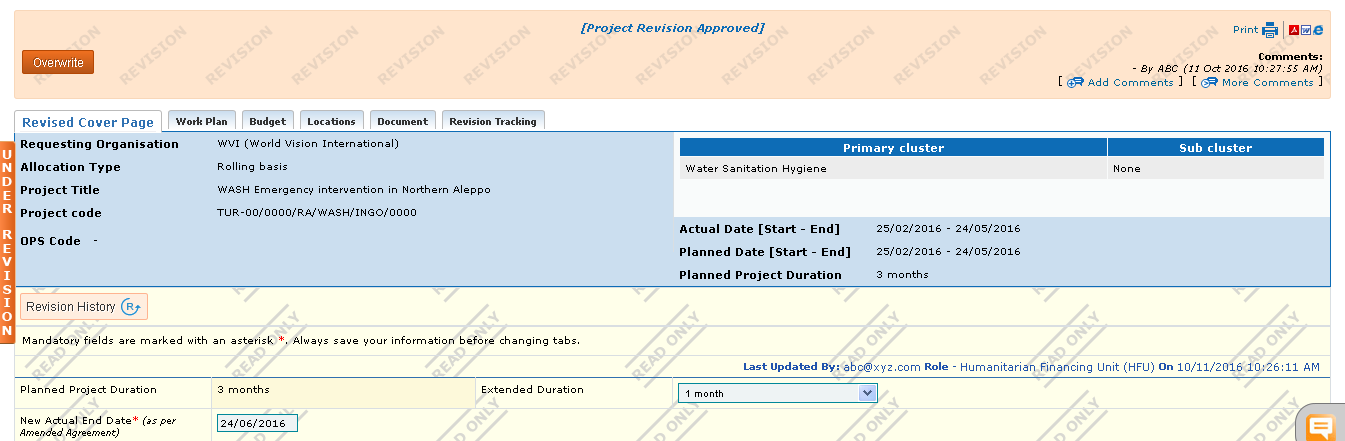
REVISING PROJECT DURATION (NO COST EXTENSION)
After the HFU has approved the IP’s NCE request and activated the “NCE” section, the IP will be able to access the following tabs in the project revision: Revised Cover page and Work Plan.
Revise the Cover Page tab by inputting the ‘New Actual End Date (as per amended Agreement)’ field and fill in the Work Plan tab by ticking the boxes of the extension for the relevant activities.
REVISING THE PROJECT BUDGET (including Cost Extension)
The budget tab is editable by IPs, provided that the HFU unlocked the tab. Partners can revise the budget, and re-organize the costs within the budget categories without modifying the overall grant total.
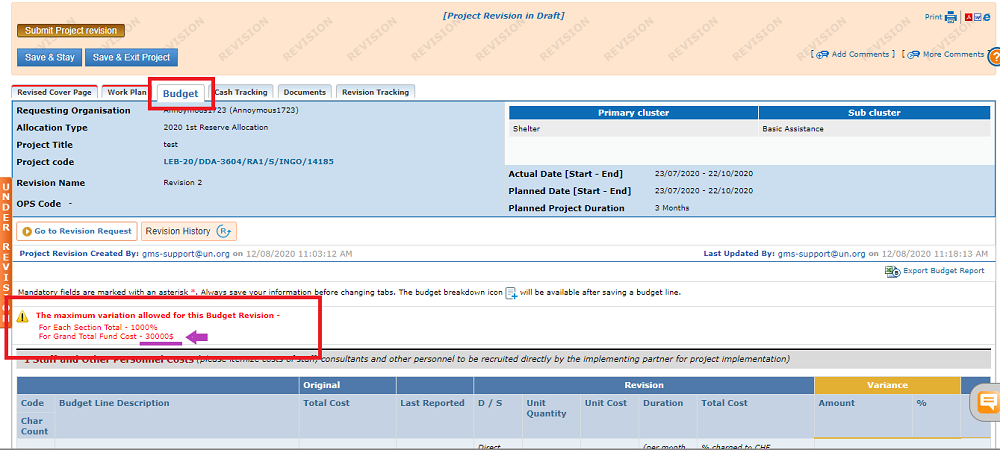
To do so, go to the Budget tab of the project revision, and edit the lines you wish to change. At the top, you can find the maximum variance you are intitled to. The maximum variance per category is automatically set as 1000%, which allows for flexibility to revise budget lines across categories.
While the budget revision allows for a certain variance at the category level, only Cost Extensions will allow for an increase in the overall project budget. If you requested a Cost Extension, please read this section of the article.

To revise the budget, you can edit existing lines, deactivate budget lines by setting their cost as 0, and add budget lines by clicking on [Add new Row].
DO NOT FORGET TO CLICK ON [SAVE AND STAY].
Once you save your revised budget tab, you have the possibility to delete the added budget rows by clicking on the delete icon  , and to access the budget line breakdown by clicking on the budget breakdown icon
  .
.
You can monitor the variance thanks to the Variance section at the right-hand side.
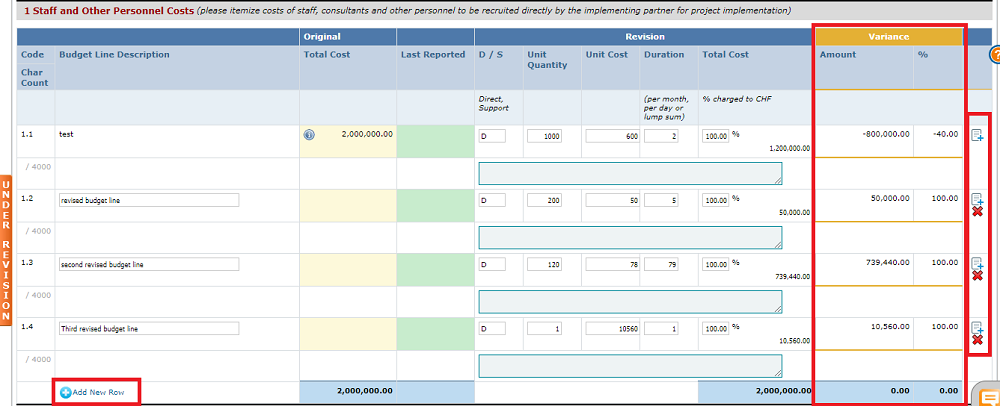
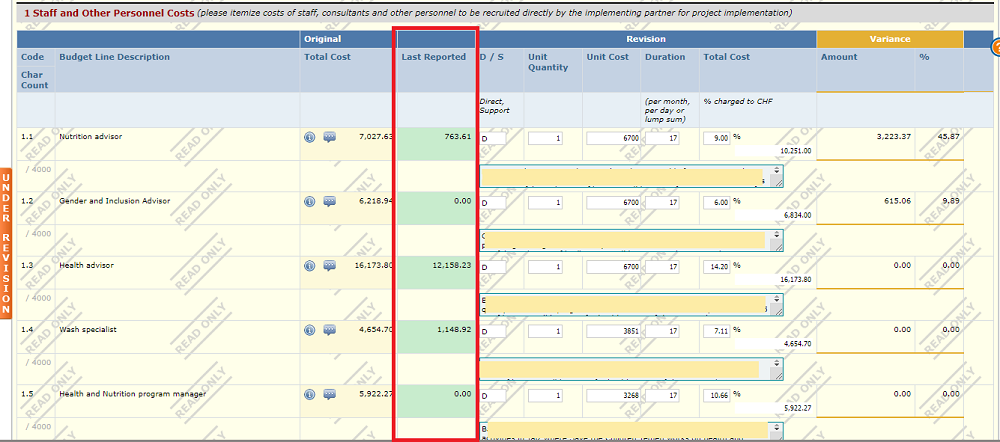
*Please note, an IP cannot revise the budget line and go below the amount that was last reported if a financial report has been submitted. The system will block the partner from going below the figures reported.
|
During budget revision, if the revised grand total cost is different than the original amount, the GMS will block the revision submission. Indeed, the only way to increase the budget total is through a cost extension. If you requested a Cost Extension during the Revision Request (step 1), you will find a positive figure in the Maximum Grand Total Variance field, at the top of the Budget tab. While simple budget revisions have a 0 USD grand total amount variance, hence cannot change the original overall total, a Cost Extension allows for an increase of the original budget. The extension amount authorized is indicated at the top of the Budget tab.
You can edit the budget lines like a simple budget revision, as the same logic applies. You can add costs up to the limit as set by the HFU. Please note that the system will not allow you to go above the total budget extension amount granted by the HFU. Do not forget that the system will not allow you to edit a line and insert a cost that goes below the figures reported in the submitted financial reports. |
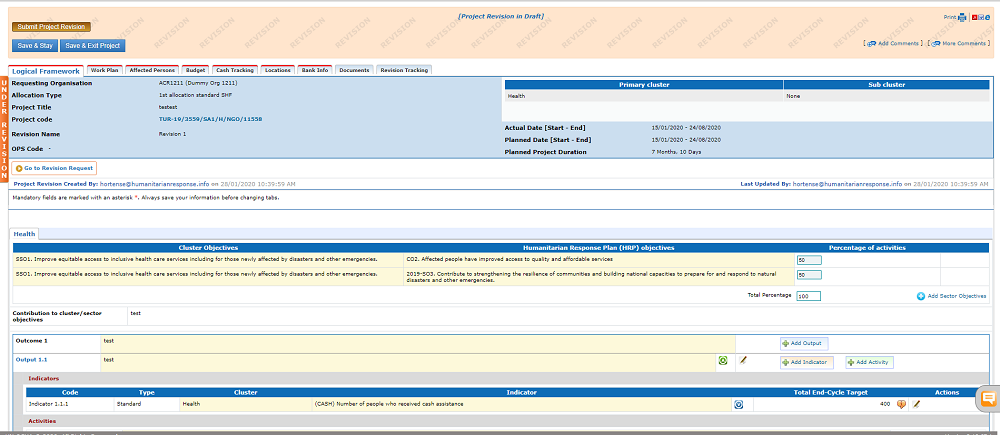
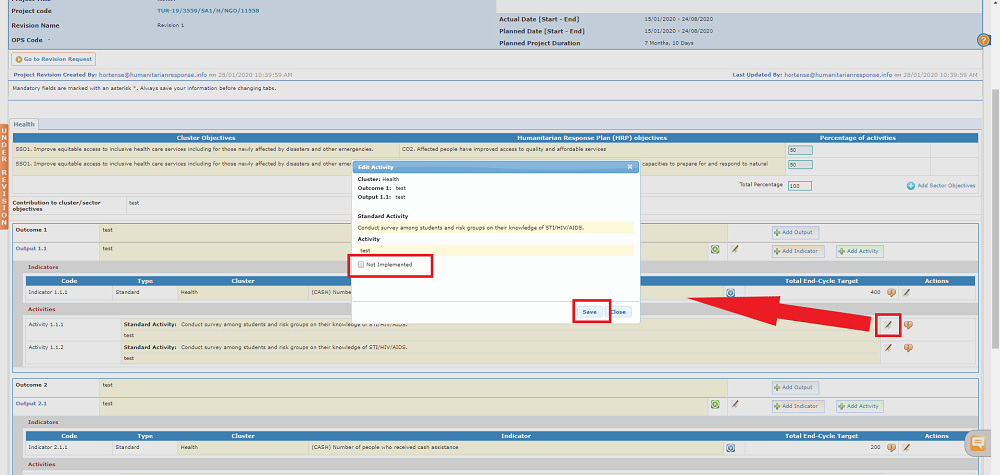
REVISING THE LOGICAL FRAMEWORK TAB
IPs can revise the logical framework tab, provided it has been unlocked by the HFU.
IPs can directly edit the following elements:
- Indicators’ planned end-cycle targets and means of verification,
- Outputs’ assumptions and risks,
- Set and activity as 'Not implemented'
by clicking on the edit icons  of the according lines.
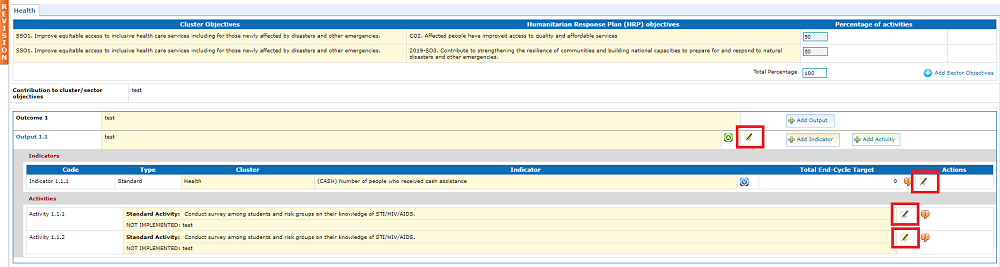
However, the system does not allow the users to edit the following elements:
- Outcomes;
- Outputs;
- Indicators;
- Activities.
If you wish to edit the above-mentioned elements, you will need to deactivate them in the logframe, and then create/add new ones in replacement. Please refer to this section to learn how to deactivate the logframe elements.
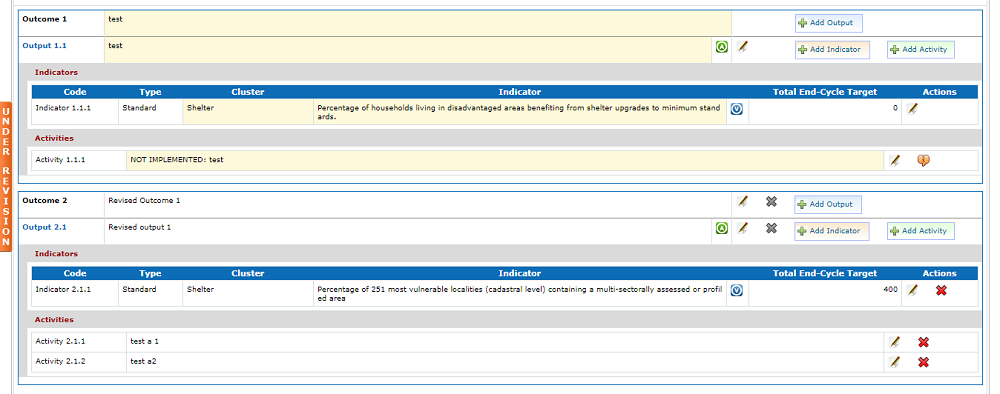
You can add outcomes, outputs, indicators and activities to the existing logical framework.
Please note that the system does not allow the users to delete existing outcomes, outputs, indicators and activities. However, again, it is possible to deactivate them.
How to add new logframe elements:
To add a new logframe element, click on the according button on the right-hand side.

Click on [save and stay] at the bottom of the page to save your changes.
Do not forget to revise the work plan tab after adding new activities.
 of the indicator. In the appearing pop-up window, set all planned end-cycle targets to zero. Click on [save].
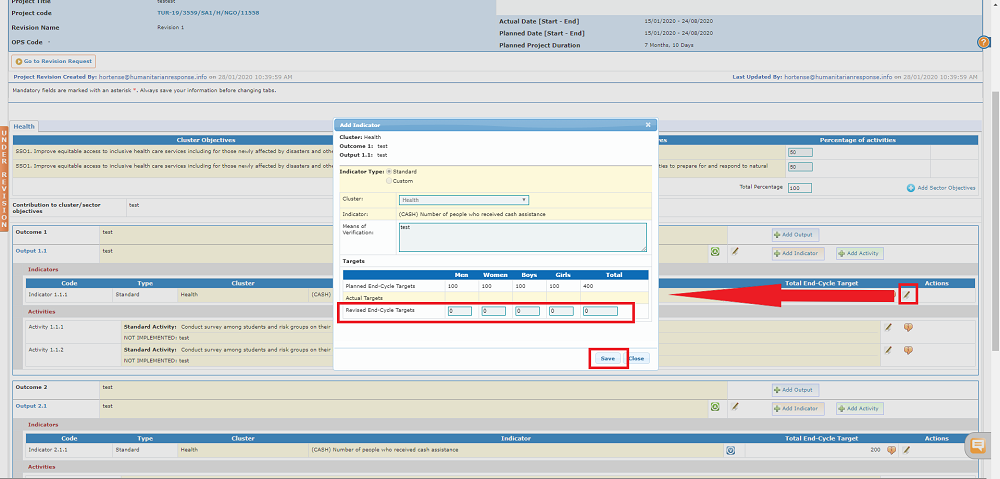
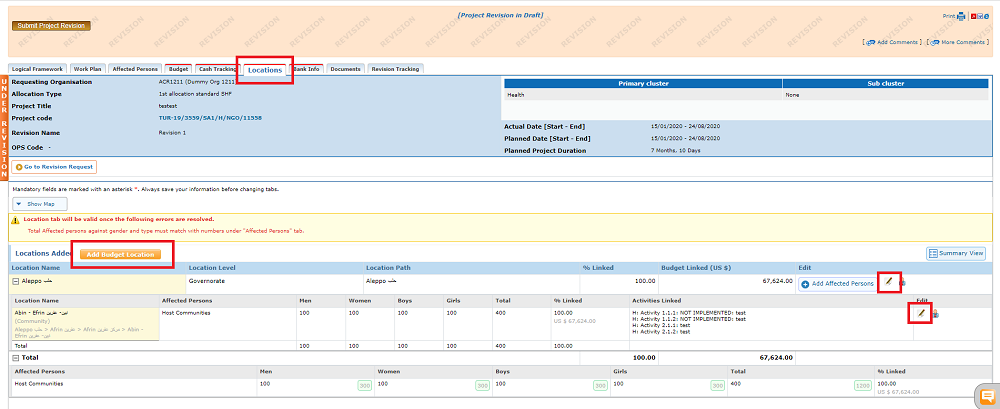
REVISING THE AFFECTED PERSONS AND LOCATIONS TAB
Implementing Partners should revise the affected persons’ tab and the budget tab (if necessary) prior to revising the locations’ tab.
Affected Persons’ tab
Implementing partners can revise both the affected persons’ and the locations’ tabs, provided they have been unlocked by the HFU.
If the IP reported a certain amount spent/affected persons numbers reached, the revision cannot go below the numbers reported.
In the Affected Persons’ tab, input the revised numbers in the corresponding boxes. Implementing partners also have the possibility to add other beneficiaries’ categories. Don’t forget to click on [save and stay].

Locations’ tab
Once the affected persons have been revised, the locations tab will show error messages related to the new affected persons’ figures.

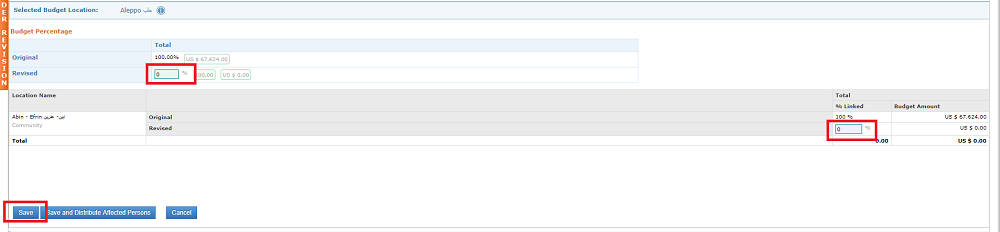
In the Locations tab, users can add and edit locations and distribute affected persons in the same way as the original project proposal. If you encounter difficulties, please refer to the Project Proposal Submission article of the Help Portal, at the Locations section, available HERE.
Important Note: The Admin Location Level of an existing location's line cannot be changed. (An existing location's line means a location that was originally in the approved project proposal).
*Please note, it is not possible to delete already distributed affected persons from a location, nor to delete an already saved location. However, it is possible to deactivate such locations. Please refer to the section right below to learn how to do so.
 at the left-hand side of the location.
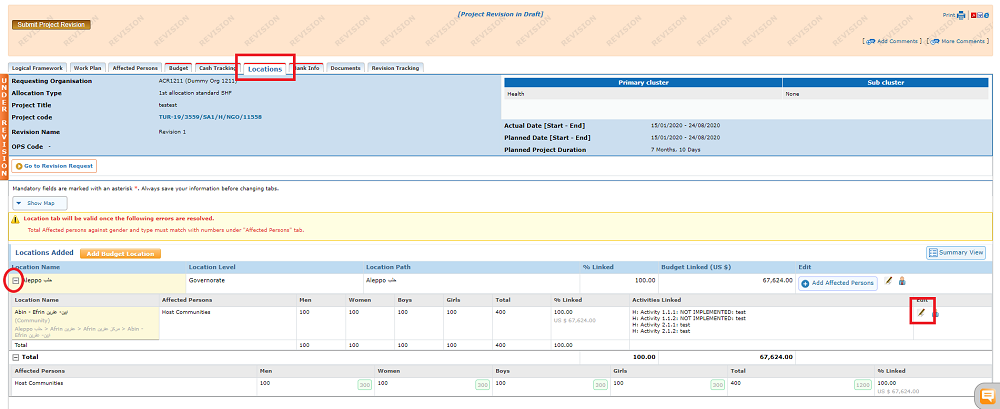


REVISING THE BANK DETAIL INFO
It is possible to revise the bank info tab, provided that the HFU unlocked the tab. However, partners can only select a different bank account if it is added in their due diligence form. Please note that only bank accounts from an approved Due Diligence will be displayed in the drop-down list.
In the bank info tab, select a different bank in the drop-down list and click on [save and stay].
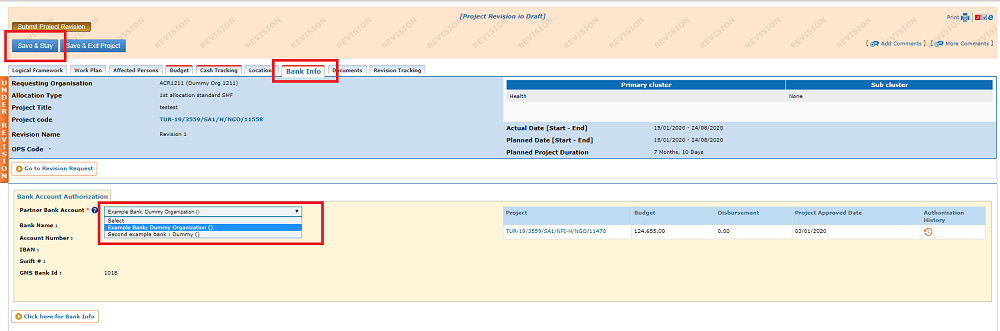
If you click on the [click here for bank info] button, you will be redirected to the due diligence form, and see the list of available saved banks
*Please note, if implementing partners wish to add another bank information and link it to their project, they must send an email to the HFU requesting to edit their Due Diligence form. They will then be able to add the new bank details in the Due Diligence. Only once the Due Diligence form is approved by the HFU will the new bank account appear in the drop-down list of the revision form. To learn how to add a new bank info in the Due Diligence form, please refer to the dedicated article in the Help Portal HERE.
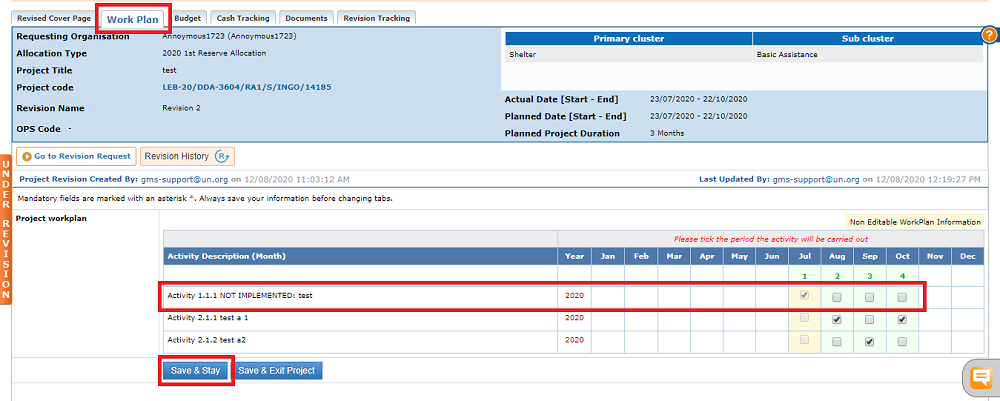
REVISING THE WORKPLAN TAB
Implementing partners can revise the work plan, provided HFU unlocked the tab. Simply tick the relevant boxes corresponding to the period the activities will be carried out and click on [Save and stay].
* Please note, it is not possible to tick/untick the box of a past month.
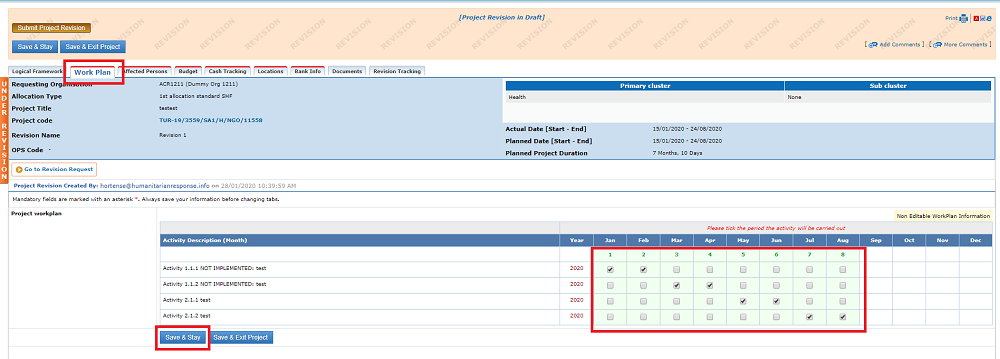
*Please note, when the revision includes an NCE, the workplan should mandatorily be edited, as it should reflect the activities that will be carried out during the additional months.
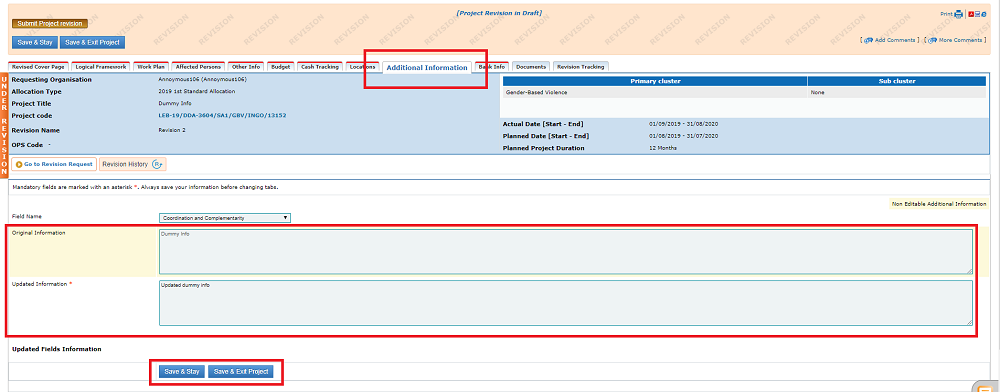
REVISING THE NARRATIVE FIELDS - ADDITIONAL INFORMATION TAB
Provided that the HFU unlocked the tab during the Revision Request phase, you have the possibility to update the information inserted in most of the narrative fields of the original project proposal in the ‘Additional Information’ tab of the revision.
Select from the drop-down list the field you wish to update.
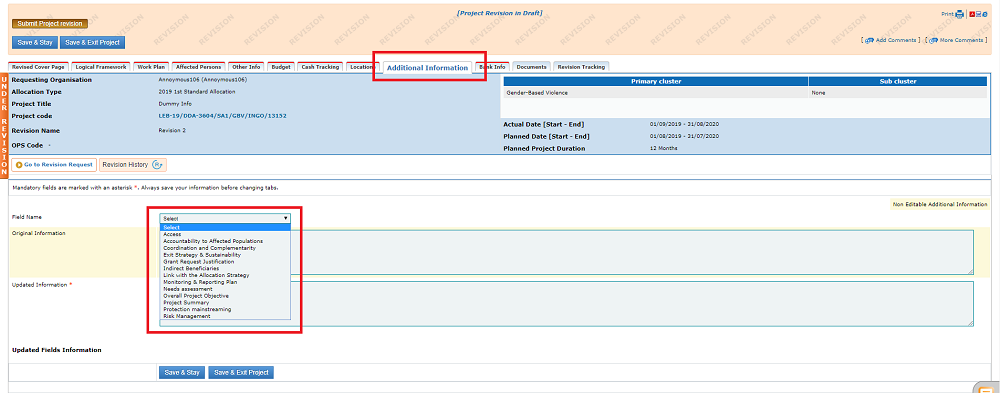
Then, enter in the ‘Updated Information’ box the updated narrative. To allow for an easier process, you can find the original information from the project proposal right above.
Do not forget to click on [Save and Stay] or [Save and Exit] after inputting the updated information.
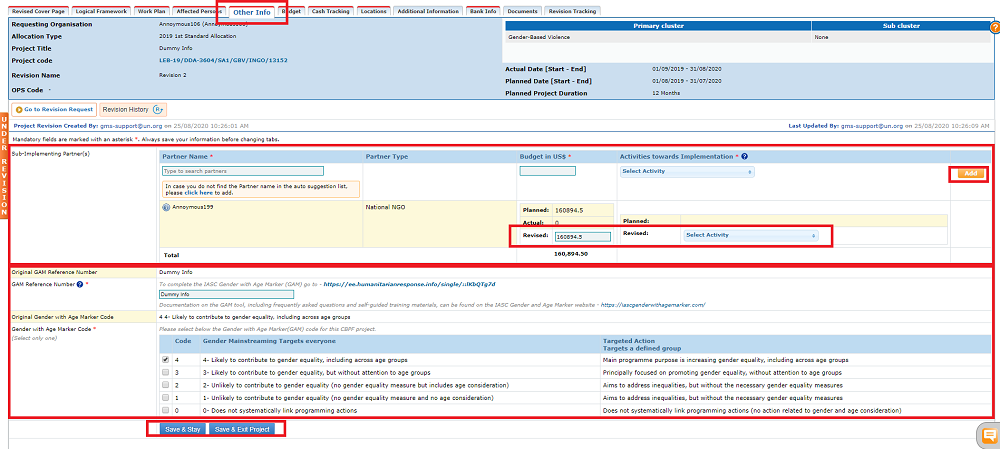
REVISING THE GAM AND SUB-IMPLEMENTING PARTNER INFORMATION - OTHER INFO TAB
You have the possibility to update the information pertaining to either the Sub-Implementing Partner or the GAM in the ‘Other Info’ tab of the revision, provided the HFU unlocked the tab during the Revision Request phase.
In the ‘Revised’ field, enter the Revised data.
- If you wish to add an additional Sub-implementing Partner, enter its corresponding information and click on [Add]
- If you wish to edit the budget sub-granted to the original sub-implementing partner, edit the Revised budget field,
- If you wish to update the activities implemented by the Sub-Implementing Partner, select them in the drop-down list,
- If you wish to edit the GAM Reference number, insert the new number in the revised field, which should be as following : HXXXX-XXXX-XXXX (X being a number). Documentation on the GAM tool, including frequently asked questions and self-guided training materials, can be found on the IASC Gender and Age Marker website - https://iascgenderwithagemarker.com/
- If you wish to edit the GAM code, tick the new code’s box in the Revised GAM code section.
Do not forget to click on [Save and Stay] or [Save and Exit].
REVISING THE CASH TRACKING INFORMATION
You can revise the cash tracking information in the cash tracking tab of the revision page, provided the HFU unlocked it during the Revision Request phase.
- If you wish to add a new cash tracking line, click on [Add Cash Tracking], Insert all related Cash tracking information in the pop-up window, and click on [Save]. You will have the possibility to edit and delete the newly created cash tracking line before submitting the project revision.
![]()
- If you wish to edit an existing cash tracking line, click on the edit icon. You can change the cash tracking information in the pop-up window in the ‘Revised Value’ fields.
Then, click on [Save].
To allow for an easier revision process, you can find on the right-hand side of the pop-up window the original cash tracking data from the project proposal.
![]()
*Please note, if applicable, the system will not allow you to revise the value of cash below what you have previously reported in a narrative report.
Do not forget to click on [Save and Stay] or [Save and Exit Project] after inserting the revised information.
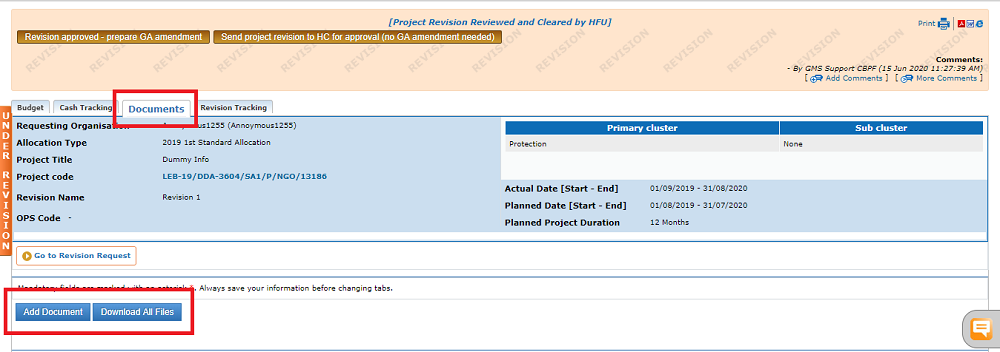
ADDING DOCUMENTS TO THE REVISION
At any point during the Revision Process (Step 2), users can add documents pertaining to the revision. To do so, go to the Documents’ tab of the revision page, and click on [Add documents].
You can also download all documents by clicking on [Download All Files].
HOW TO SUBMIT THE PROJECT REVISION
After completing the revised sections of the project proposal, and making sure you saved all your data, click on the [Submit Project Revision] button. Upon clicking on [Submit Project Revision], the IP will be prompted to type in 'Comments for project in "Project Revision in Draft”. Click on the [Yes] button to submit the project revision to the HFU.
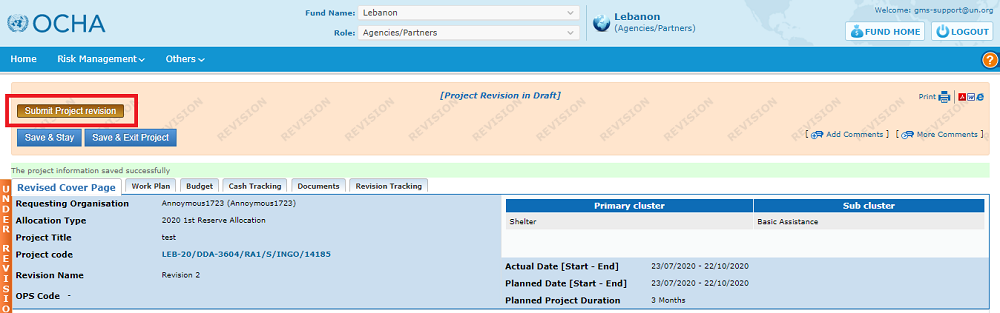
*Please note, if the system doesn’t allow you to submit your project revision, then there is either unsaved data, or mandatory fields unfilled. Make sure the tabs’ headers are blue and not red, as a red color indicates there is missing data in the tab and impedes the submission.
What is the Revision Tracking Tab?
The Revision tracking tab allows user to track the who, what, when, pertaining to the Revision. It shows all steps of the revision request workflow, including the dates when the revision request’s status changed, and the user who pushed it to the next stage.
![]()
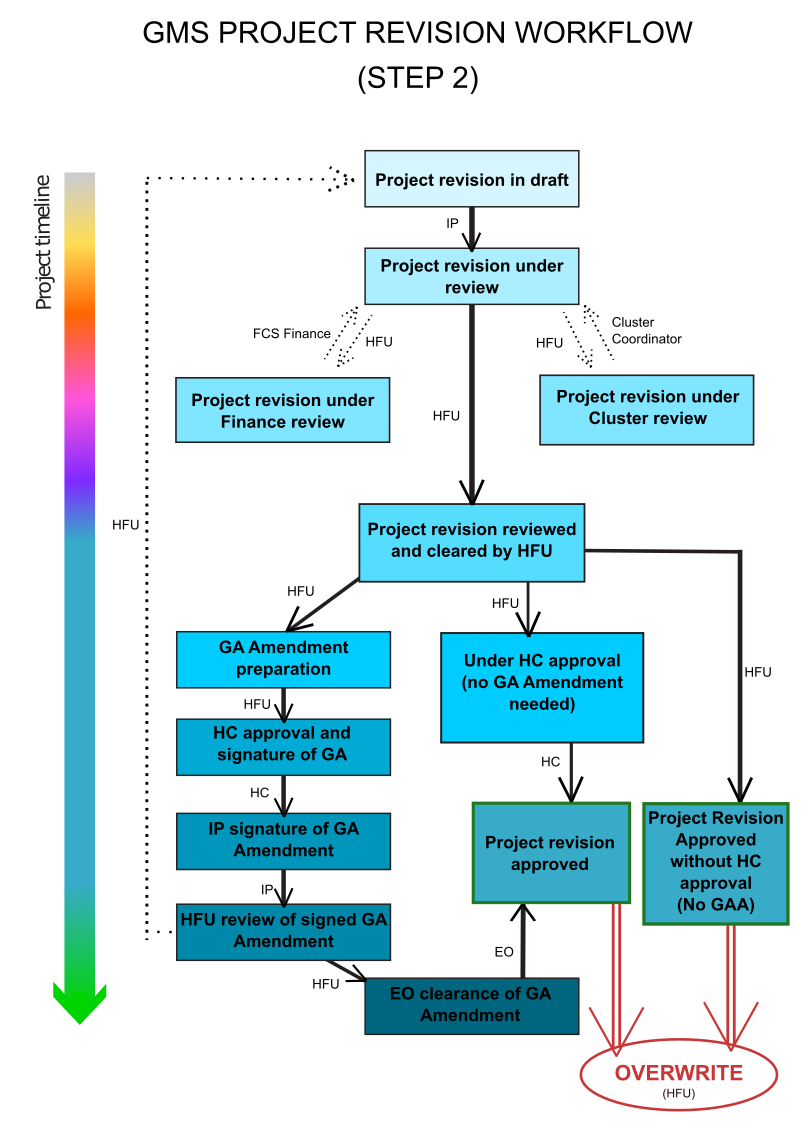
Reviewing and Approving a Project Revision (HFU) Top
When the IP submits the Project Revision, it goes to 'Under Review' stage of the workflow.
The HFU will be able to view the project revision on their GMS Home Page, under their Revision Task list. Click on the DATE link, and not the project code link, to access the Revision page.
Once on the Revision page, the HFU reviews all edited tabs and leaves comments by clicking on the  icon to add a comment for the selected tab.
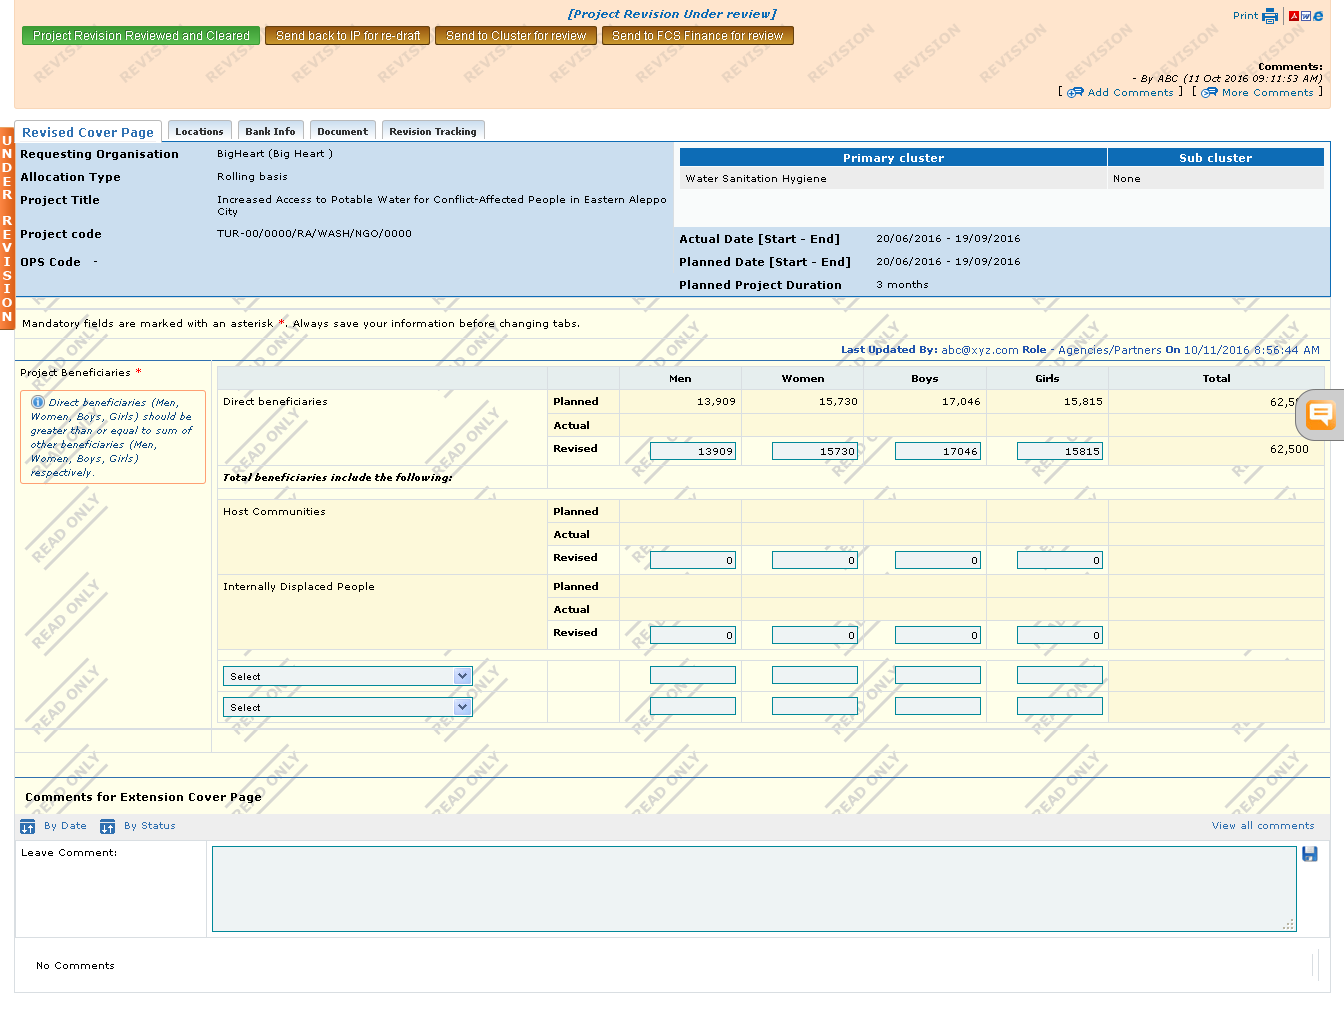
After review, the HFU has the below options:
Send the revision to the Cluster Coordinator: if the project revision entails significant changes to the project focus, locations, LogFrame, beneficiaries, the HFU can choose to send the project revision to the Cluster Coordinator by clicking the [Send to Cluster for review] button. The project revision will go to the Cluster Coordinator, who will leave comments and make a recommendation to approve/reject the project revision. Once comments are made, the CC will click the button [Send recommendation to OCHA].
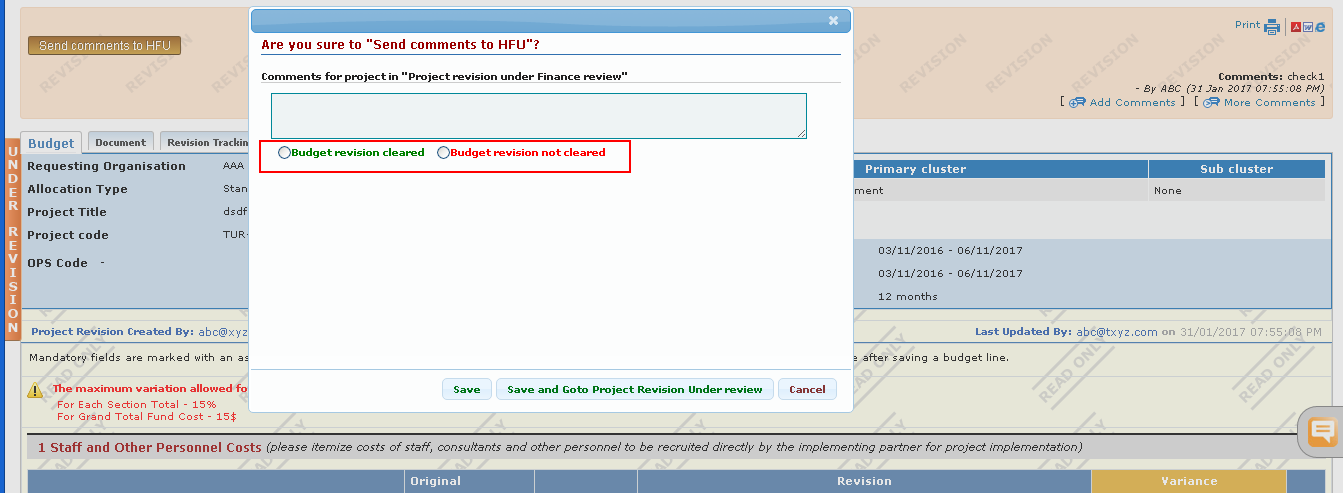
Review by FCS Finance: If the project revision includes a budget revision, the HFU must send it to FCS Finance for compliance review by clicking the [Send to FCS Finance for review] button. FCS Finance will leave comments (in the GMS comments area) and make a recommendation to approve/reject the project revision. Once comments are made, FCS Finance will click the button [Send comments to HFU] and inform whether the budget has been cleared.
Once comments are addressed, HFU will either approve directly (if no re-draft by the Partner is required) by clicking on the [Project Revision Reviewed and Cleared] button or send the project revision back to the IP (if revisions are required) by clicking on the [Send back to IP for re-draft] button.
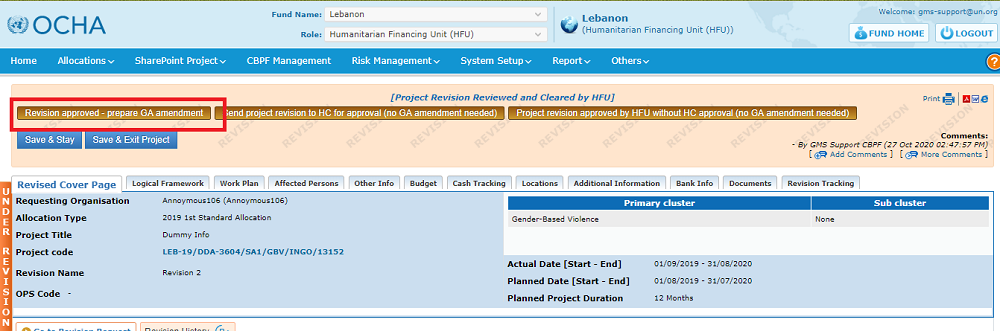
After approval by the HFU, a decision on the correct next step needs to be taken from the following three options:
- Generation of Grant Agreement Amendment (GAA), click on [Revision Approved prepare GA Amendment];
- Approval by the HC (WITHOUT GAA), click on [Send Project Revision to HC for approval (no GA Amendment needed)].

3. Approval of the Project Revision by HFU without HC approval and without Grant Agreement Amendment: click on [Project revision approved by HFU without HC approval (no GA amendment needed]
![]()
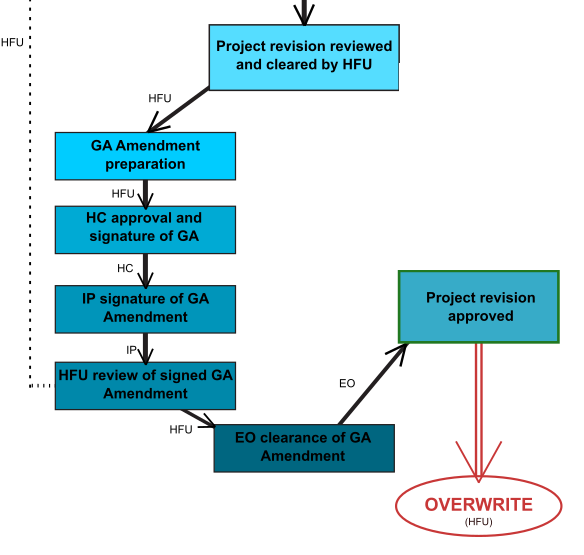
APPROVAL OF THE REVISION AND GENERATION OF GRANT AGREEMENT AMENDMENT (GAA) (HFU)
The HFU prepares the GA amendment through the GMS only if there is:
- A change in the Project duration/end date
- A budget variance of more than 15% of the budget categories
- A change in the bank account to be used for disbursement of funds
- An increase in the total project budget
- The addition of a new budget line
If the revision requires a GAA, the HFU must click on [Revision Approved – prepare GA Amendment].
Note: The GA amendment should not be created offline! Use the Reports->Grant Agreements menu and select the appropriate revision (in case of multiple revisions) to generate the GA Amendment.
|
GMS Focus : Project Timelines' update A Project Revision might trigger the need to create additional instances in the project’s Timelines in the two following cases:
A Timelines’ update is required if the duration or budget extension changes the applicable operational modalities linked to the project. The changes will imply either additional reporting/monitoring instances, a change in the disbursement tranches, or both. In the case of a NCE, the due dates of the final reports should always be updated in the Timelines tab of the project prior to the GAA generation. These are the only cases when a Timelines’ update will be necessary. If the project revision does not include one or both of the above scenarios, you can proceed with the revision without updating the Timelines. If you are faced with one or both of these cases, you should update the project’s Timelines before generating the Grant Agreement Amendment, when the revision workflow reaches: ‘Grant Agreement Amendment Preparation’. The 'Timelines' tab of the revision module is designed to help you with this update. To learn more on how to update the Timelines, PRIOR TO GENERATING THE GAA, please refer to this article of the Help Portal.
|

|
When the project Timelines have been updated (if necessary), you can proceed with generating the GAA. Please click here to learn how to generate the GAA and here to learn about the GAA signature process. |
Once generated, the GA Amendment must be signed by the Humanitarian Coordinator (HC), then by the IP, and finally by OCHA’s Executive Officer in NY.
Once the GAA is signed by all parties, the project revision is automatically approved by the GMS, and the HFU can click on the [Overwrite] button.
| Once the Project is overwritten, there is no way of reversing the project revision, and the revision data becomes part of the project proposal. This process cannot be undone; therefore, the Overwrite button must be clicked with utmost care. |
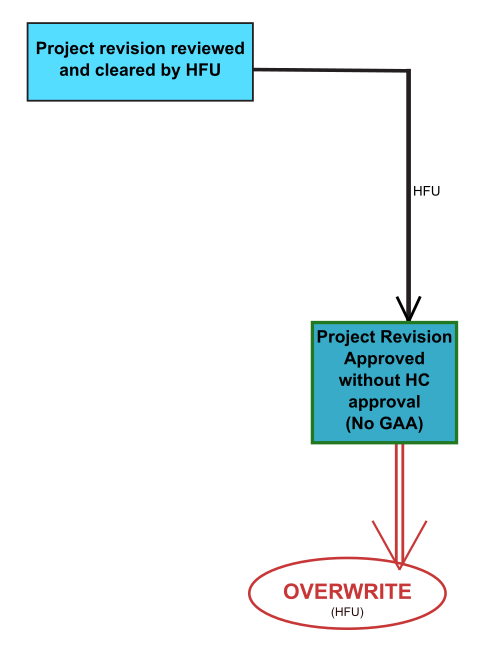
APPROVAL OF THE REVISION (without GAA) (HC/HFU)
The HFU IS NOT REQUIRED to generate a Grant Agreement Amendment for the following changes :
- Creation of a new budget line not exceeding 15% of the budget category, PROVIDED that the total budget is not exceeded.
- Change of project location, UNLESS the entire project area has been changed;
- Change in number of beneficiaries, UNLESS this changes the nature of the project;
- Change in approved project activity, UNLESS this changes the project objective and key result.
If the project revision does not entail changes requiring an amendment of the existing GA, the HFU can either:
- Push the project revision directly to the HC for approval, by clicking on [Send Project Revision to HC for approval (no GA Amendment needed)].
- Approve the Project Revision without sending it to the HC by clicking on [Project Revision approved by HFU without HC approval (no GA amendment needed)].
![]()
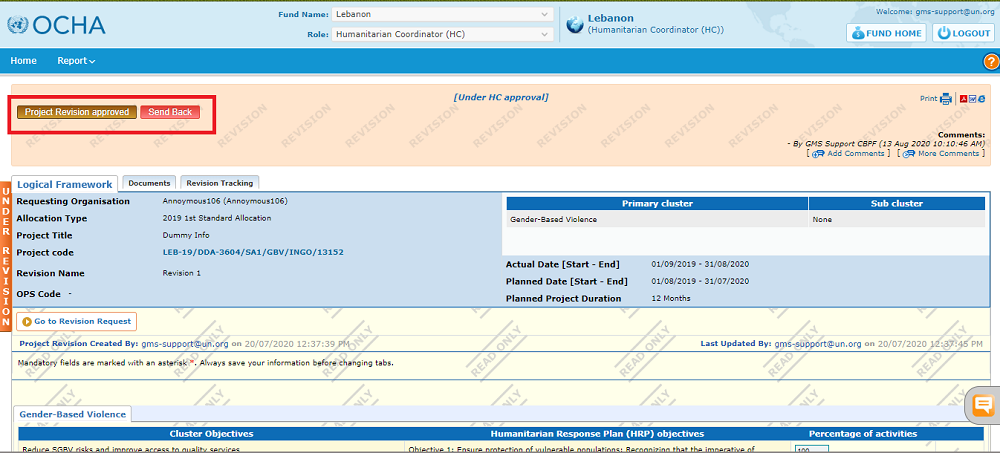
HC approval
If the HFU sent the project revision to the HC, the HC must review it, insert comments if needed, and either approve the Revision by clicking on [Project Revision Approved], or send back for correction as per the comments inserted by clicking on [Send back].
Overwrite the project data
Following the HC approval of the project revision, OR if the HFU approved the revision without sending it to the HC, the HFU can overwrite the project data as per the revision by clicking on the [Overwrite] button.
| Once the Project is overwritten, there is no way of reversing the project revision, and the revision data becomes part of the project proposal. This process cannot be undone; therefore, the Overwrite button must be clicked with utmost care. |
How to cancel a Project Revision Top
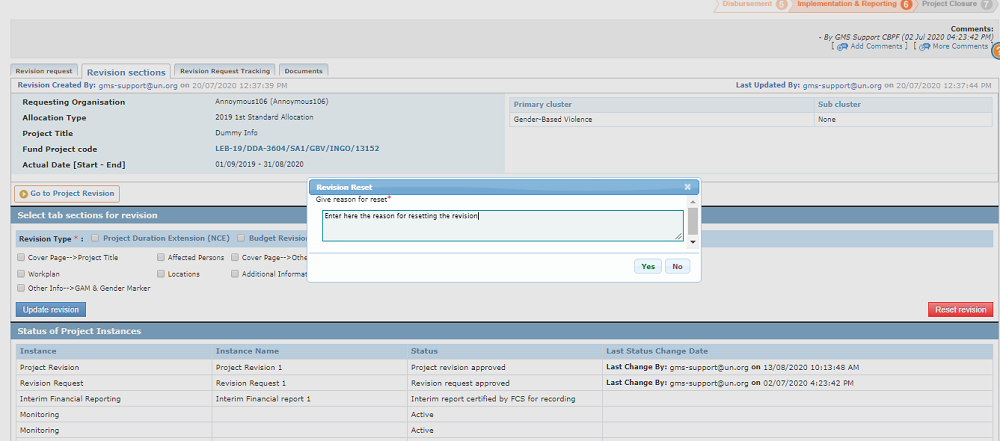
A project revision can be cancelled at any time before the project is overwritten. A cancellation can be required because the project revision is rejected by the HFU/HC/Cluster, or because a new project revision needs to be created with different sections made editable to the IP.
To cancel a project revision, the HFU should click on the button [Reset Revision] in the “Revision Sections” tab of the revision request.
In the pop-up window, enter the reason why you are resetting/cancelling the revision, and click on [Yes].
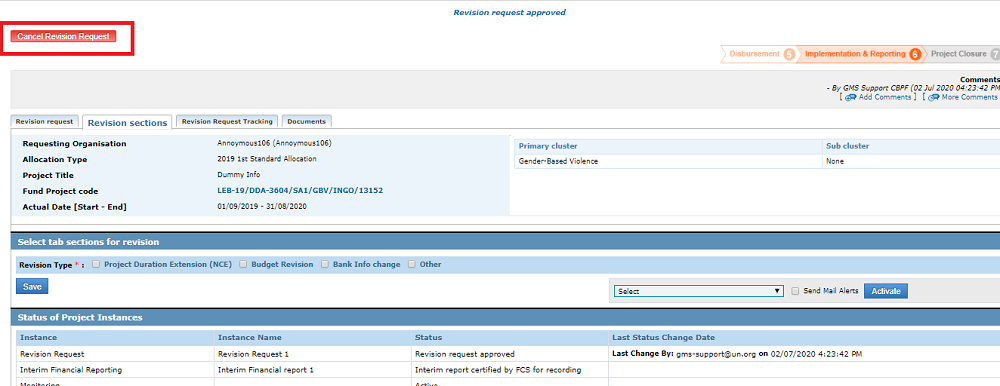
Then click on [Cancel the Revision Request].
|
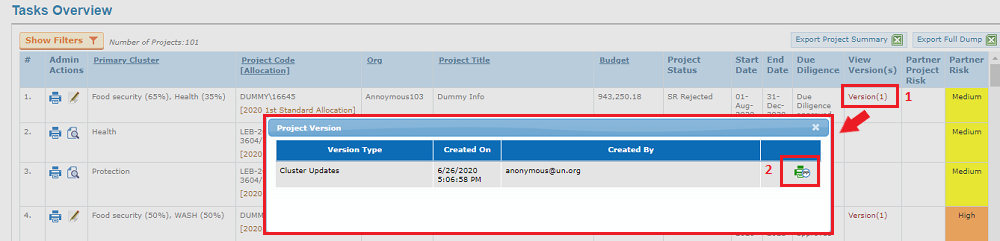
GMS Tip : How to access the previous version of the article after it has been overwritten? After the Revision has overwritten the project proposal data, it is no longer possible to view the previous data in the project proposal, since it has been erased and replaced by the revision. However, it is stillpossible for the HFU to view the previous version of the project, before the revision overwrite, by using the Advance Switchboard tool. Filter the project out by using this tool from the HFU homepage (to learn how to use the Advance Switchboard, please refer to this article). You can see if the project proposal has been overwritten in the 'View Versions' column. Click on the 'Version' hyperlink. This will open a pop-up window with the different versions there has been for this project. To access the former project proposal, click on the 'print' option.
|