General Features
I) The Strategic Prioritization tab
II) The Operational Prioritization tab
III) The People Targeted tab (optional)
IV) The Projects tab
1) Add a project and edit the sector/clusters
2) Add and edit a location
3) Add and edit an activity
4) Error message
5) Project Detail – Add a Country Focal Point
a) Overview tab
b) Focal Points
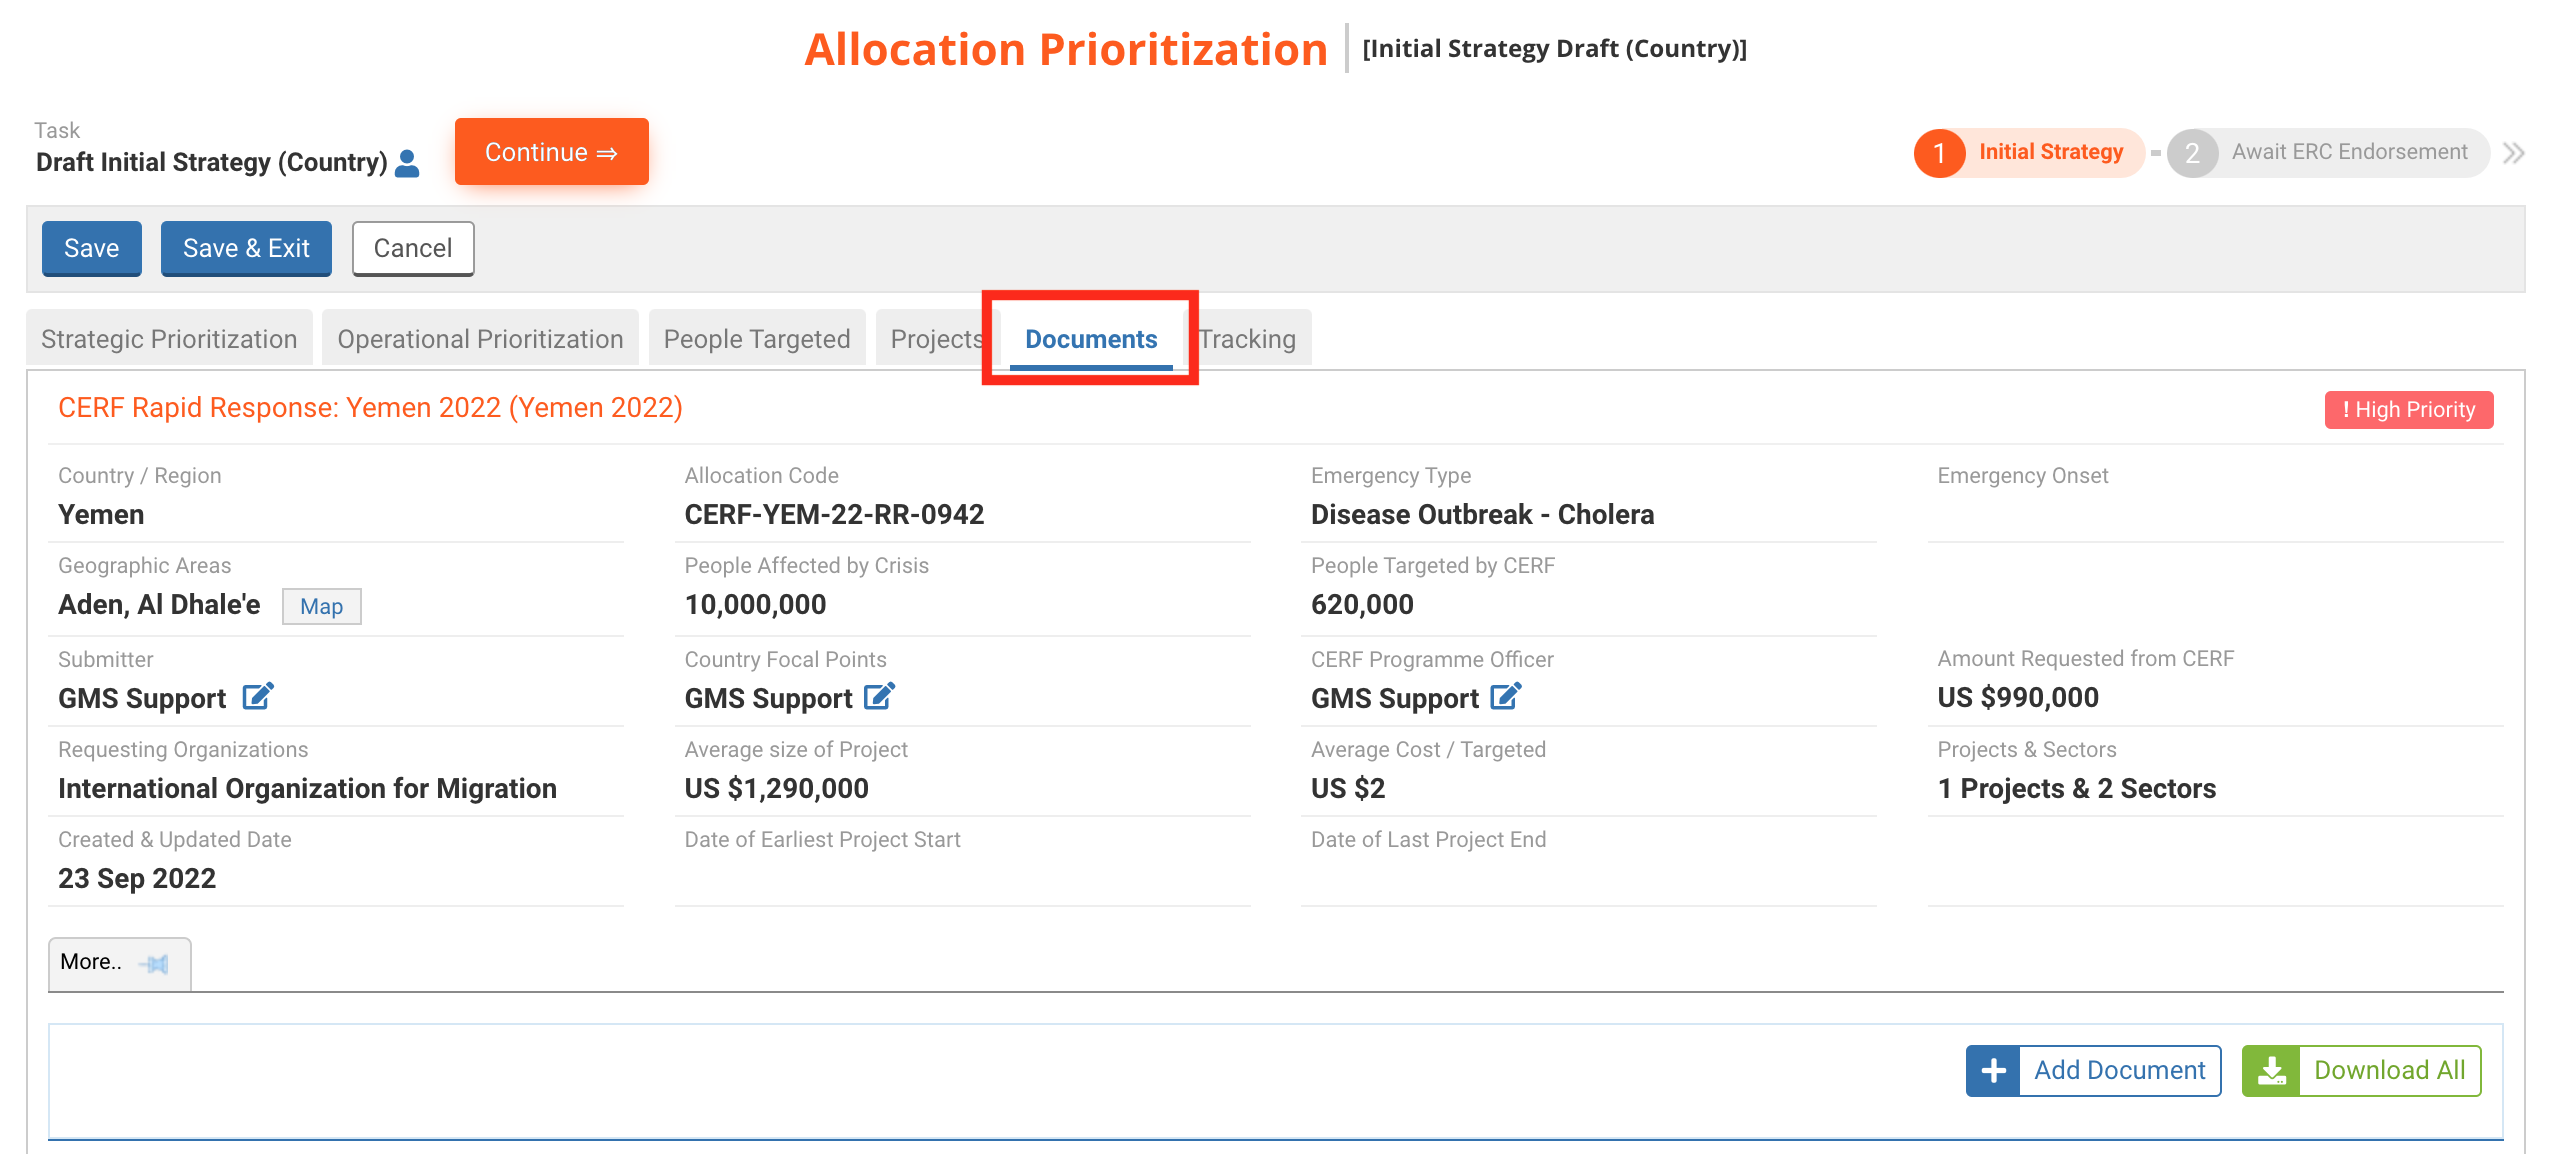
V) The Documents tab
VI) The Tracking tab
VII) Send the Initial Strategy to CERF HQ
VIII) Redraft the Initial Strategy – the comment section
1) How to view comments
2) How to leave a comment
IX) Send the Initial Strategy back to CERF HQ
Please note that all the data provided in the screenshots of this article is purely indicative.
Once the Initial Strategy Email has been sent by CERF HQ, the Country Office can log in and start drafting the Initial Strategy. If you need to redraft the Initial Strategy please click here.
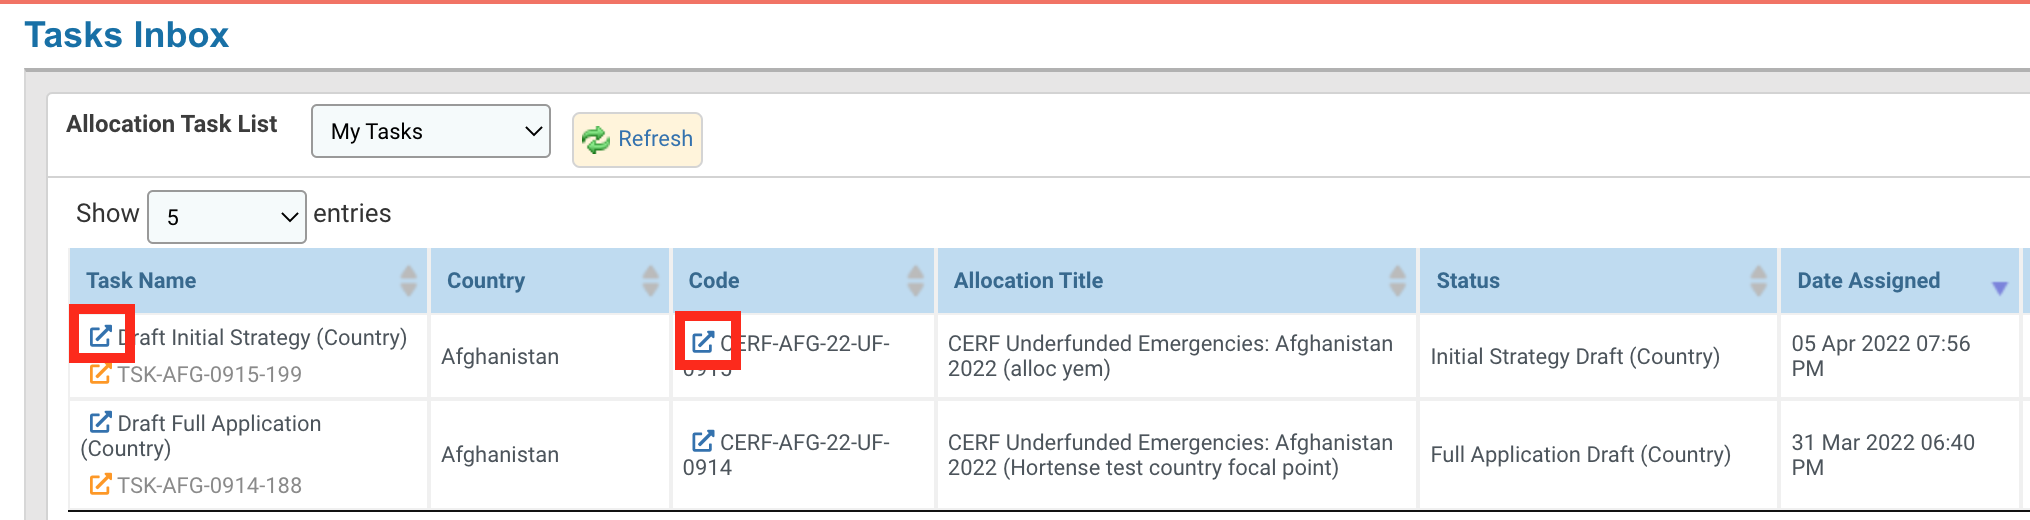
You can open the Initial Strategy form from your OneGMS homepage that displays all the tasks pertaining to allocation that currently require the Country Office’s action. To do so, click on this icon ![]() next to your task, in the ‘Task Name’ or ‘Code’ column.
next to your task, in the ‘Task Name’ or ‘Code’ column.
If you need more information on the OneGMS homepage, please click here.
The Initial Strategy is composed of the Strategic Prioritization, Operational Prioritization (only for RR), People Targeted, Projects, Documents and Tracking tabs. The Country Office must fill in all the mandatory fields of the Initial Strategy form and send the draft of the Initial Strategy to the CERF Programme Officer. Mandatory fields are marked with a red asterisk *.
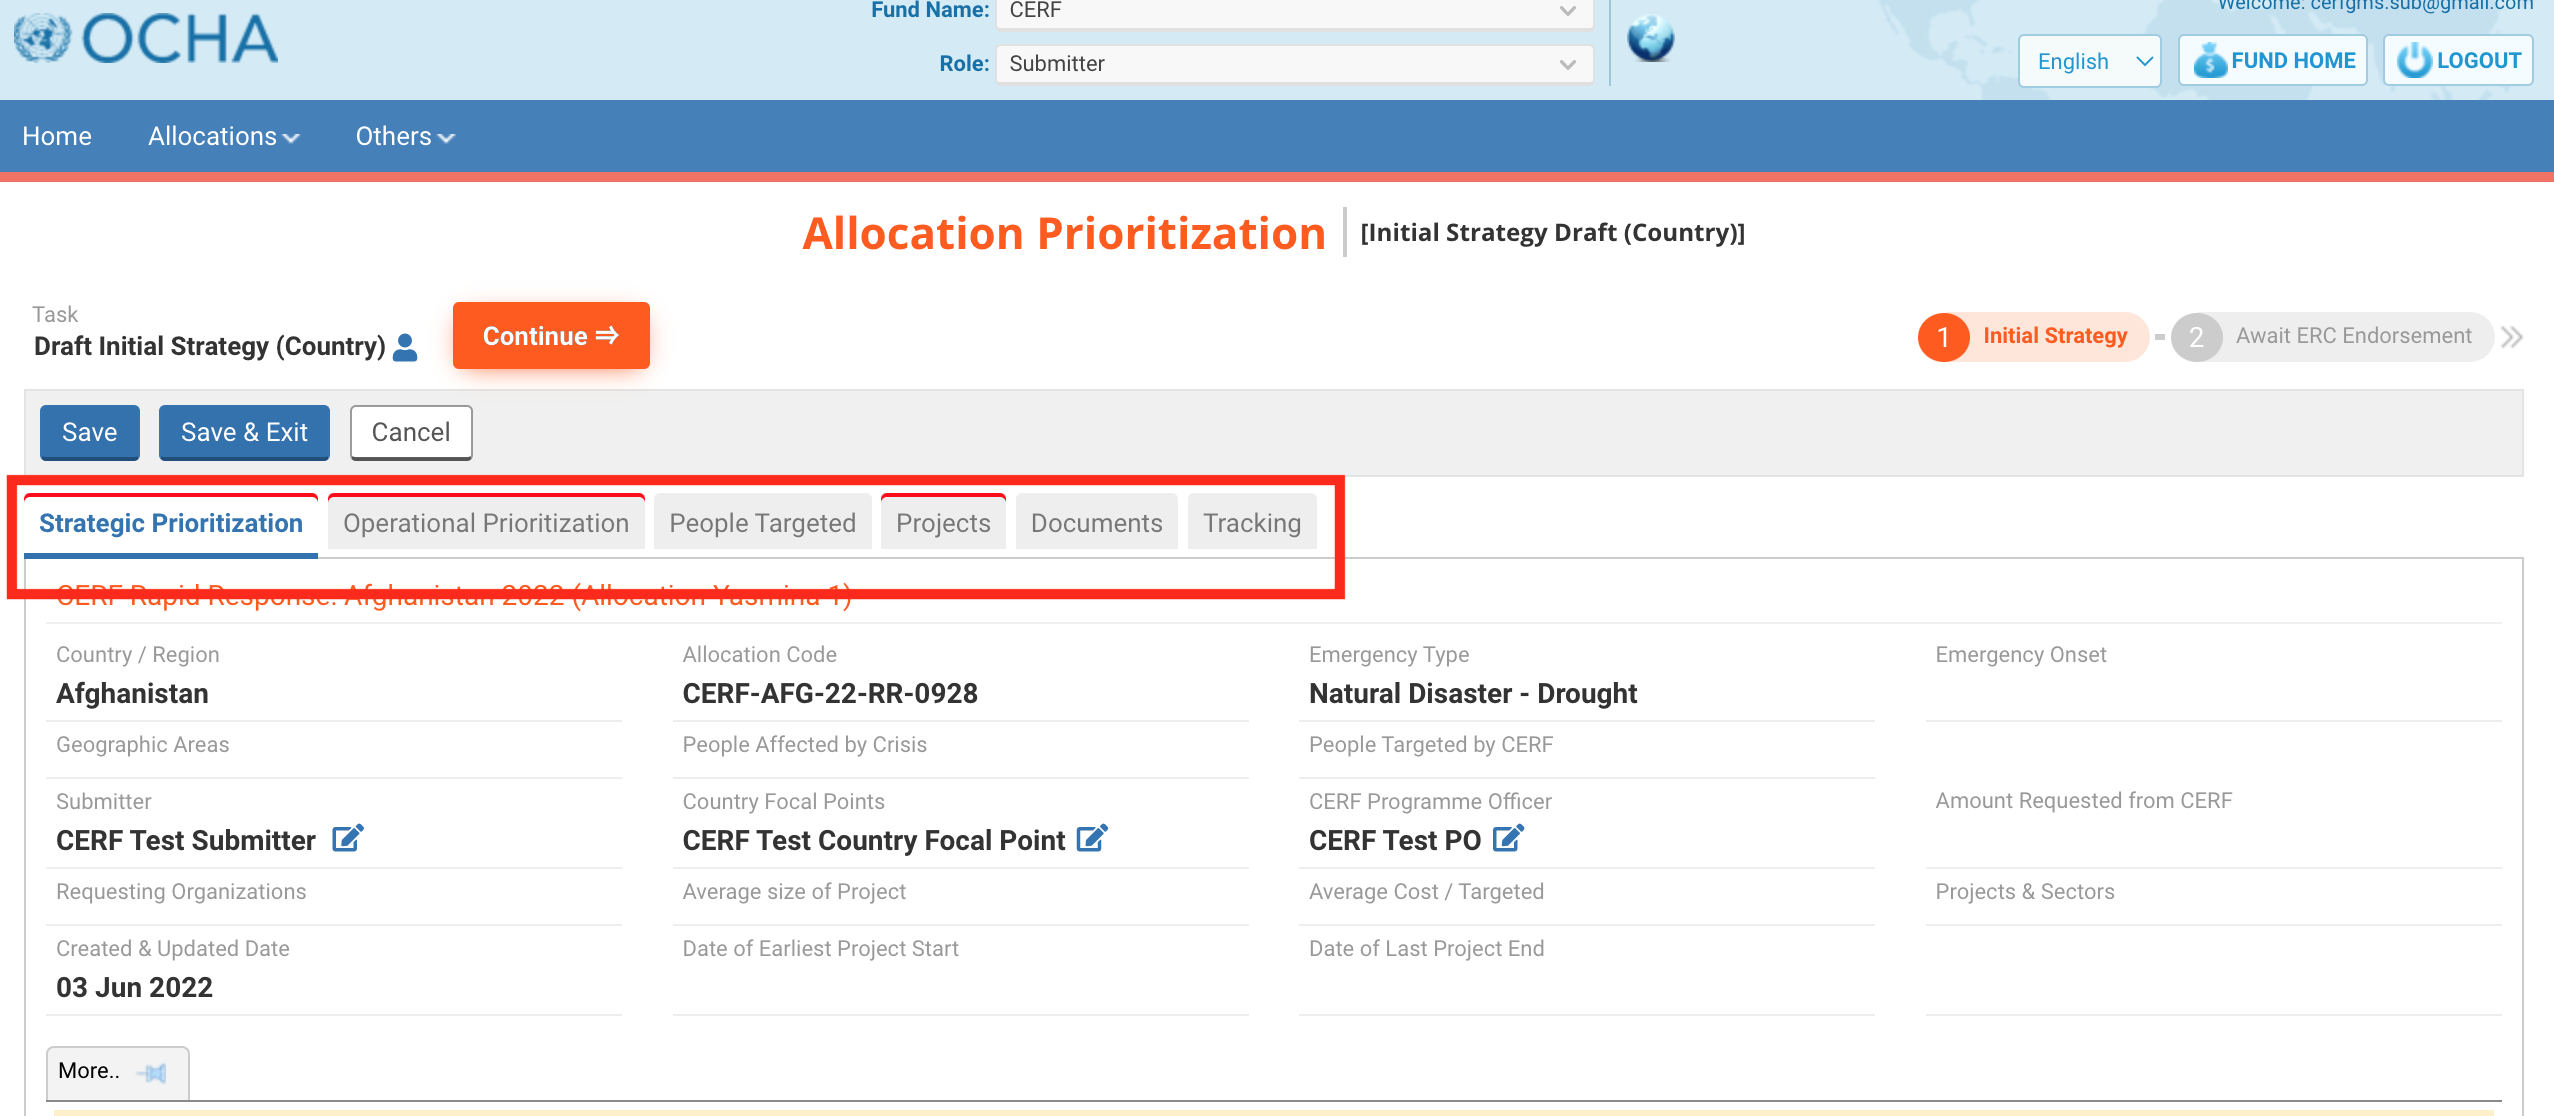
Here are the general features of the draft of the Initial Strategy.
-
Tabs with a red header are incomplete and must be completed to move forward.

- You can use the format text tool to personalize your answers

- You can display additional guidance

I) The Strategic Prioritization tab
This tab consists of the strategic statement and considerations of the project.
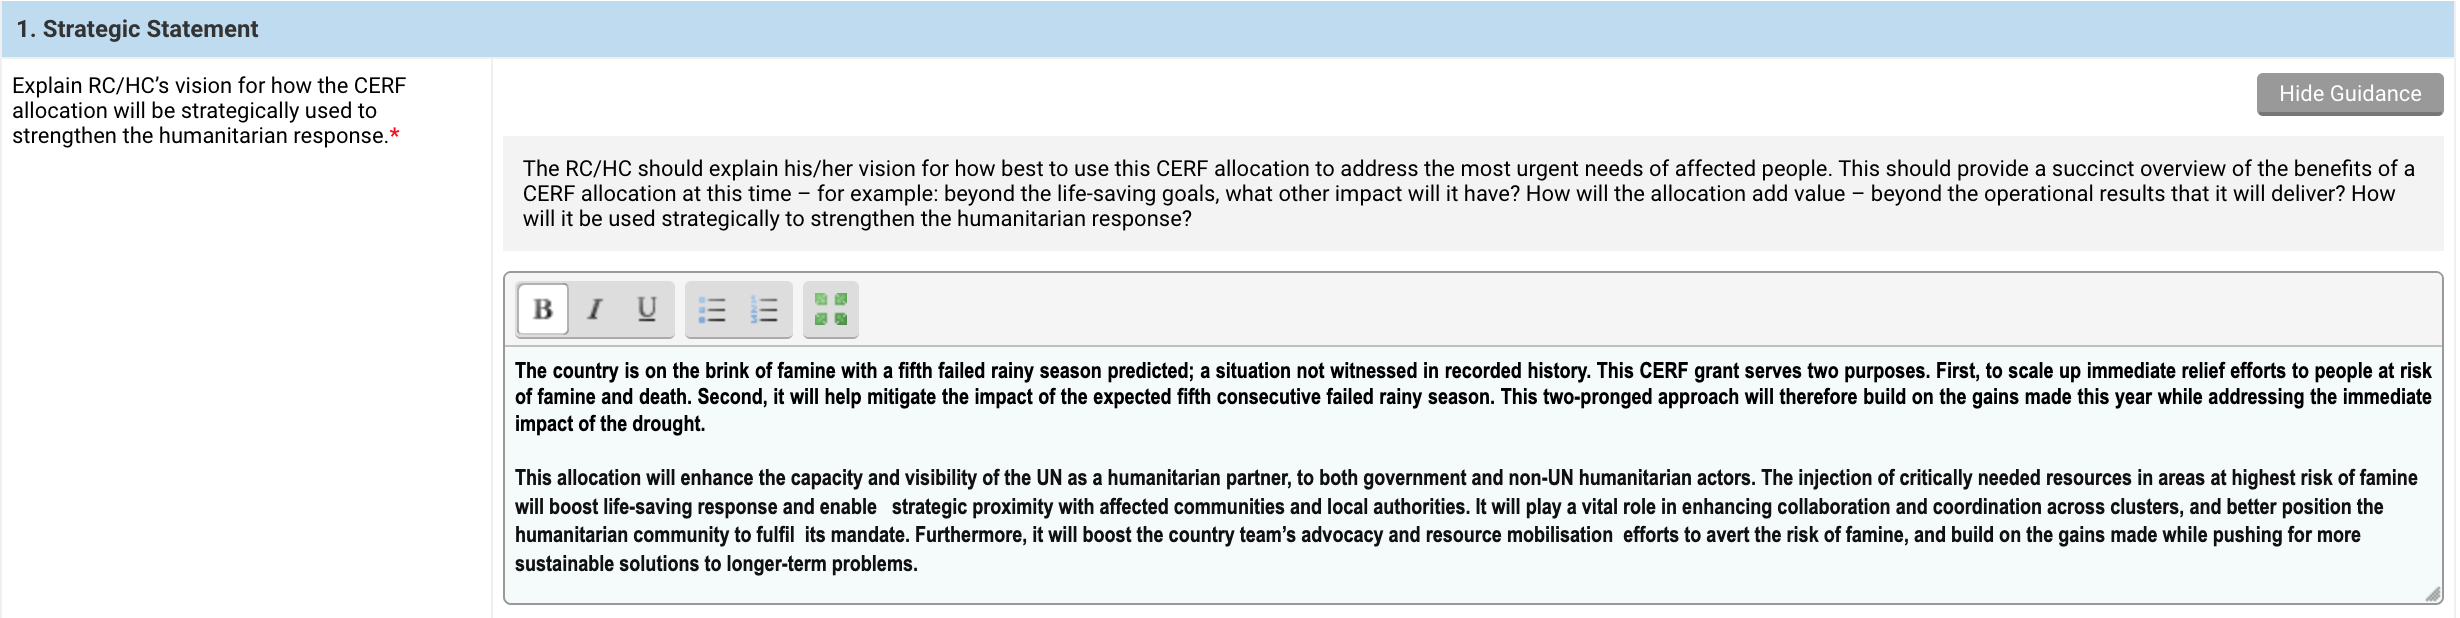
1. Strategic Statement *
Explain your vision for how to best use this CERF allocation to address the most urgent needs of affected people. Provide a succinct overview of a CERF allocation at this time. For example: beyond the life-saving goals, what other impact will it have? How will the allocation add value – beyond the operational results that it will deliver? How will it be used strategically to strengthen the humanitarian response?
2. Strategic Considerations *
Consider which of the four chronically underfunded humanitarian priority areas requires most urgent investment? What country strategies are in place to support these areas? How can CERF help advance collective efforts in these areas to bring about step changes in the response? What key challenges, if any, prevent the HCT/UNCT from advancing these areas through the humanitarian response (e.g., policies, technical capacity, resources, guidance)?
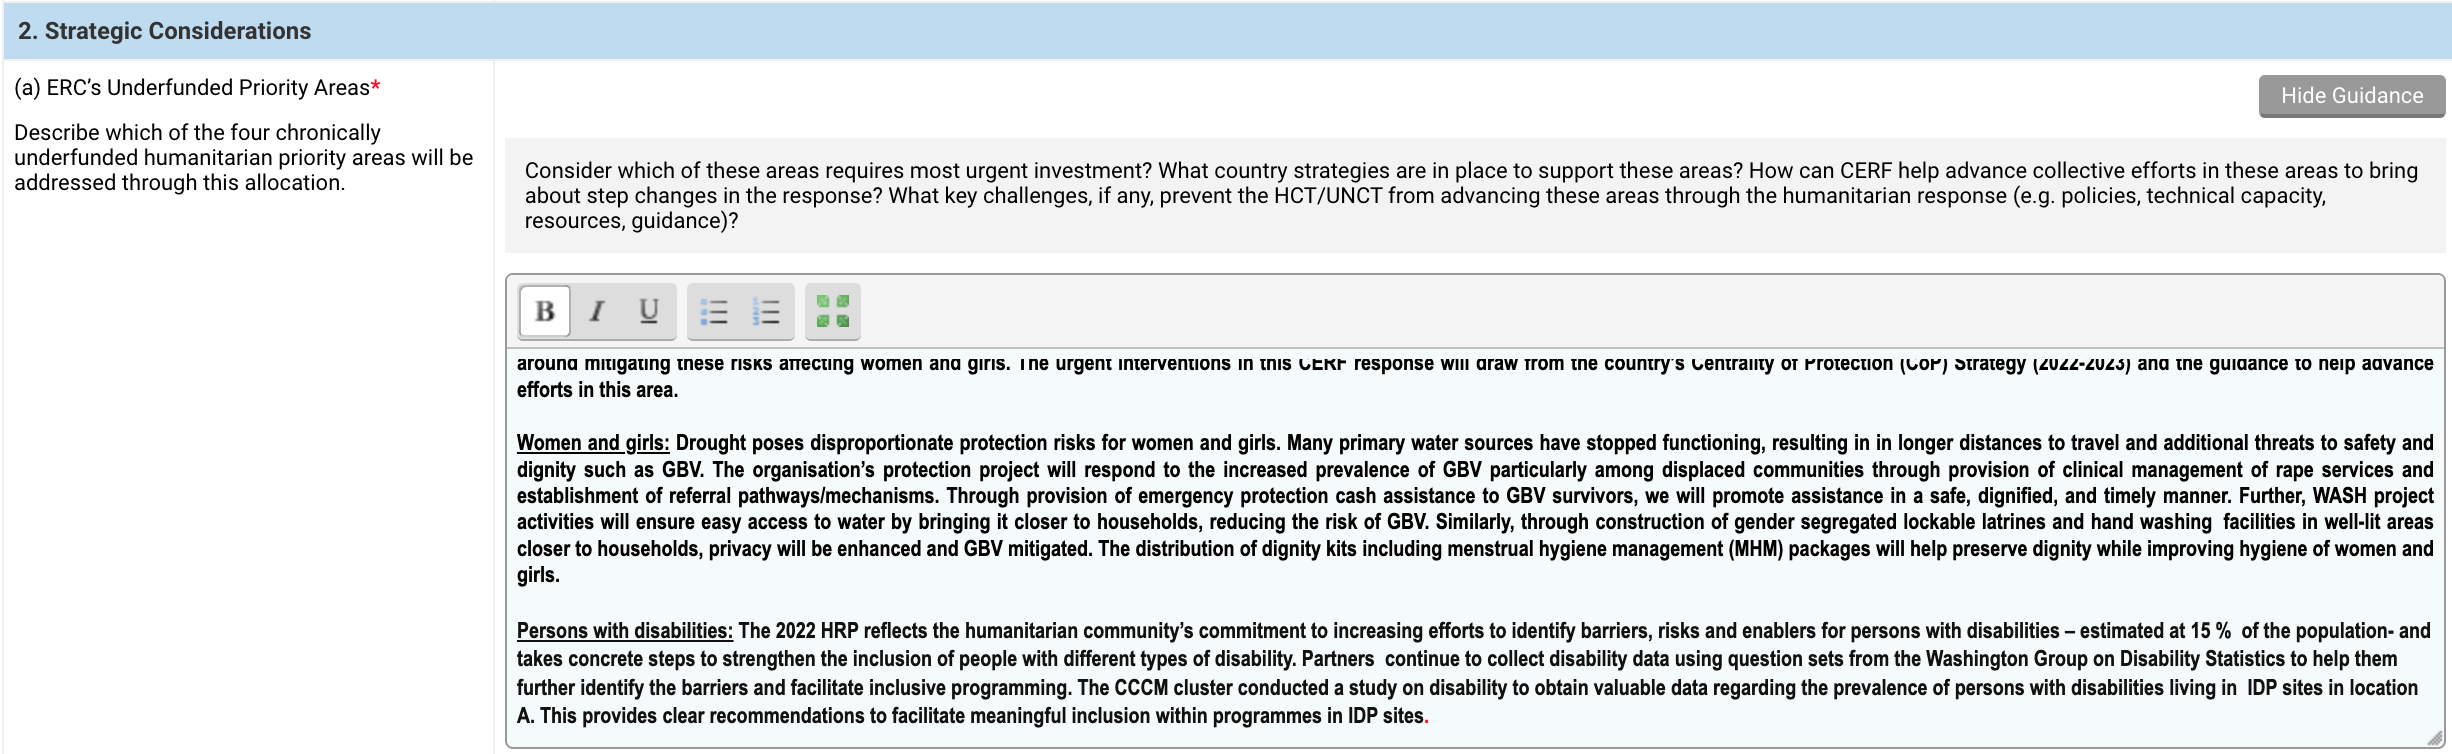
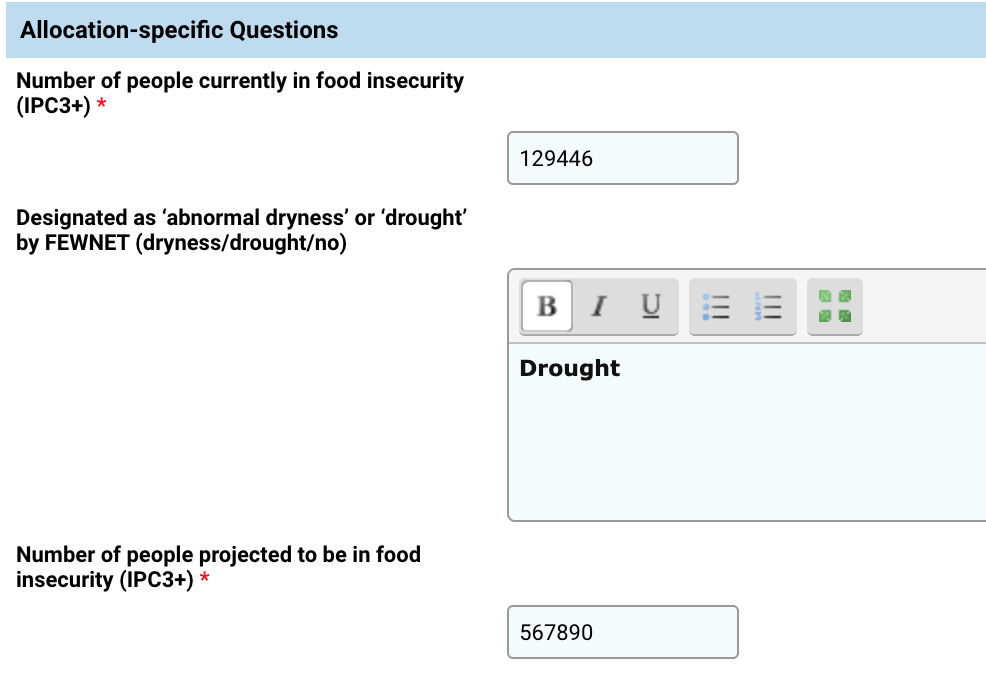
3. Allocation-specific Questions
If allocation-specific questions were added to the allocation by CERF HQ, they will be displayed here. Questions can be mandatory or optional.

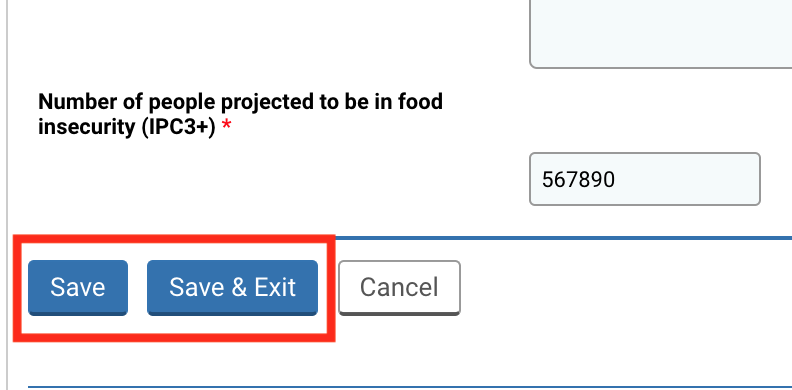
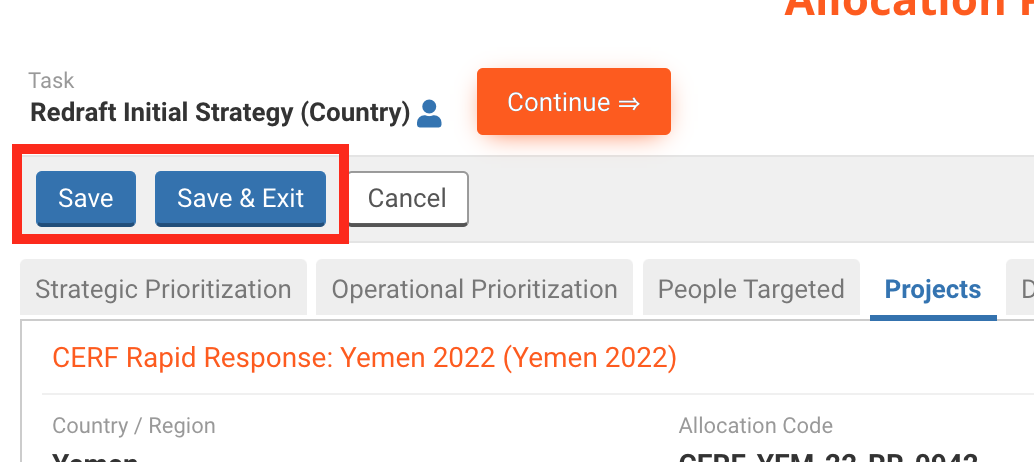
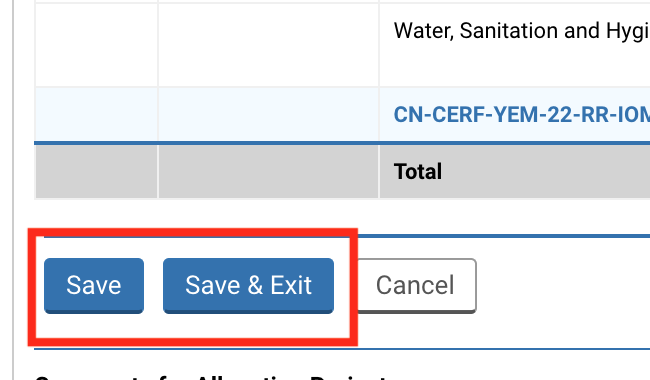
Once you have completed this tab, do not forget to save your progress, as the system will not automatically save it. You can find the save buttons at the top of the tab,
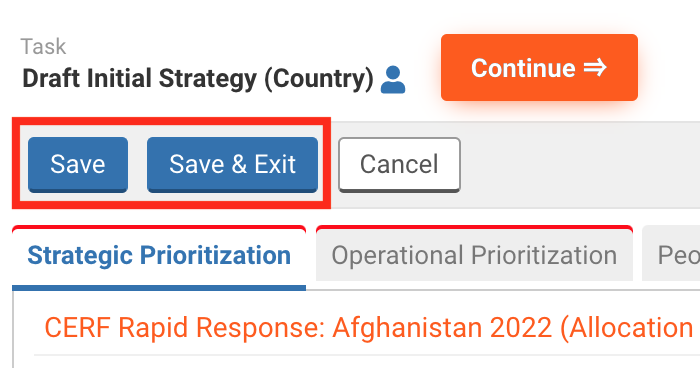
Or the bottom of it.
II) The Operational Prioritization tab
This tab allows the Country Office to provide a funding analysis and the operational considerations as well as answer allocation-specific questions if added by CERF HQ.
Please note: if you are filling in an Under Funded Emergencies (UFE) allocation, please click here, as this tab is not displayed at this stage.
Funding Analysis

Fields description:
- Total Amount Required For Response: enter in USD the total amount required, which includes the CERF funding request and funding received from other sources.
- Total Amount Received For Response: enter in USD the total amount already received for the response. The percentage of total Requirement Received will be automatically calculated and displayed by the system.
- Total Amount of CERF Funding Requested: enter in USD the total amount requested from CERF. The percentage of total Requirement Requested will be automatically calculated and displayed by the system.
Operational Considerations
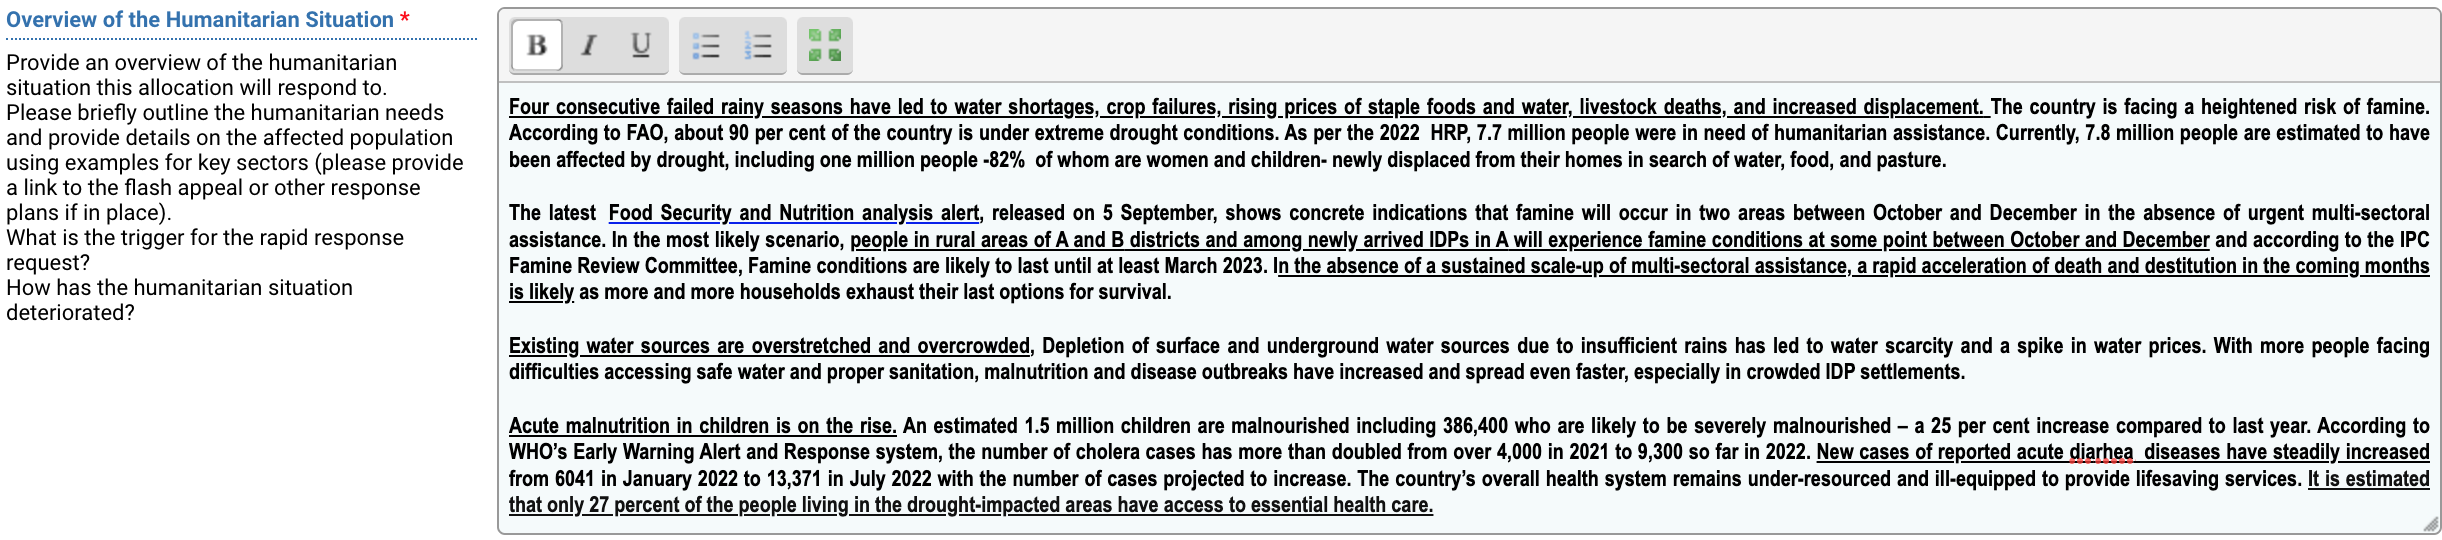
Overview of the Humanitarian Situation *
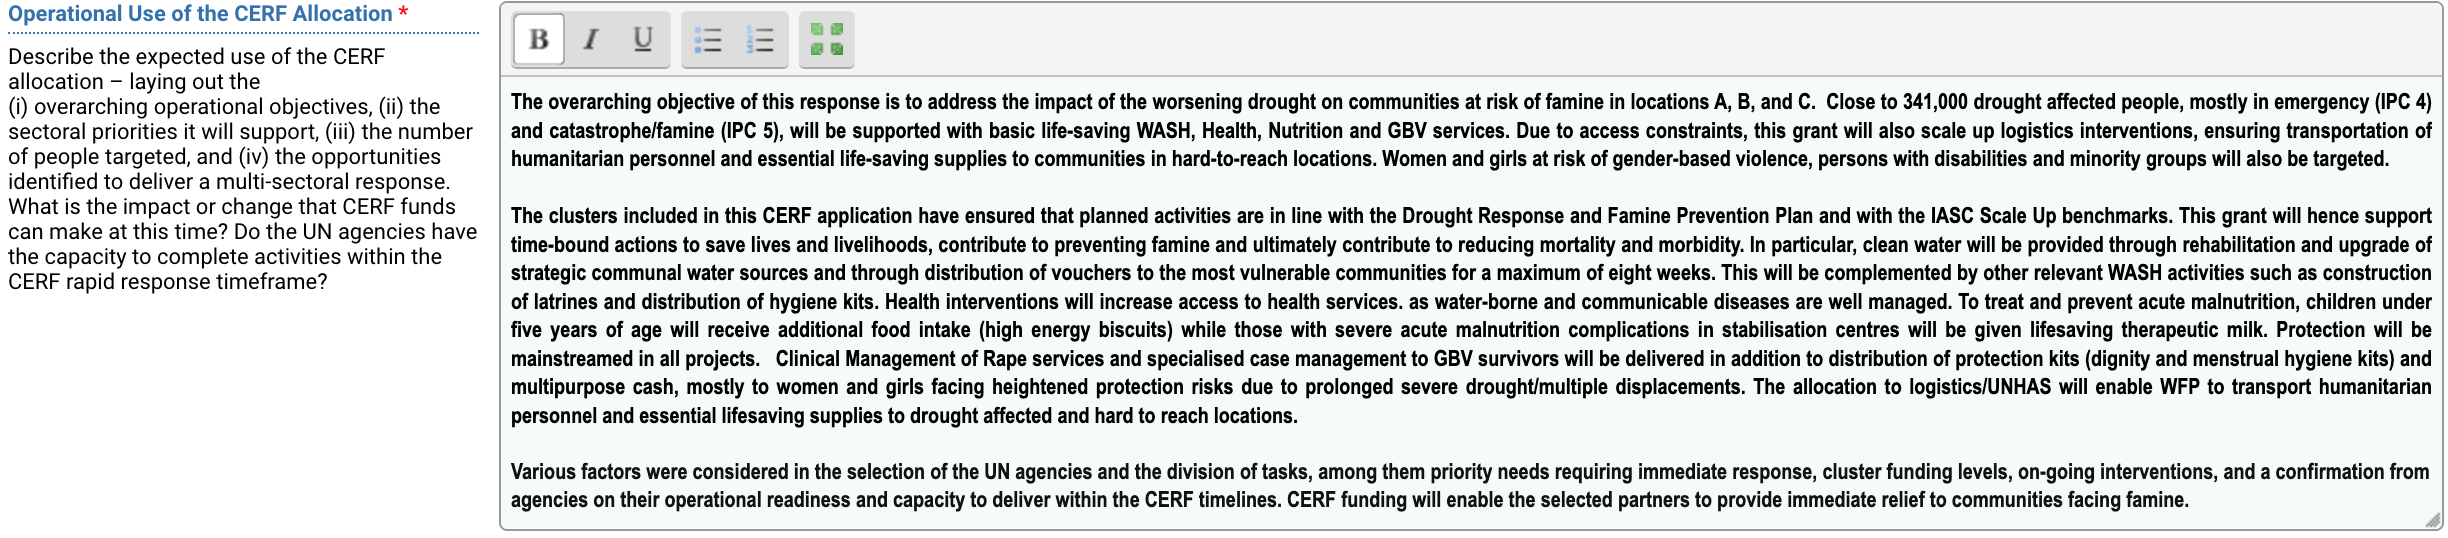
Operational Use of the CERF Allocation *
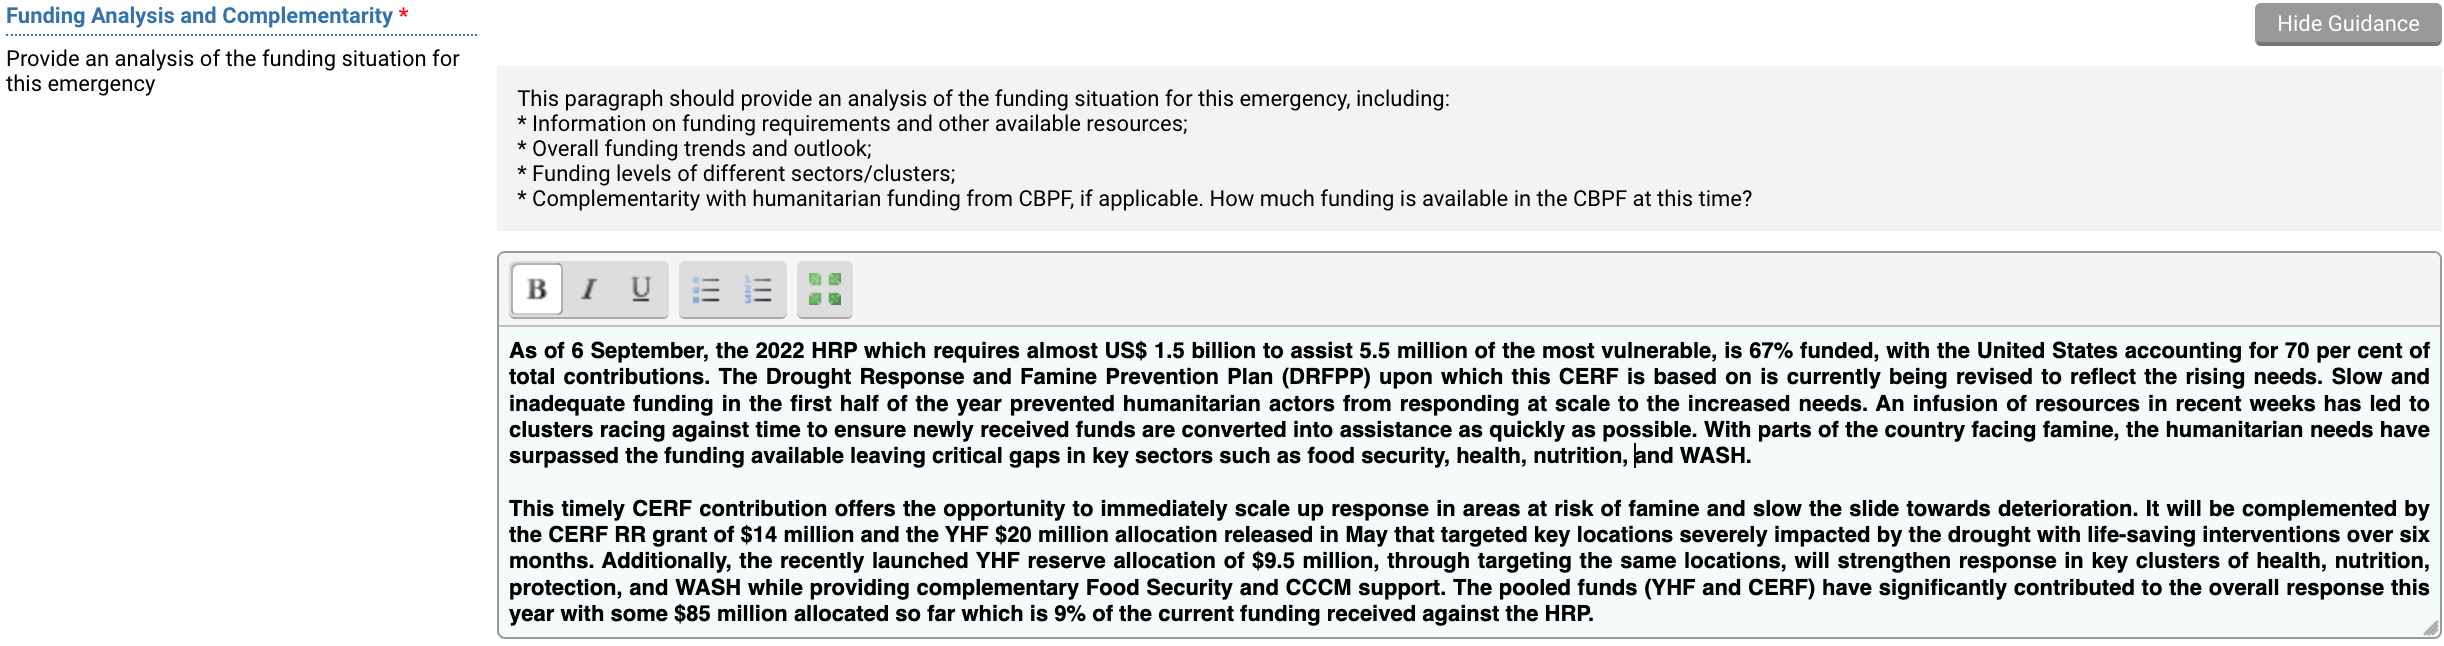
Funding Analysis and Complementarity *
Provide an analysis of the funding situation for this emergency. It should include:
- Information on funding requirements and other available resources.
- Overall funding trends and outlook.
- Funding levels of different sectors/clusters.
- If applicable, complementarity with humanitarian funding from CBPF. How much funding is available in the CBPF at this time?
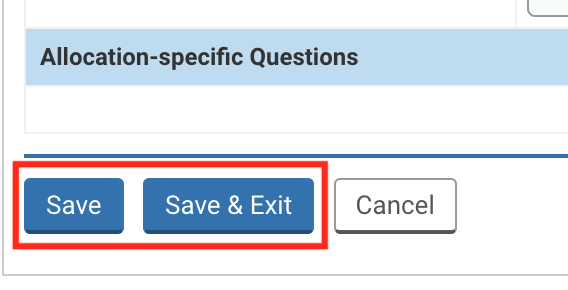
Allocation-specific questions
If questions linked to the operational prioritization were added to this tab by CERF HQ, they will be displayed in this section. Questions can be mandatory or optional.
Once you have completed this tab, do not forget to save your progress, as the system will not automatically save it. You can find the save buttons at the top of the tab,
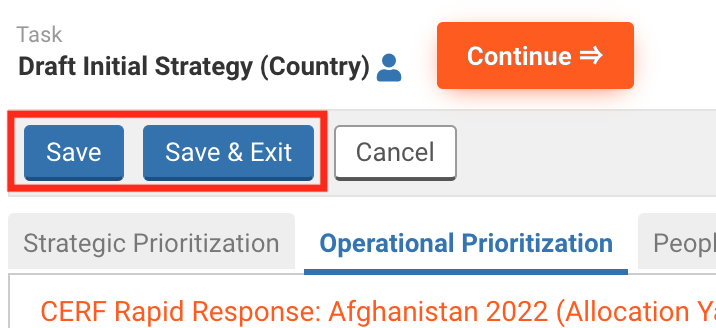
Or the bottom of it.
III) The People Targeted tab (optional)
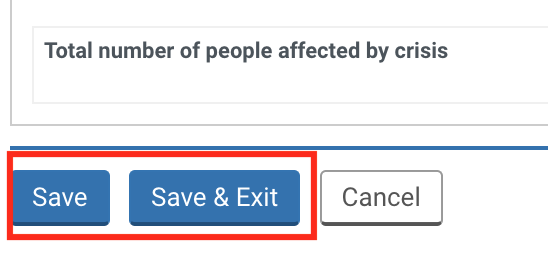
At this stage of the allocation, this tab is optional. However, it is recommended to fill it out and enter the total number of people affected by the crisis and the total number of people directly targeted by this CERF allocation.
Please avoid double counting when entering the total number of people directly targeted by CERF.

Once you have completed this tab, do not forget to save your progress, as the system will not automatically save it. You can find the save buttons at the top of the tab,
Or the bottom of it.
In this tab, the user can add all the projects included in the request to explain the coverage of sectors and geographic coherence of the proposed response. I addition to this article, you can watch our video tutorial on how to fill in this tab.
Please note:
- There should be only one project per agency.
- Submissions that are not sufficiently focused are likely to be returned for amendments.
- In most cases, only one agency should be included per sector.
1) Add a project and edit the sector/clusters
You will first have to add a project, which starts by adding an organization and a sector. To add a project, click on [Add Project].

On the pop-up window, select from the drop-down list one organization that will apply to the allocation and one or multiple Sectors/Clusters. Then click on [Save].
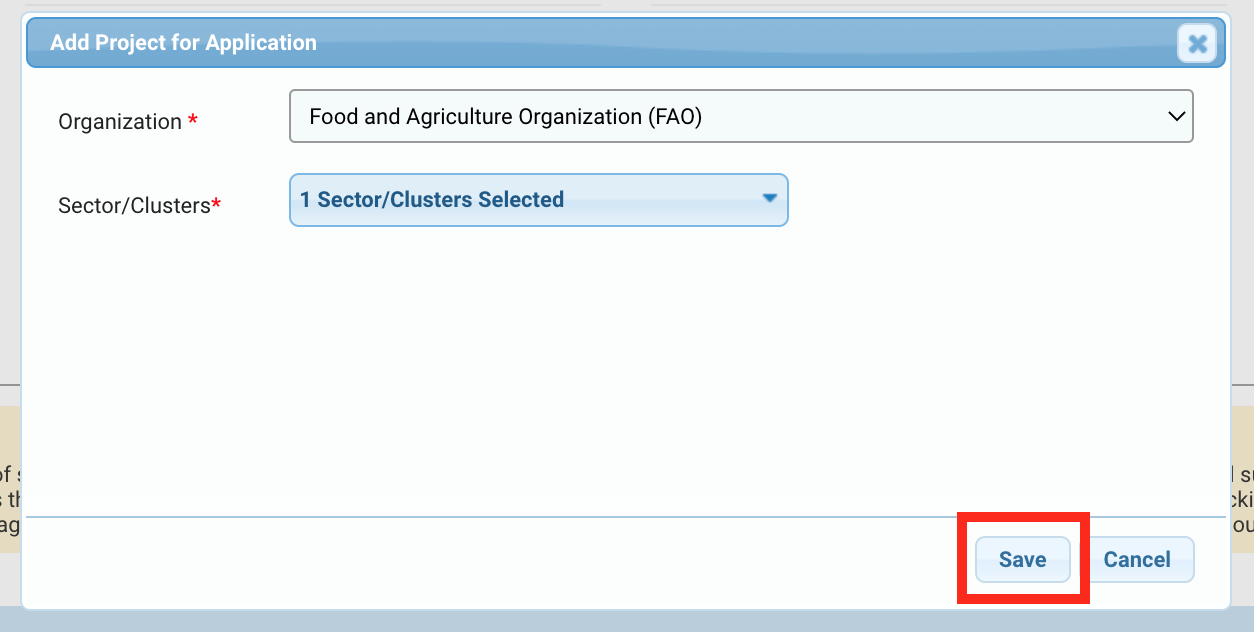
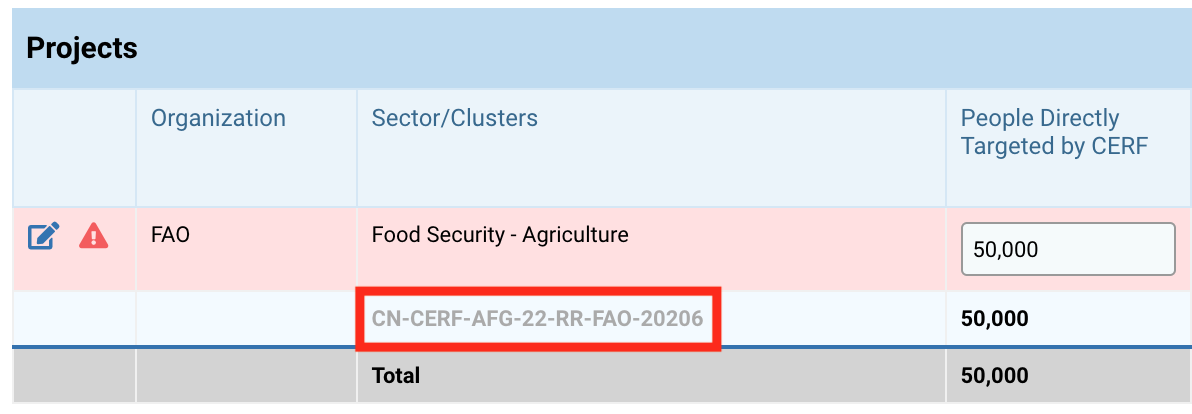
The project will be added to the table.

Please note: you will not be able to modify the organization. If you need to do so, you will have to delete the project and add a new one. Please click here to see how to delete a project.
Fields description:
- Organization: the name of the organization.
- Sector/Clusters: the sector/cluster selected.
- People Directly Targeted by CERF: enter the total number of people directly targeted by this CERF allocation. Please, avoid double counting when entering this amount.
- Overall Project Requirement (US$): enter in USD the total amount required for this project.
- Amount Requested from CERF (US$): enter in USD the total amount requested from CERF which includes the PSC.
- Locations: once added, the locations will be displayed in this column.
- Activities: once added, the activities will be displayed in this column.
- Total: the total number of People Directly Targeted by the CERF allocation, the total overall project requirement and the total amount requested from CERF in USD for all projects will be automatically calculated by the system.
Below the sector, a temporary project code is displayed. A new permanent code will be provided once the project proposal is created by the Agency.
To edit a cluster/sector, click on the edit icon ![]() at the beginning of the row.
at the beginning of the row.

To change the cluster, click on this icon ![]() , select a new cluster from the drop-down list and click on [Add Sector/Clusters]. Then click on [Save].
, select a new cluster from the drop-down list and click on [Add Sector/Clusters]. Then click on [Save].
To add a location, click on [Add/Edit].

On the pop-up window, you can select the location(s) from the left column ‘Select project location(s)’. Click on the arrow to display the level of location and tick the box(s) to select the location(s). If you click on [Save], the location(s) selected will be removed from the left column and added to the right column, where the selected project locations are displayed.
If it is a multi-sector project, you can select any other sector to automatically add all the locations selected to the sectors. To do so, select the sectors from the Sector/Clusters drop-down list.
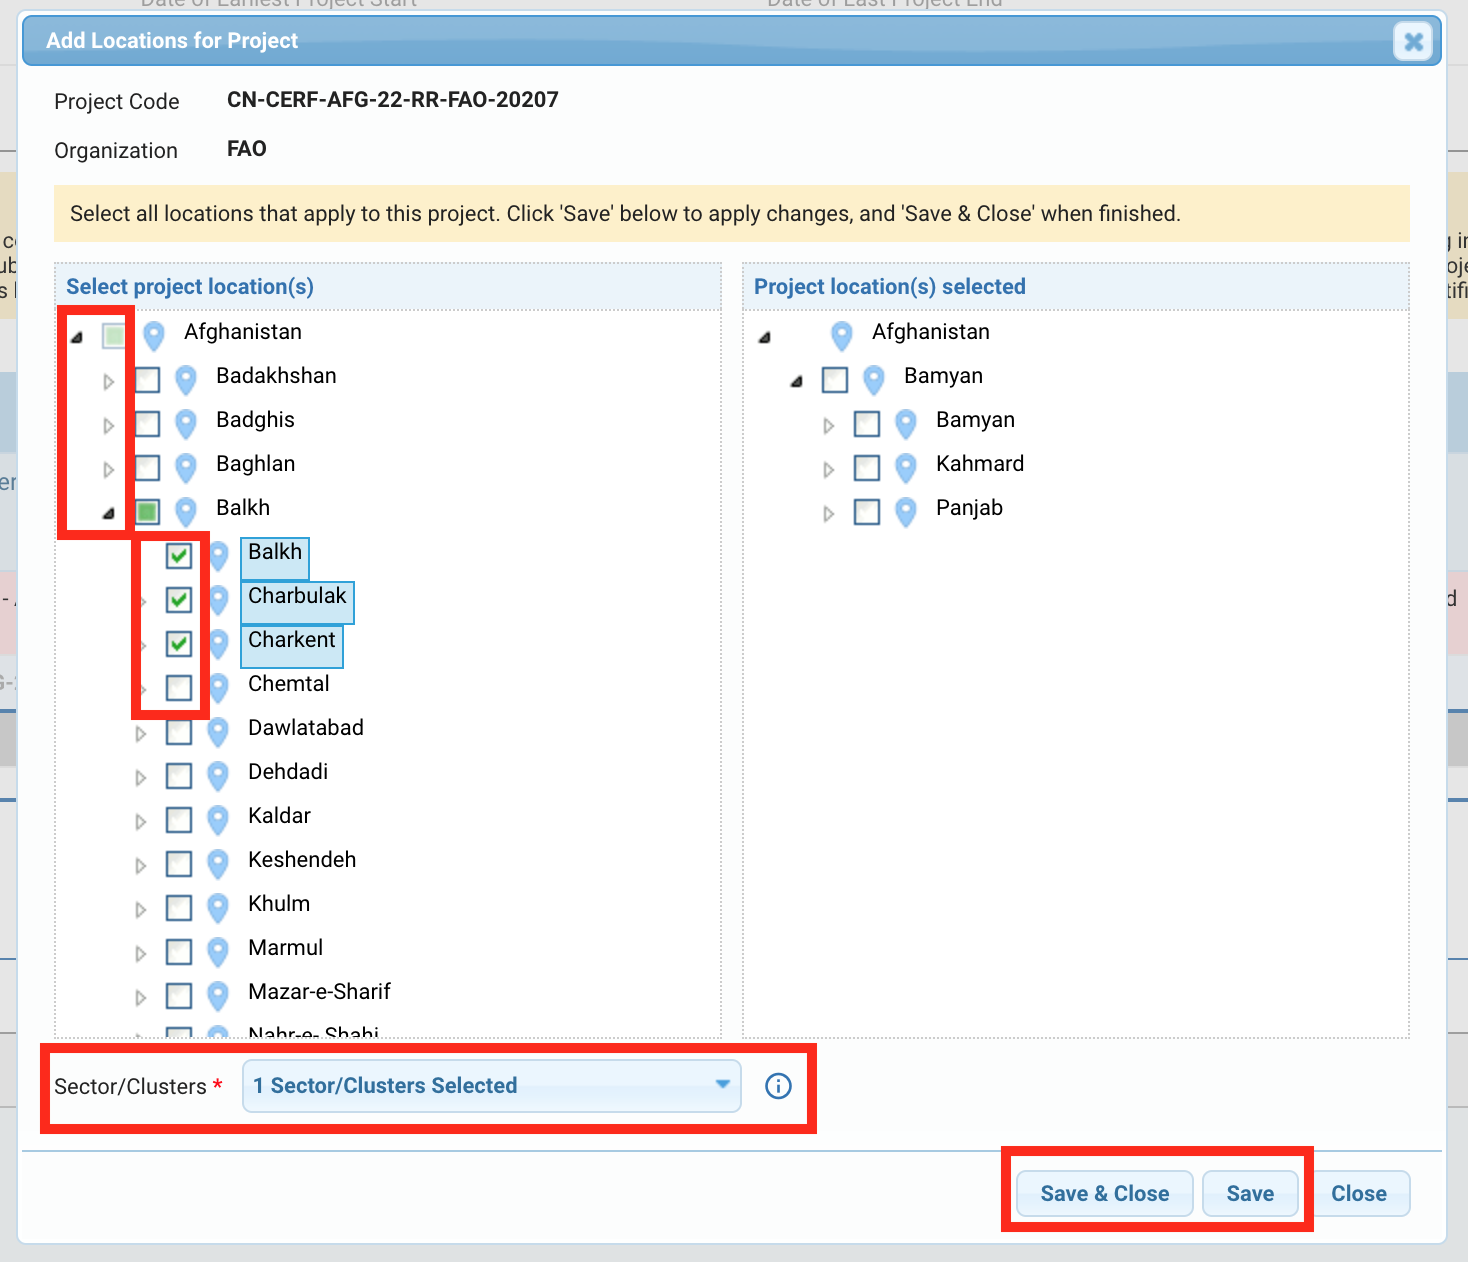
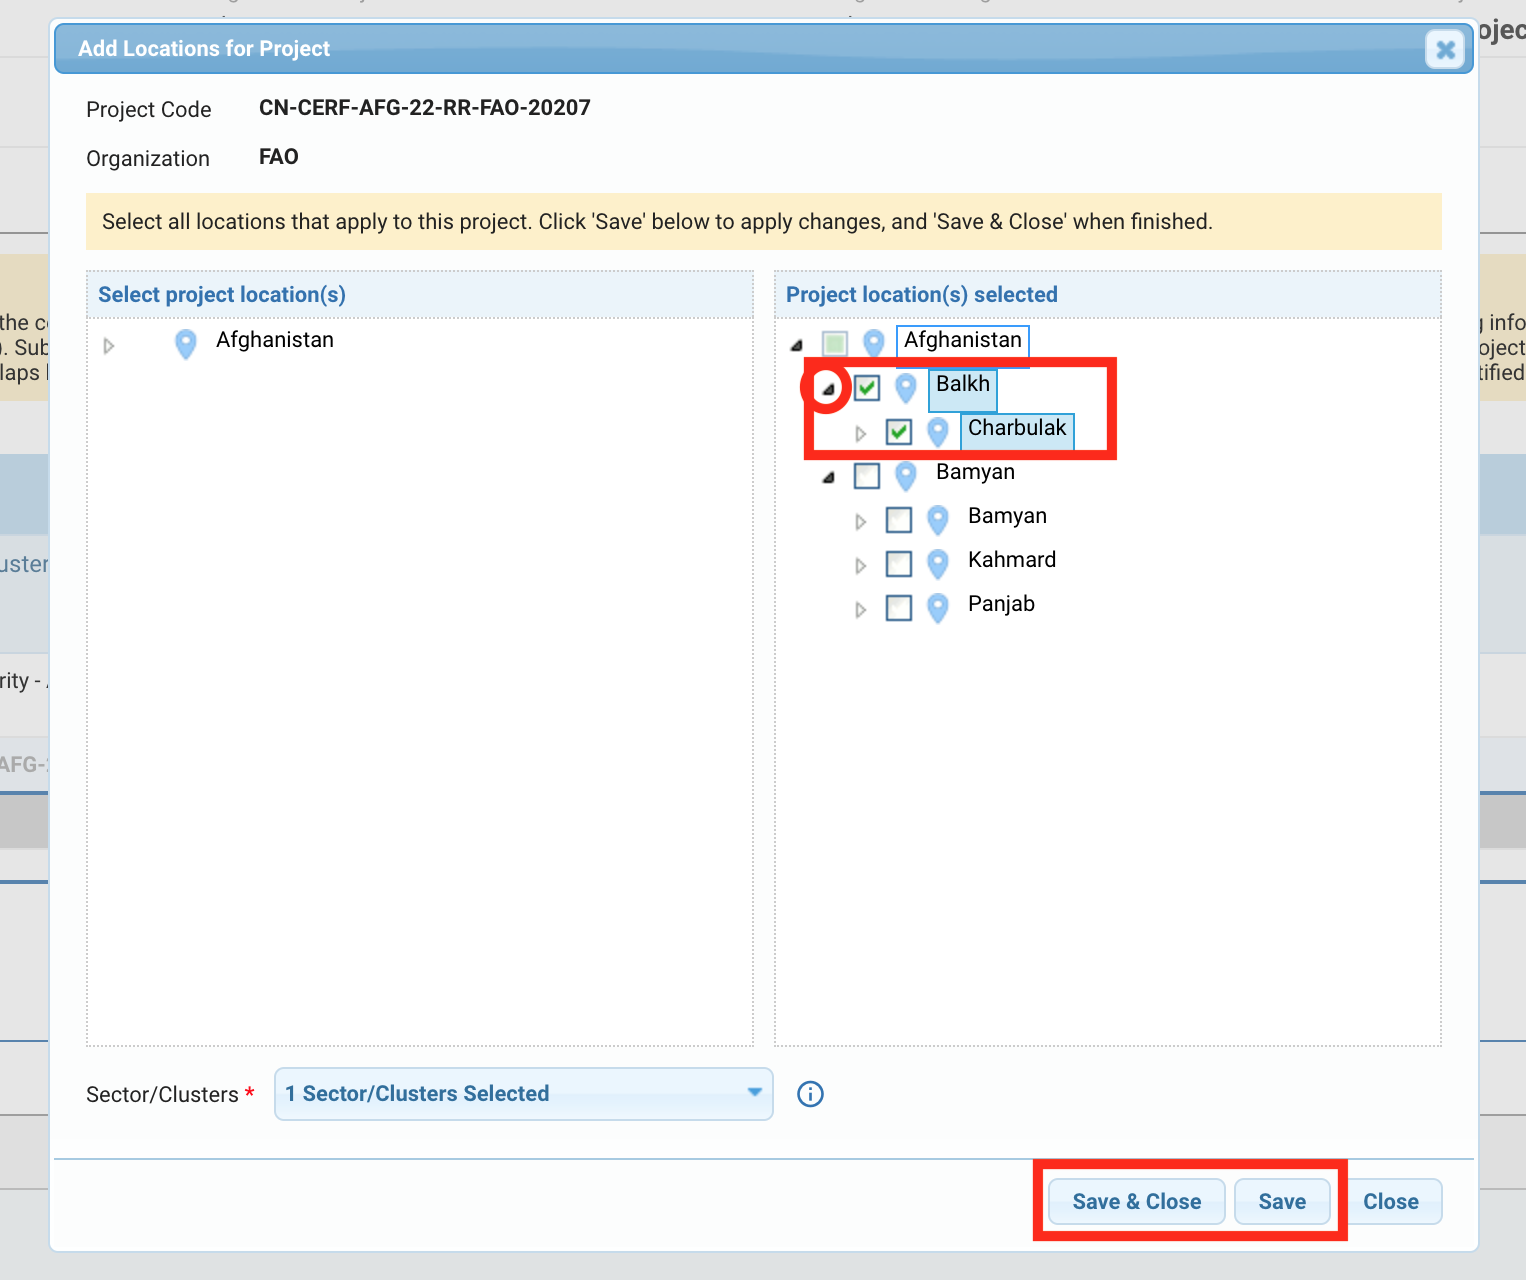
To edit the locations, click on [Add/Edit].
In the right column, ‘Project location(s) selected’, click on the arrow to display all the locations. Tick the box of the location(s) you wish to delete and click on [Save].
To add an activity, click on [Add] in the activity column.

In the pop-up window, click on [Add Activity].
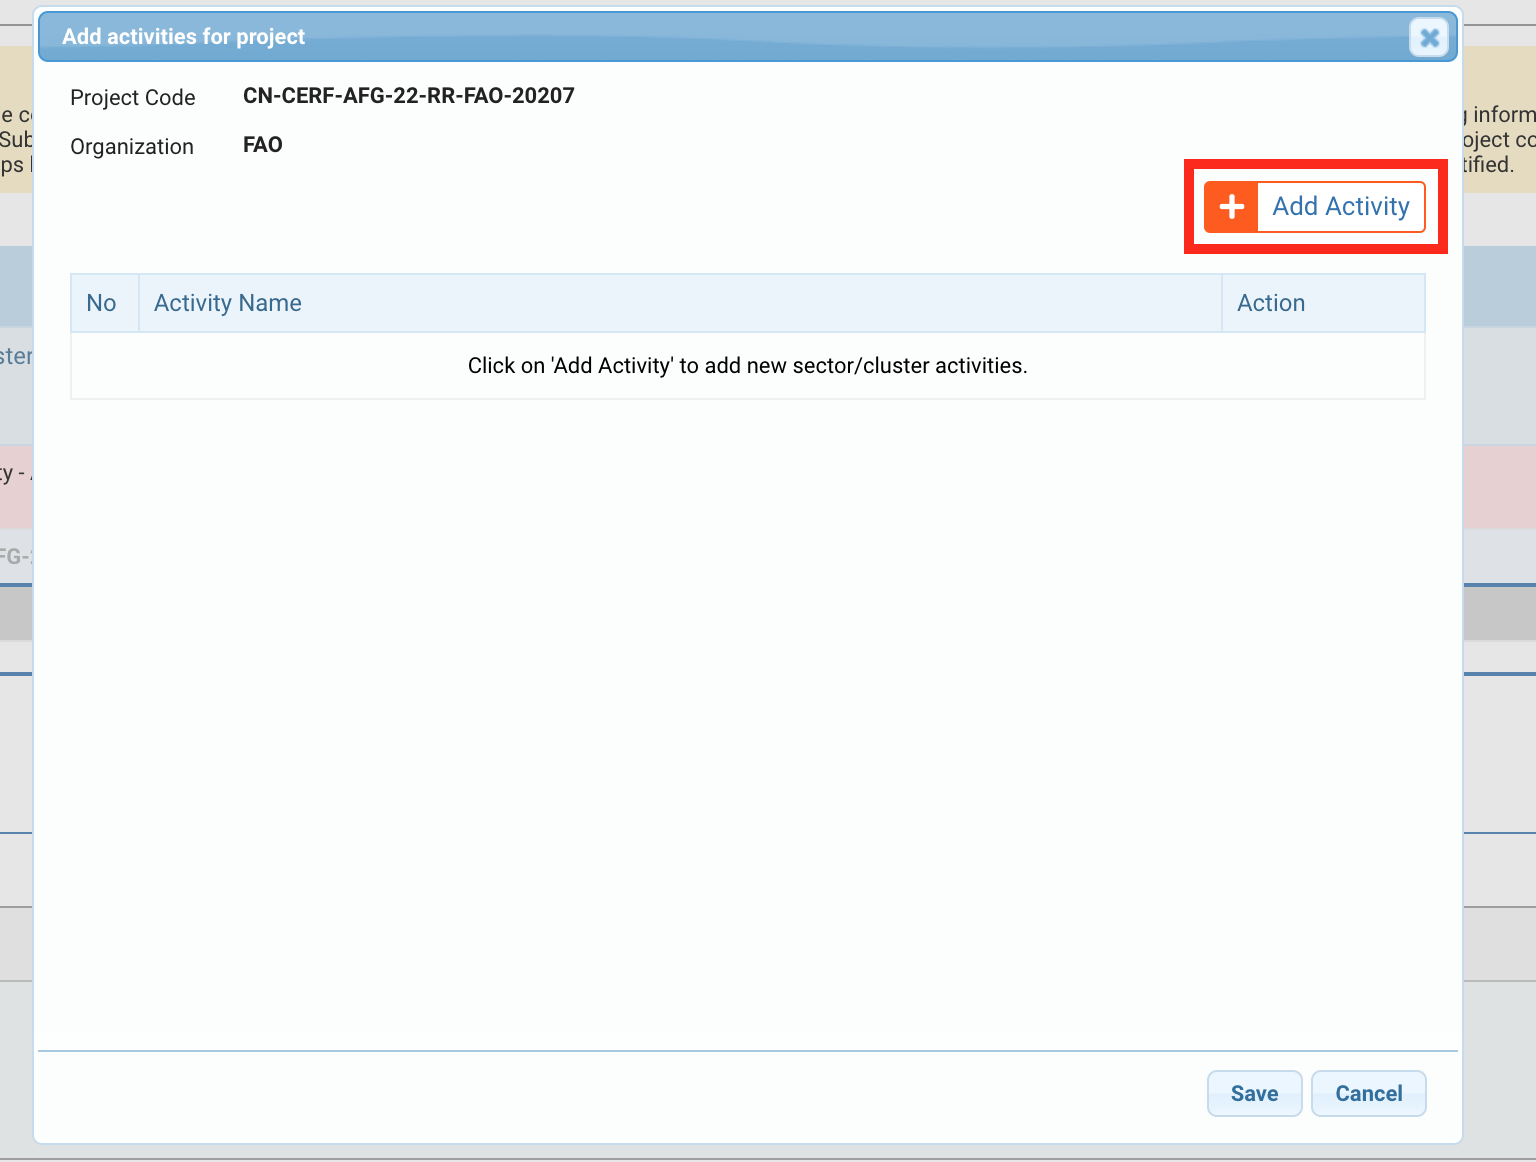
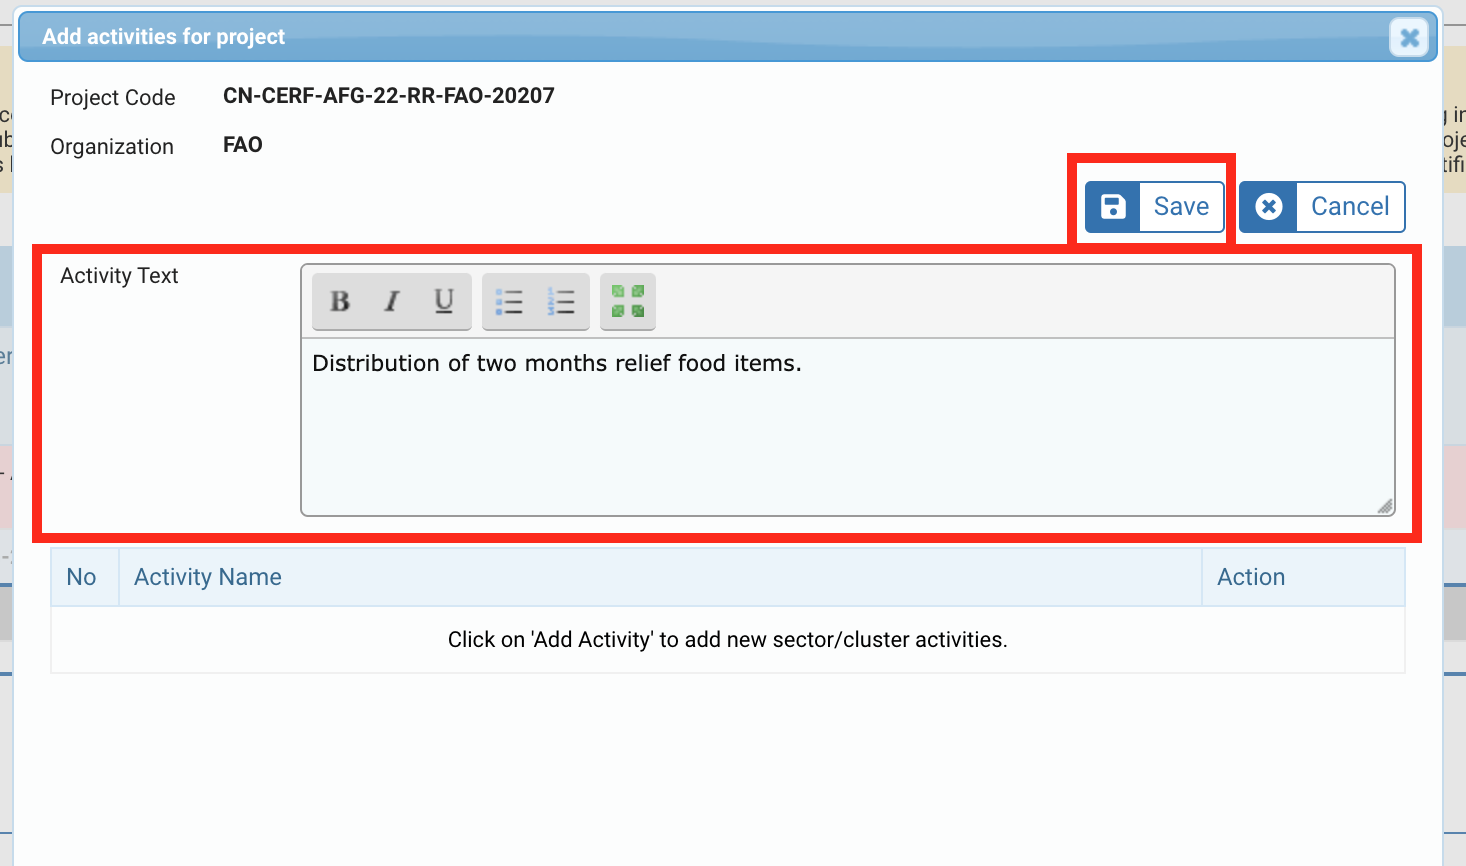
A narrative box will be displayed. Enter a brief description of the activity in the narrative box and click on [Save].
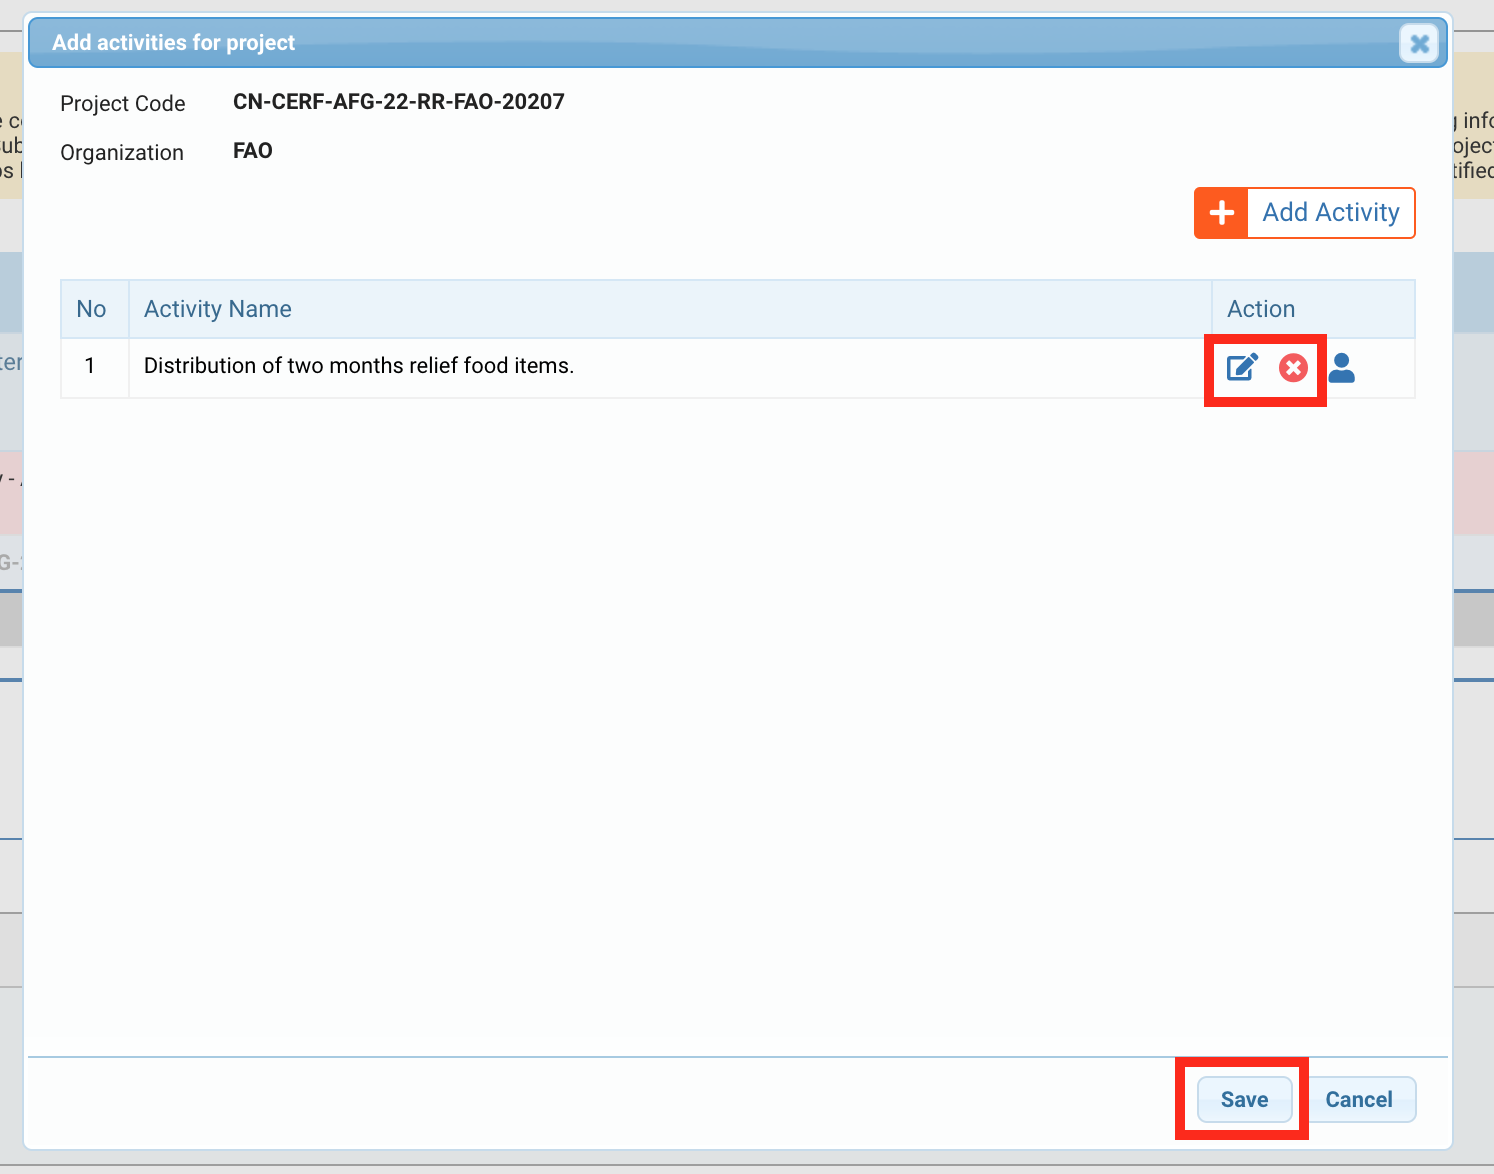
Once saved, the activity will be displayed in the table. You can click on this icon ![]() to edit the activity or this icon
to edit the activity or this icon![]() to delete it. Then click on [Save] to add the activity to the project.
to delete it. Then click on [Save] to add the activity to the project.
If the project’s row is highlighted in red, it means that one or several element(s) are missing, and you will not be able to save the tab. To see which element(s) need(s) to be rectified, hover over the warning icon at the beginning of the row.

5) Project Detail – Add a Country Focal Point
To access the project detail of a project, click on the edit icon ![]() at the beginning of its row.
at the beginning of its row.
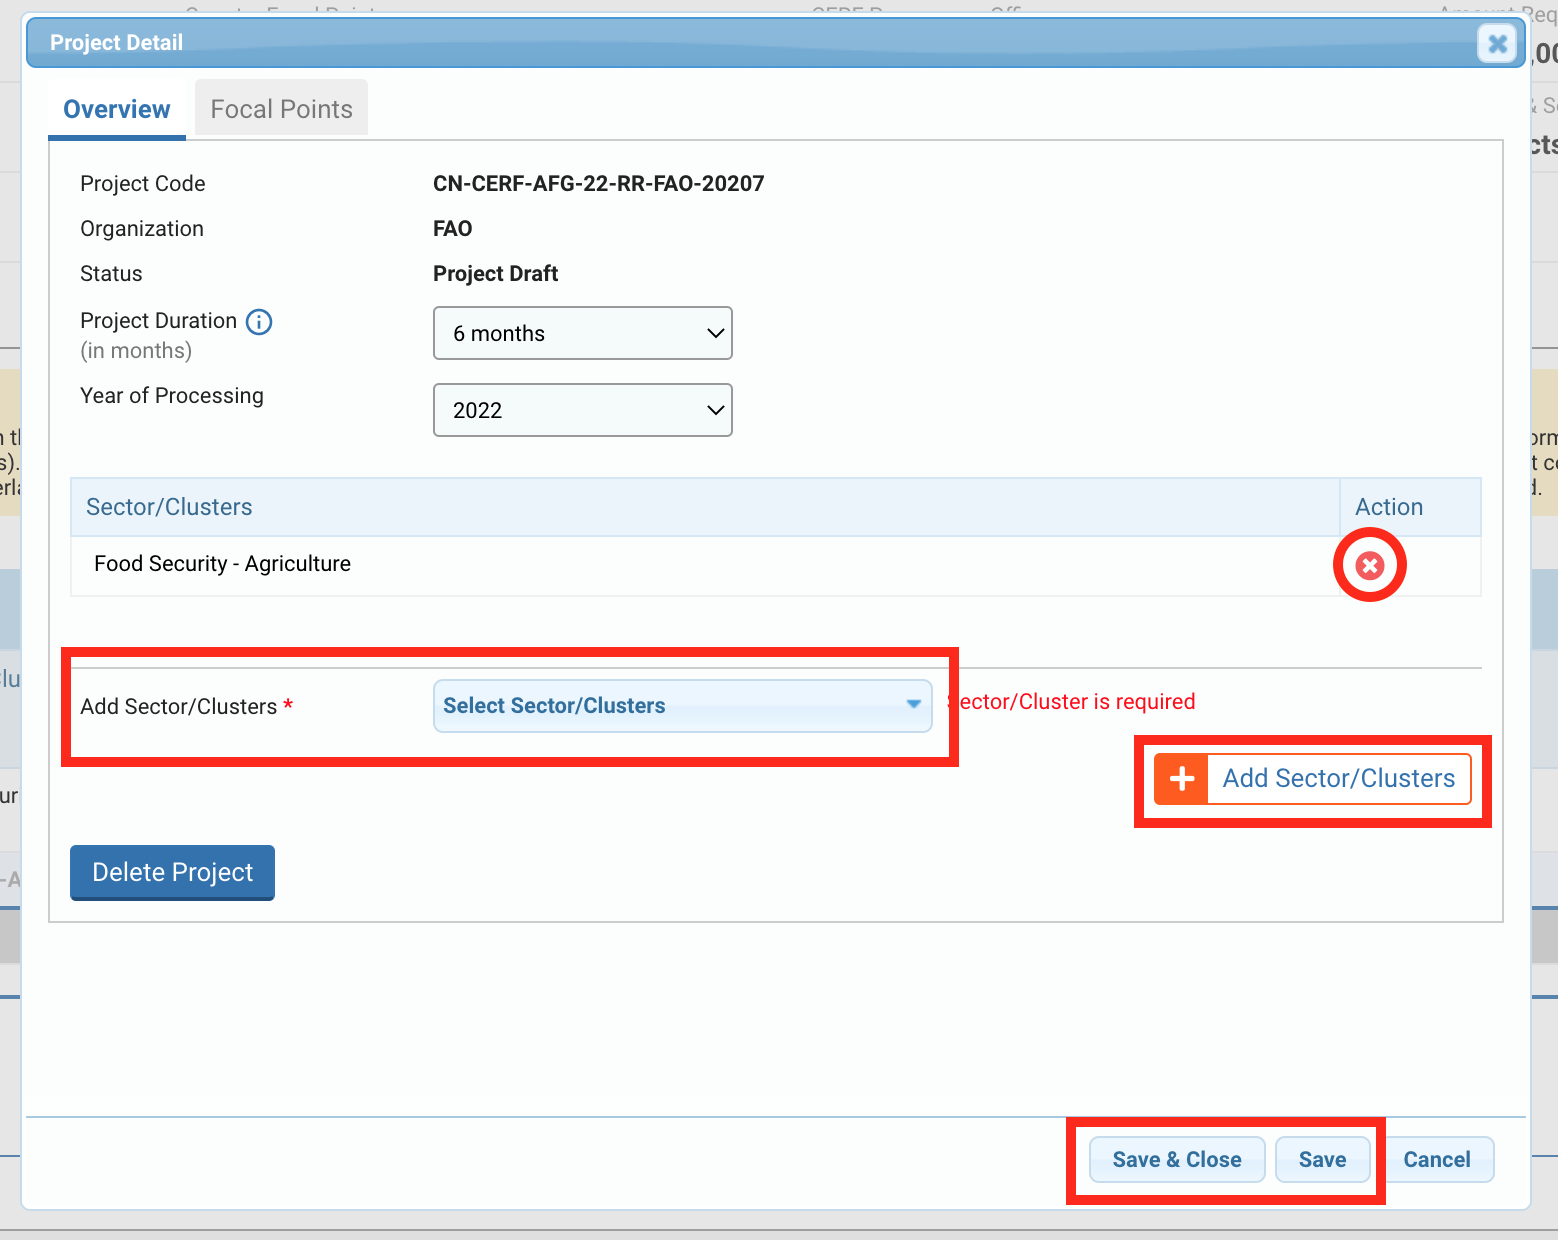
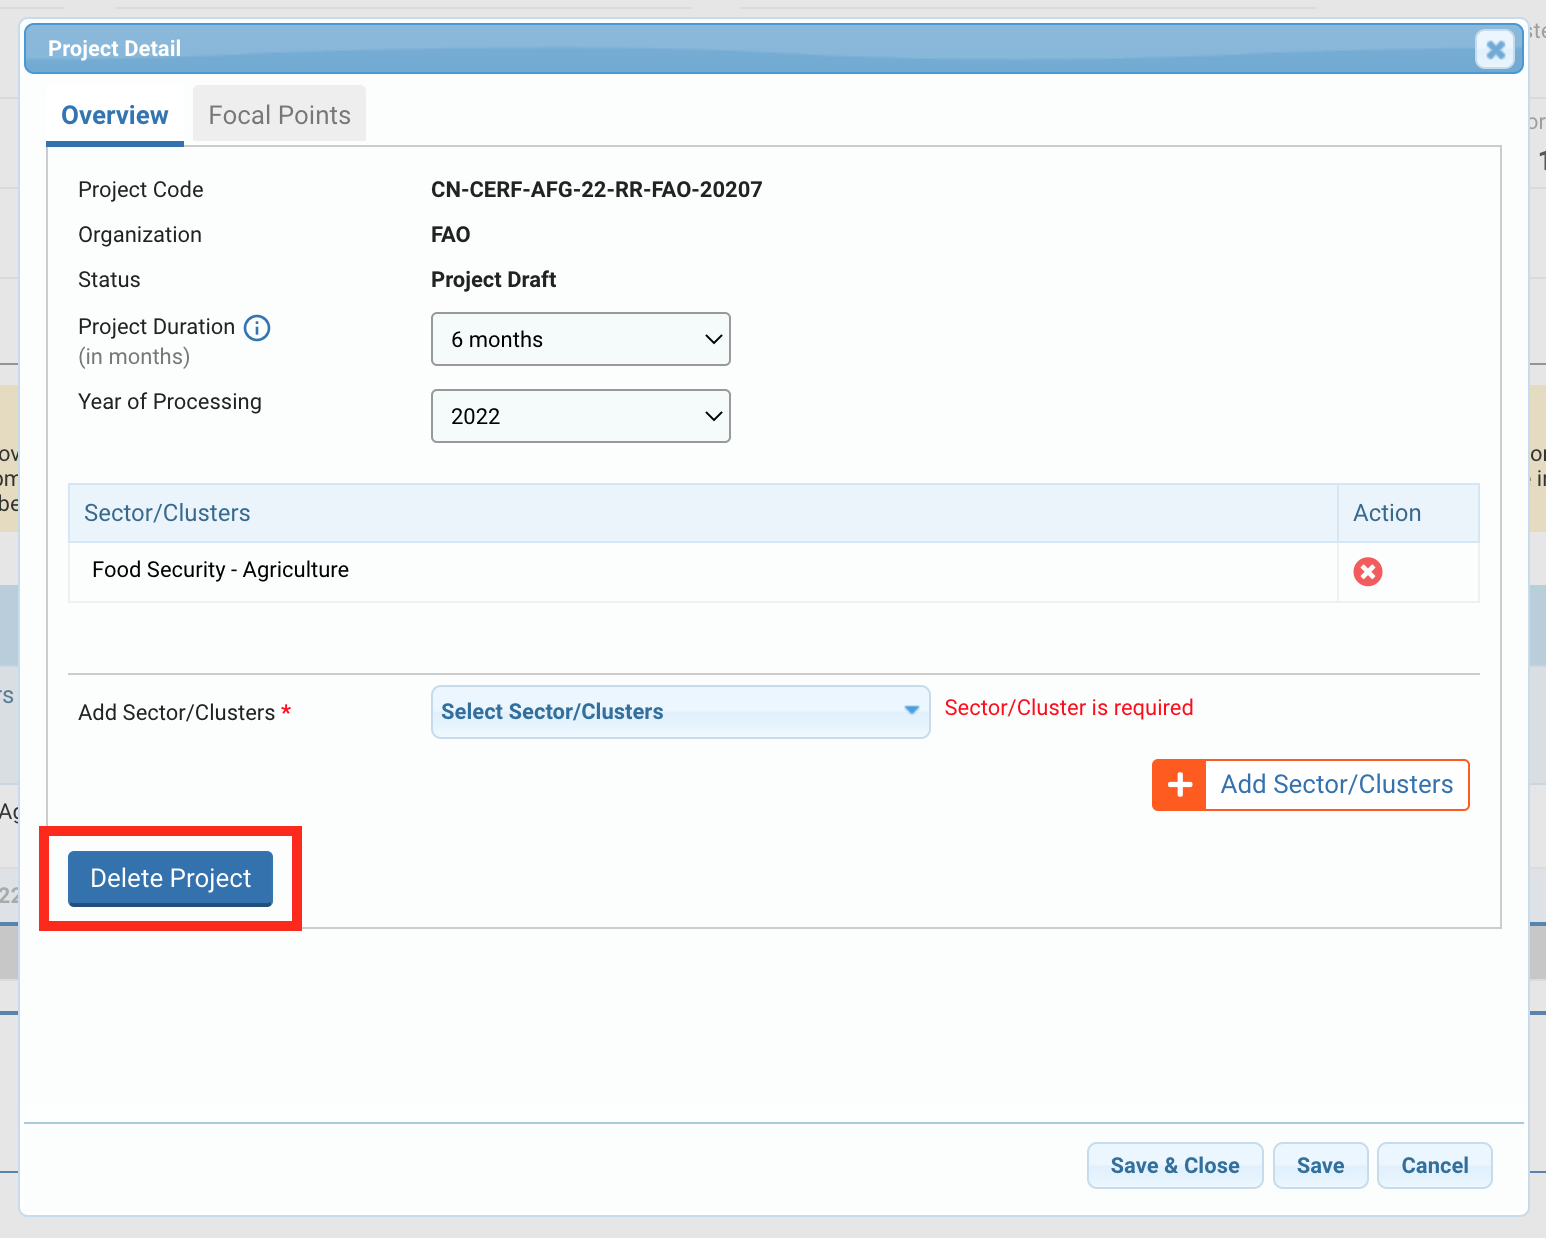
On the Project Detail pop-up window, the user can modify the project duration, the year of processing, the cluster, delete the project and add agency focal points. This window will be useful if you need to make some changes to the project, or when you will have to add an Agency Focal Point. Although it is not mandatory at this stage, you can add the Agency Focal Point if known.

The ‘Overview’ tab provides information on the project and allows you to edit the project duration, the year of processing, the cluster or delete the project.
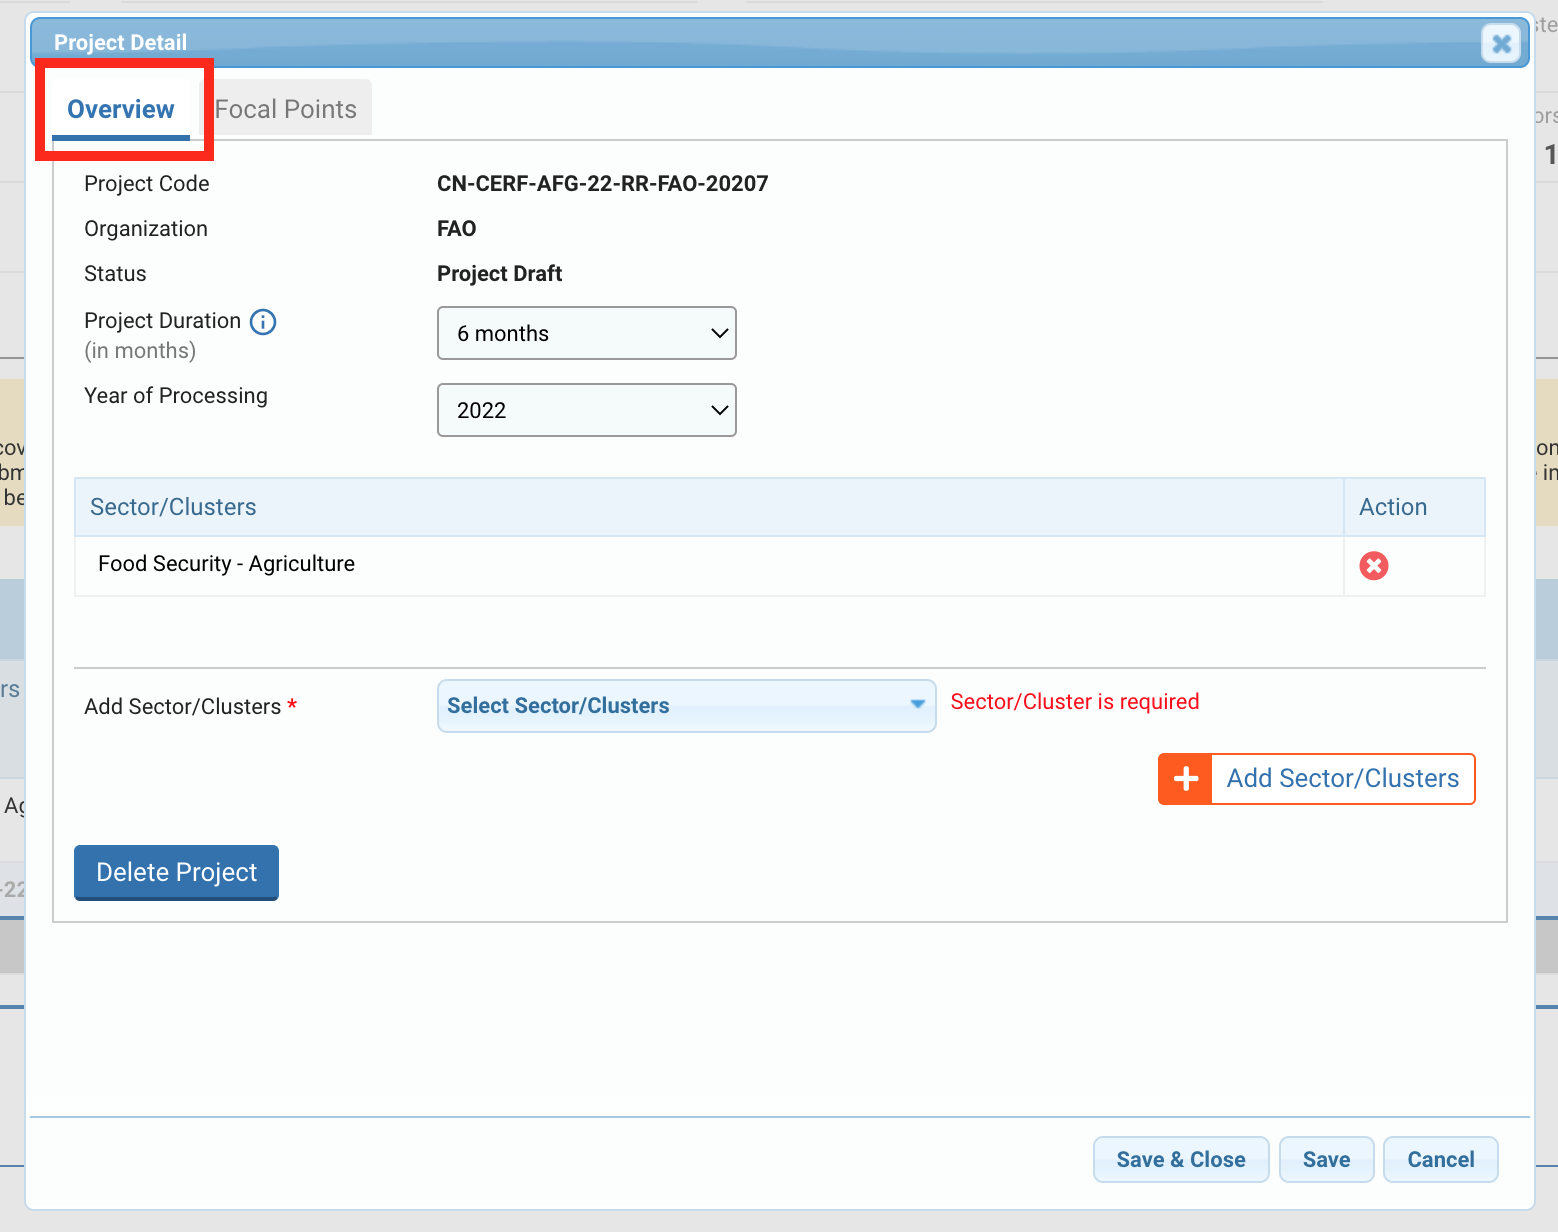
Field description:
- Project Code: the temporary code provided after you added an organization and a cluster. A new permanent code will be provided once the project proposal is created by the agency.
- Organization: the name of the organization.
- Status: the status of the project.
- Project duration: the duration of the project.
- Year of Processing: the project implementation’s year.
- Sector/Clusters: the sector/clusters. To know how to add or edit a cluster please click here.
If you want to delete you project, click on [Delete Project].
This tab allows you to add a UN focal point who will have access to all the agency’s proposals for this allocation in the country.
To add a focal point, click on [Add New Focal Point].
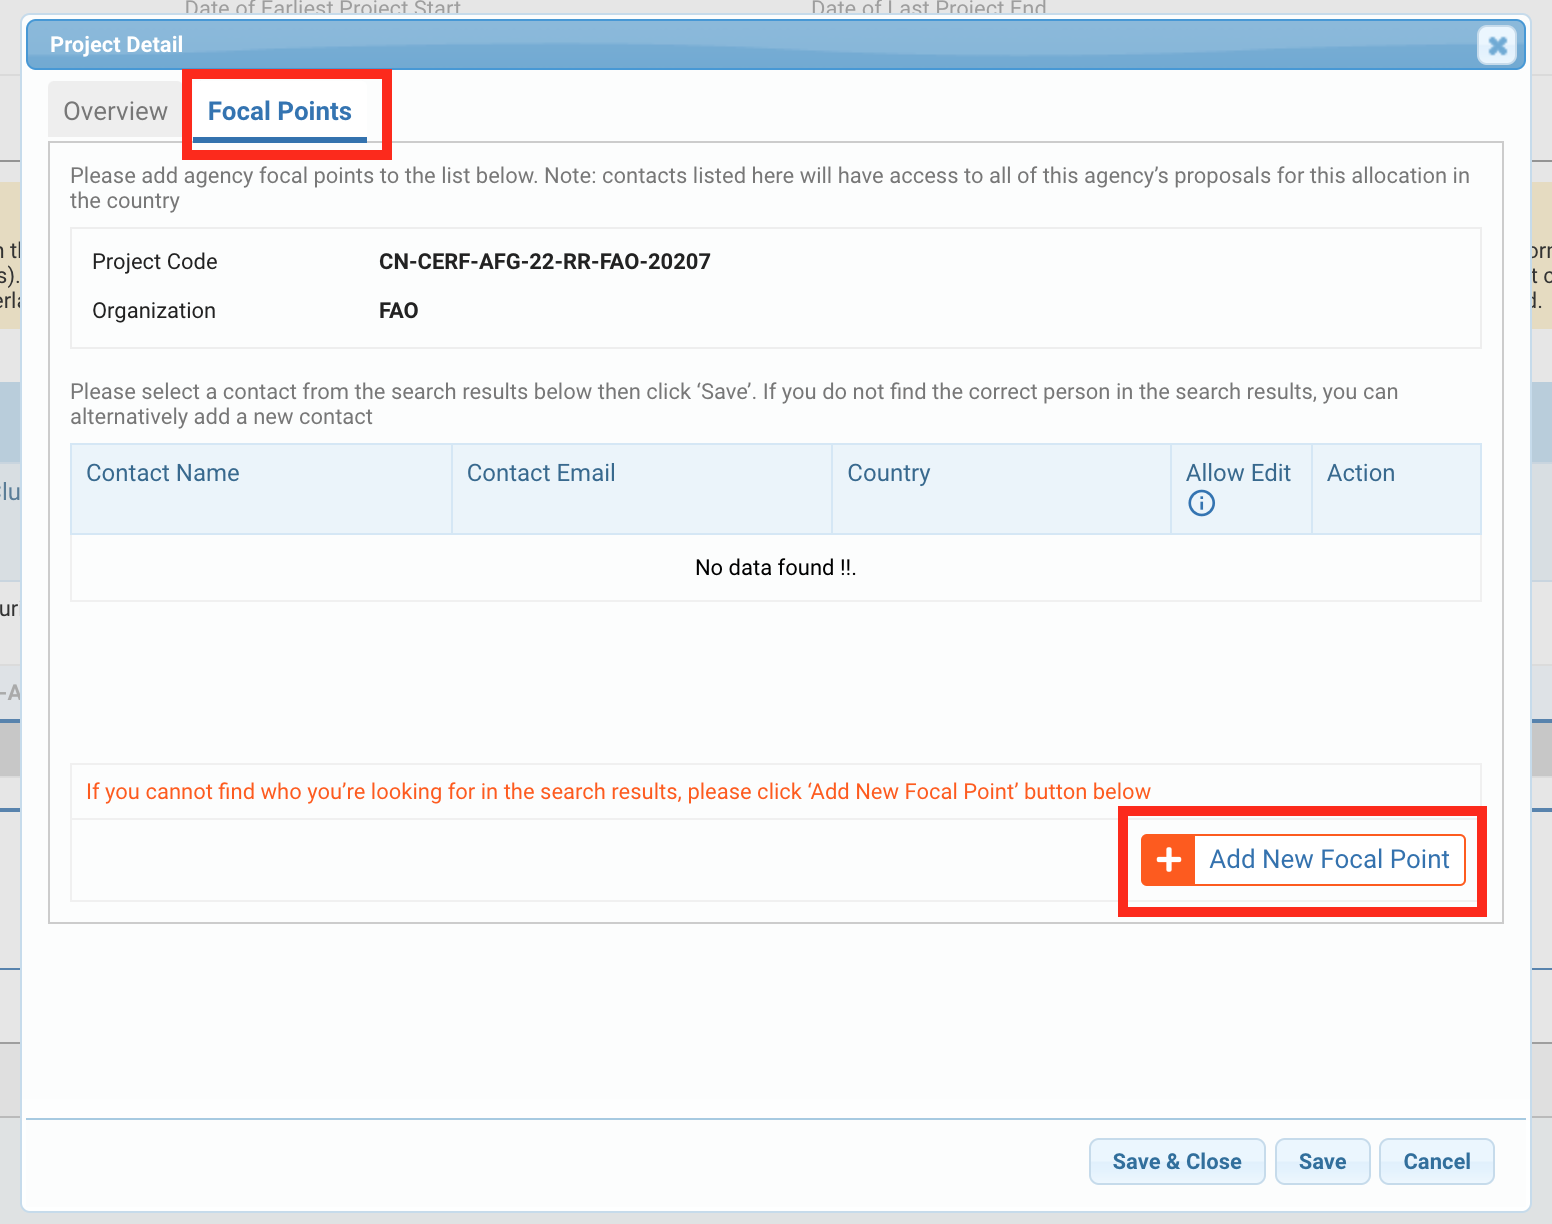
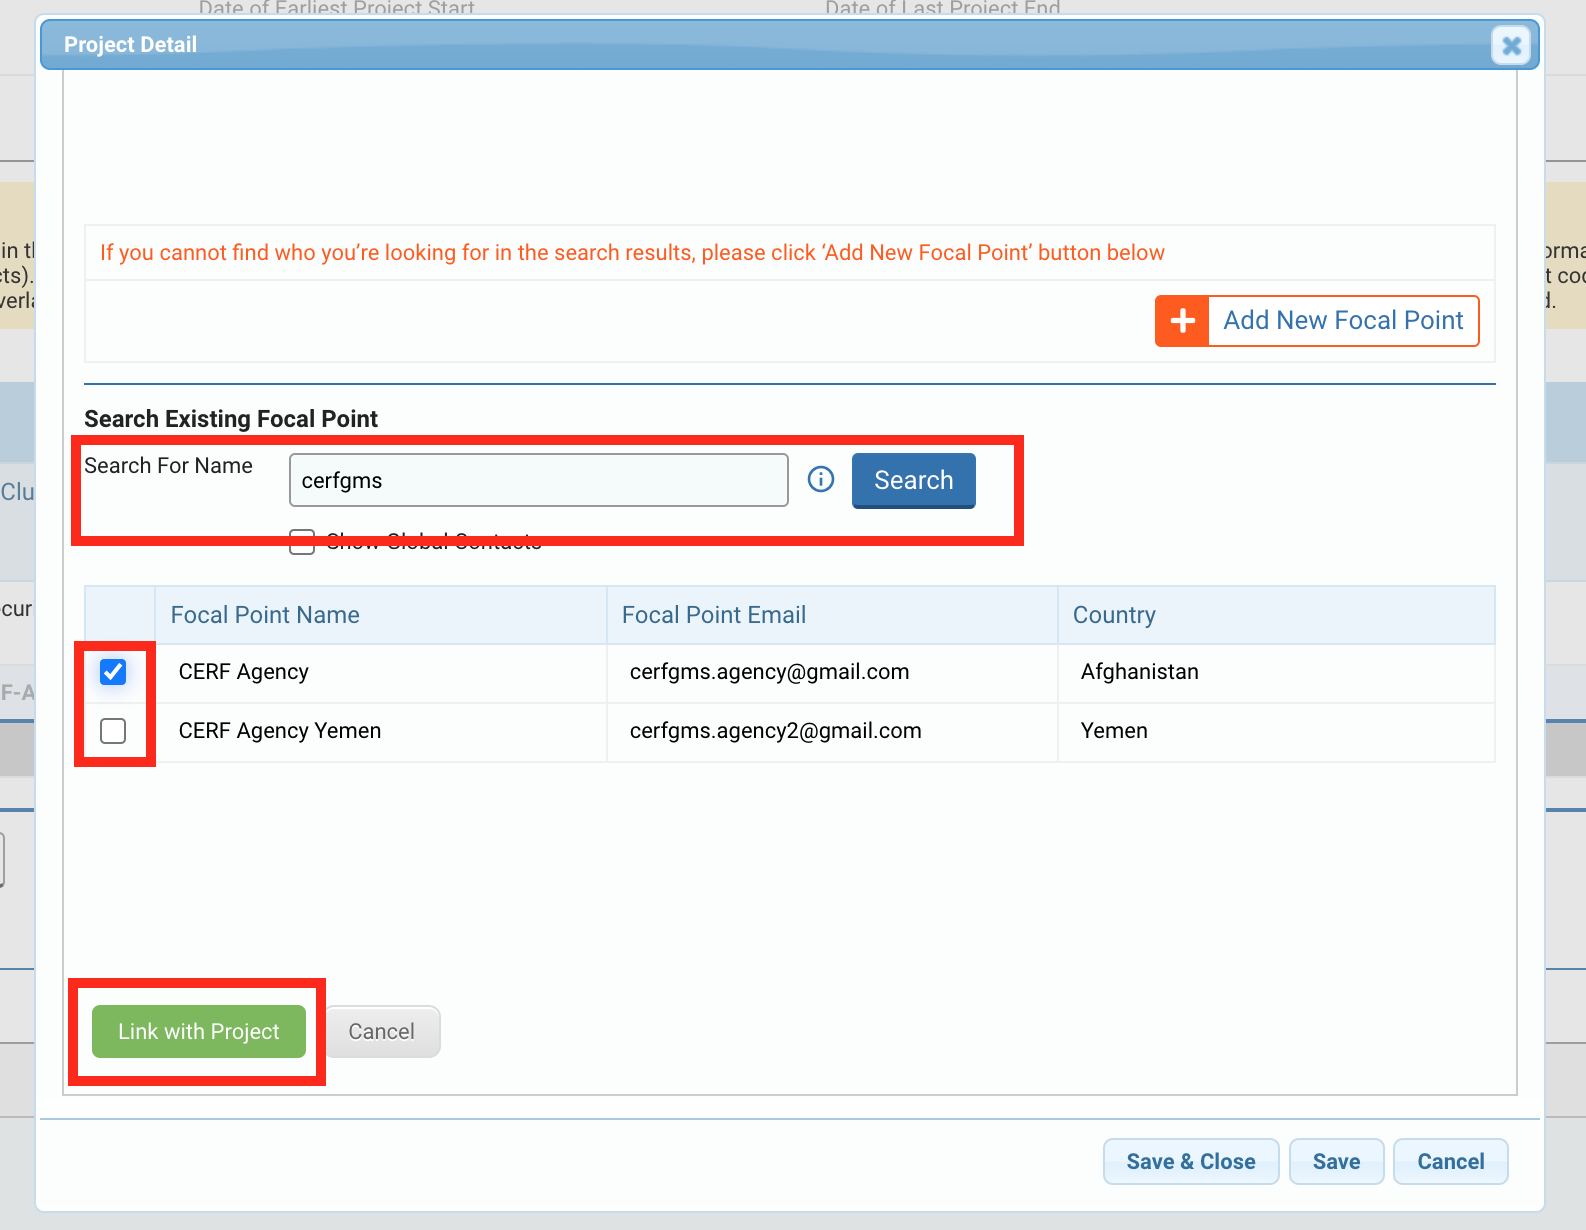
A research tool bar will appear. Enter the name of the focal point and click on [Search]. The result will be displayed in a table below. Tick the box to select the focal point and click on [Link with Project].
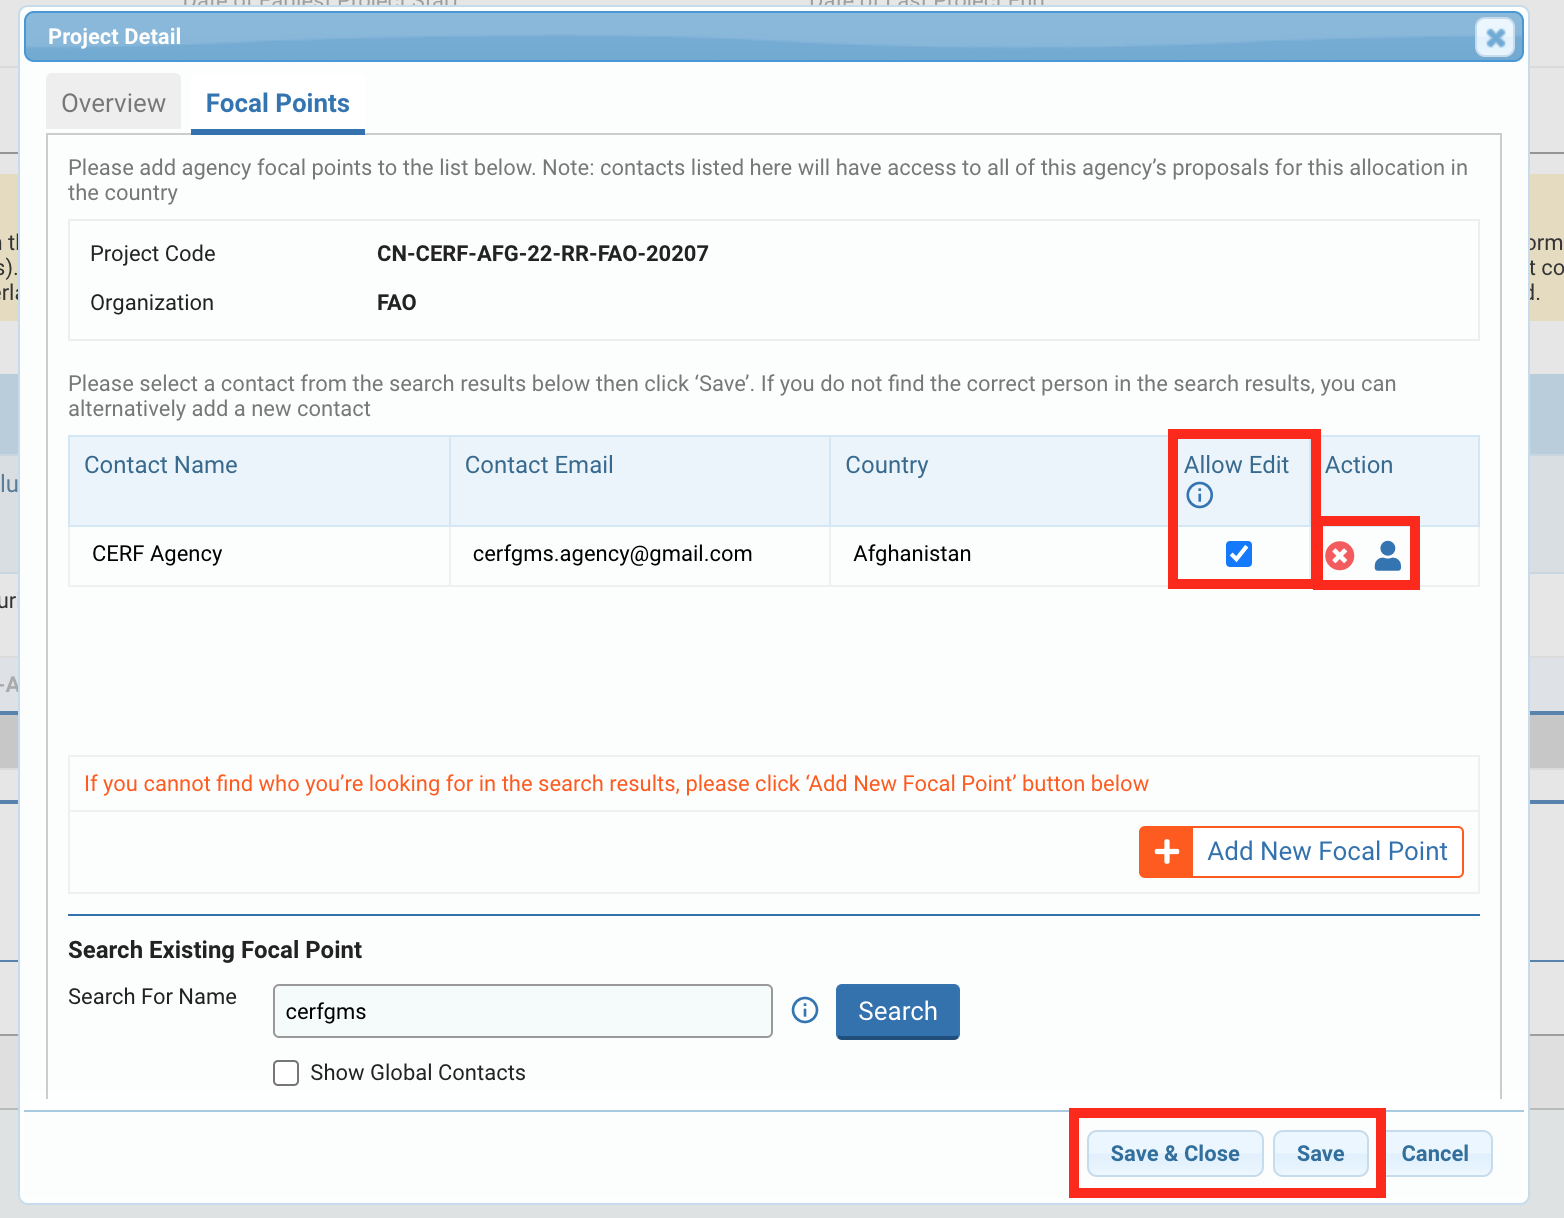
The name will be added to the contact table. You can allow or prevent the focal point from modifying the project proposal by ticking the box in the ‘Allow Edit’ column. The box is ticked by default. If you untick the box, the focal point will have a read only access to the project proposal, but will be able to add comments to each tab.
You can also delete the contact by clicking on this icon ![]() . If you hover over this icon
. If you hover over this icon ![]() , the name of the Country Officer who added the contact, and the date of entry will be displayed.
, the name of the Country Officer who added the contact, and the date of entry will be displayed.
To save the contact, click on [Save].
Once you have completed this tab, do not forget to save your progress, as the system will not automatically save it. You can find the save buttons at the top of the tab,
Or the bottom of it.
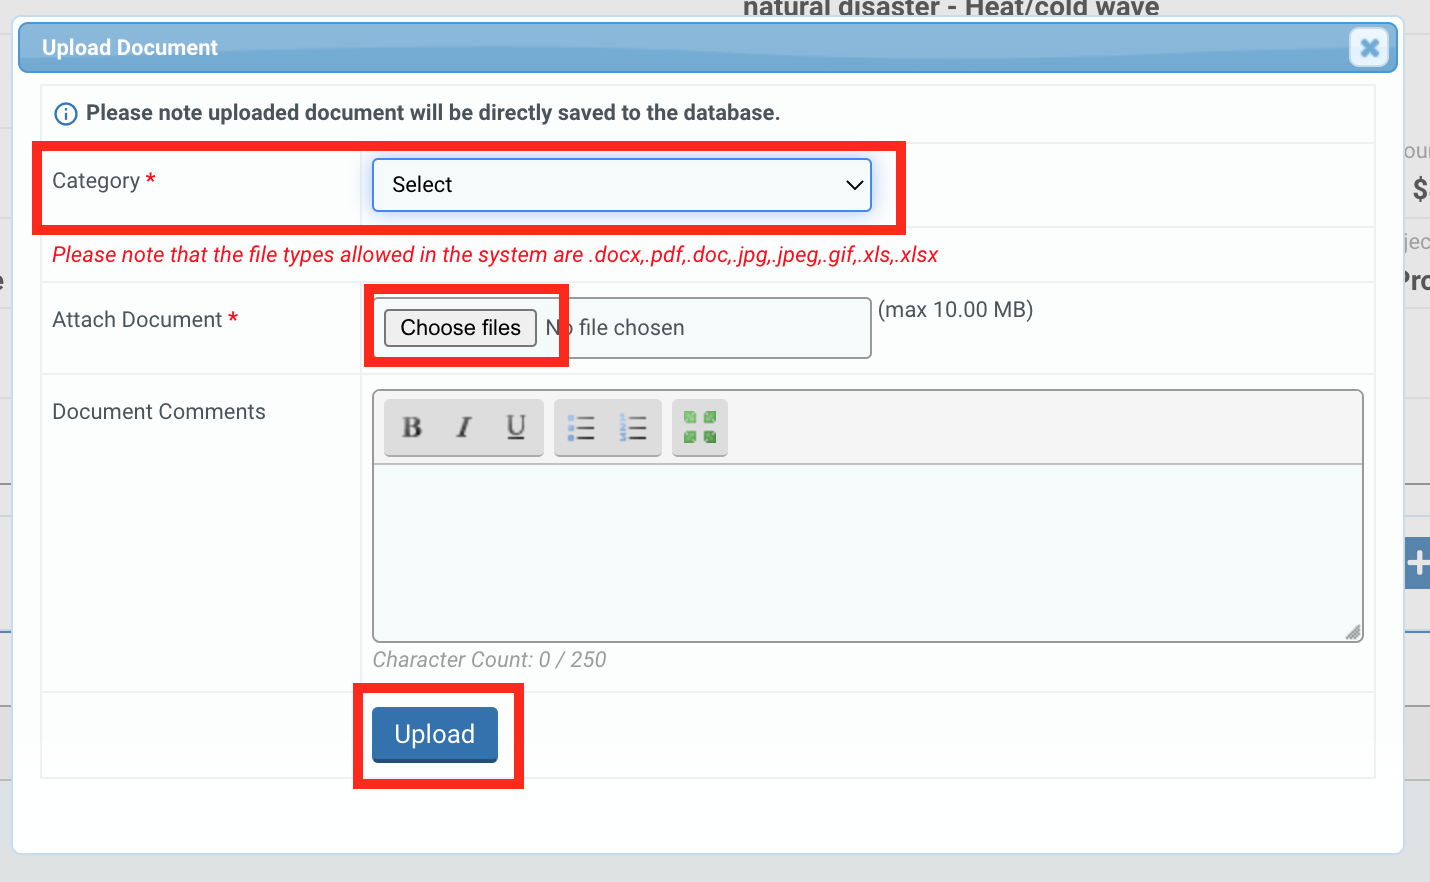
On this tab, the user can upload any relevant document to the Initial Strategy.
To add a document, click on [Add Document].
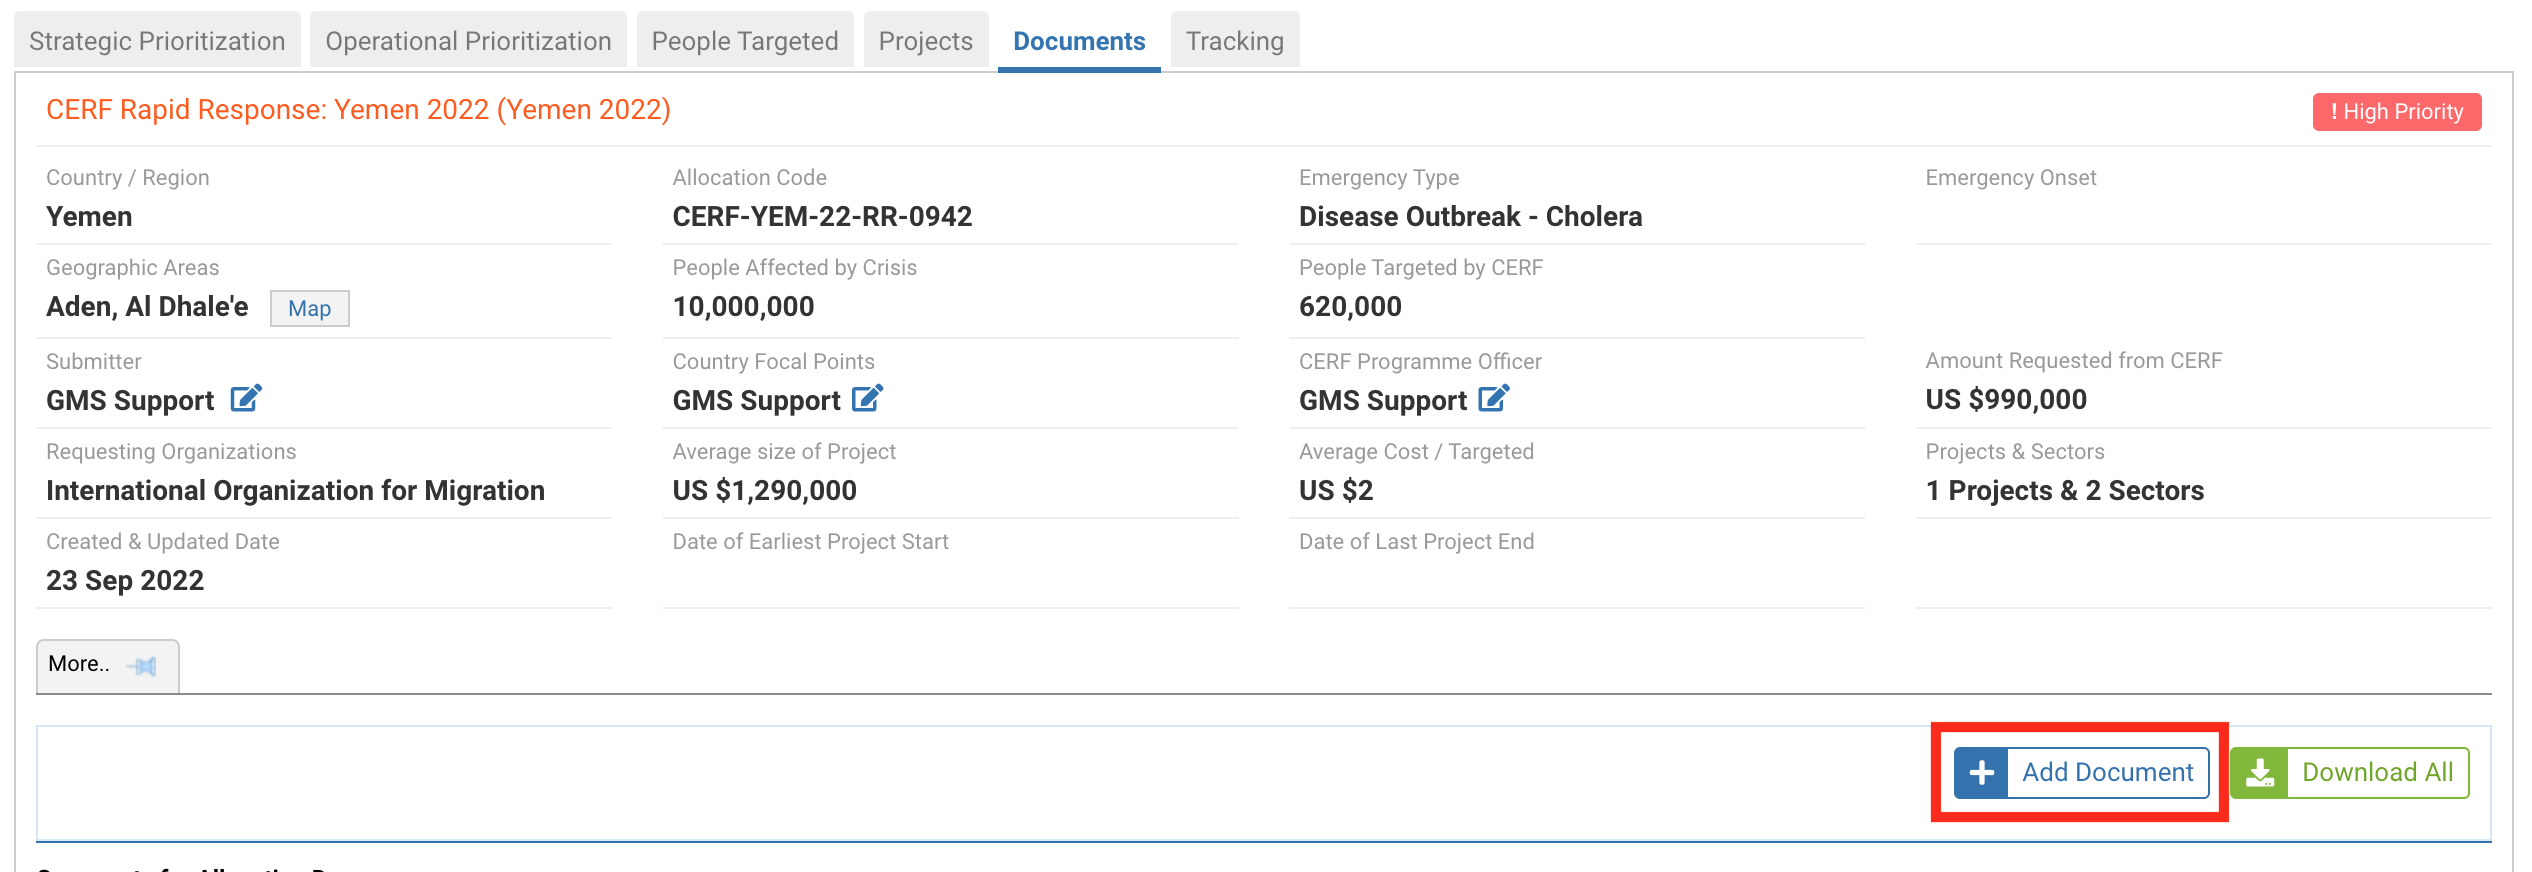
The upload document pop-up window will appear.
Select from the Category drop-down list the category of the document: CERF Allocation Report – Initial Strategy – Interim Update – Supporting Documents.
To attach a document, click on [Choose file], and select the document you would like to upload.
Please note: the file types allowed in the system are .docx, .pdf, .doc, .jpg, .jpeg, .gif, .xls, .xlsx, and the size of the document should not be greater than 10 MB.
You can leave a comment in the “Document Comments” narrative box if necessary.
Finally, click on [Upload] to upload the document.
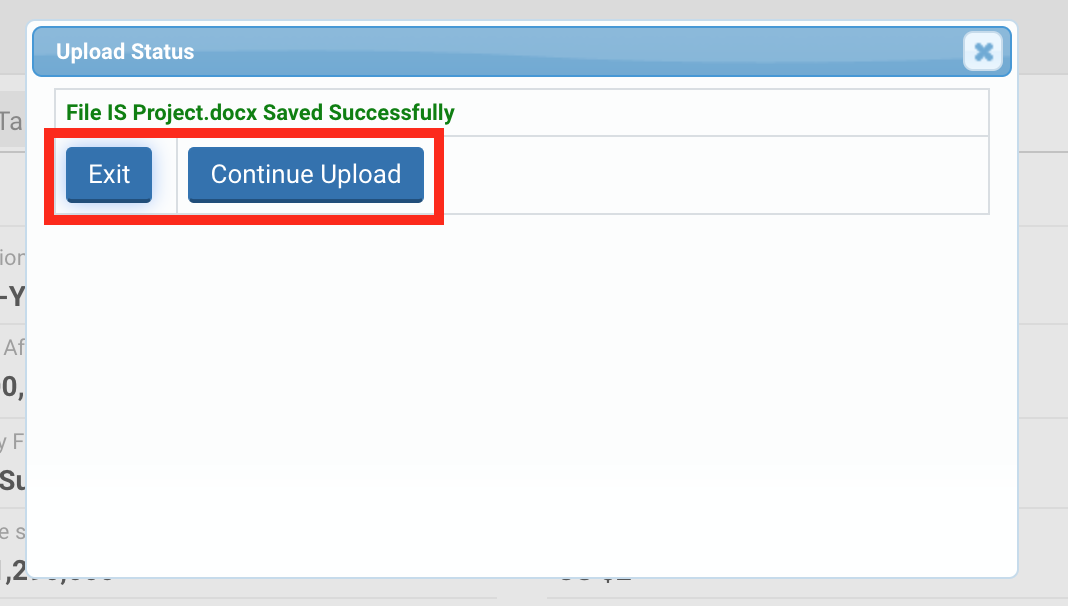
After you have clicked on [Upload], a pop-up window will be displayed. If you do not wish to upload any additional documents, click on [Exit]. Otherwise click on [Continue Upload].
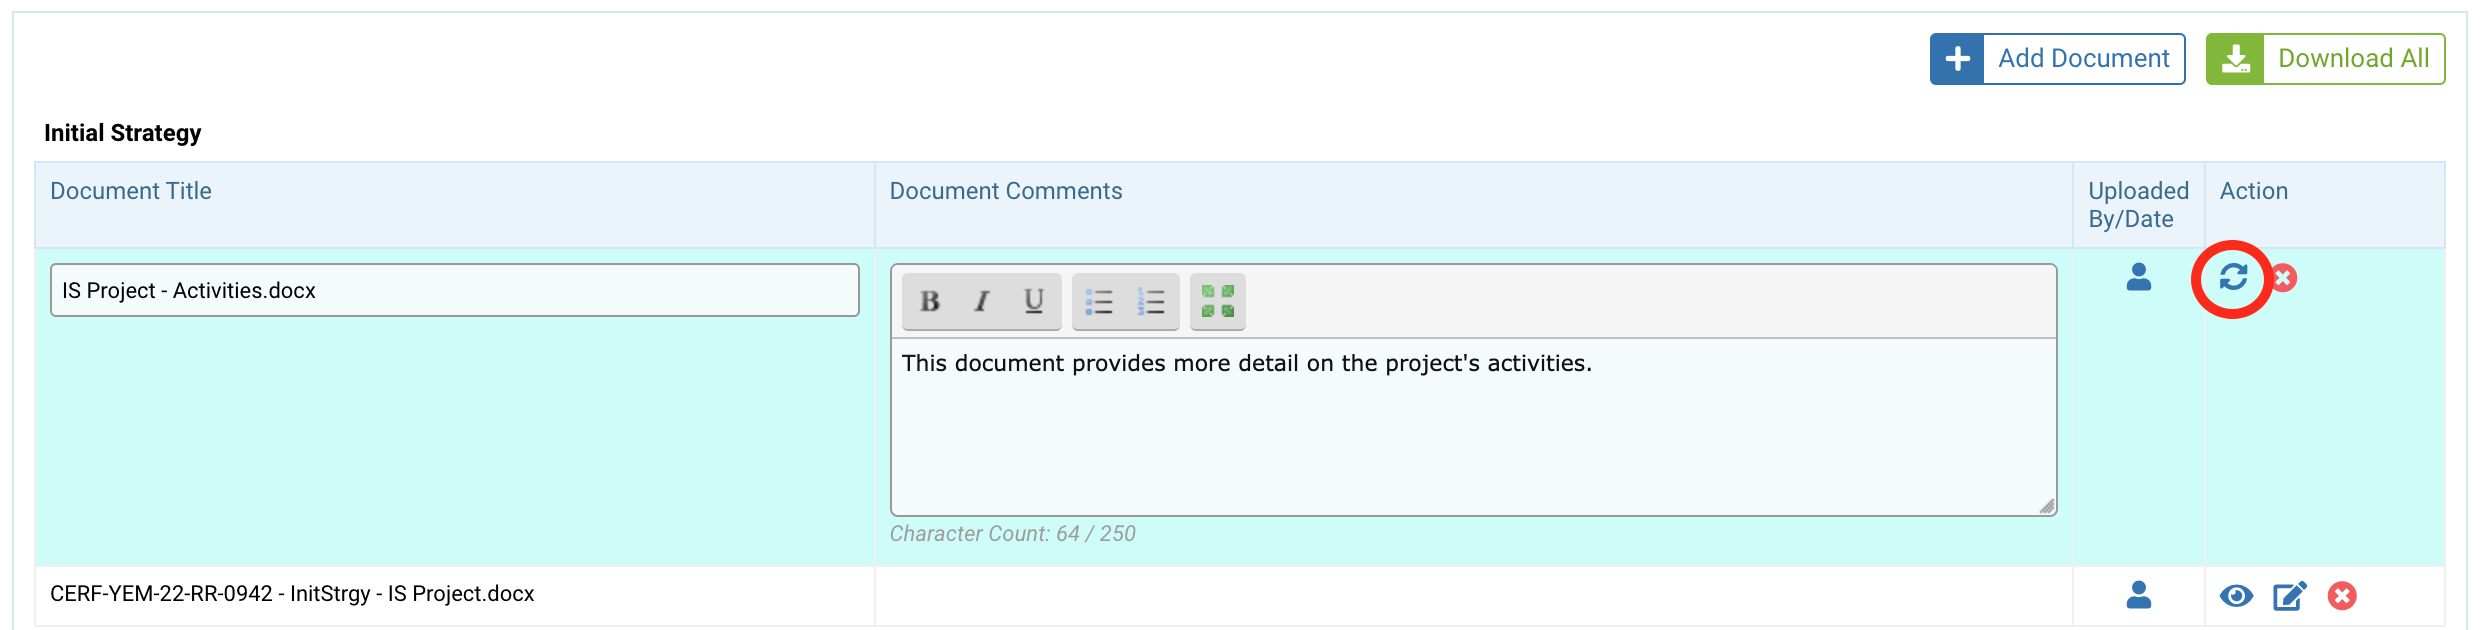
The uploaded document(s) will be displayed in a table. Click on ![]() to delete a document and on
to delete a document and on ![]() to view the document.
to view the document.
If you wish to edit the document, click on ![]() .
.

You will be able to edit the name of the document and add or edit a comment. To save your update, click on ![]()
The tracking tab displays the workflow that was created and the status of the allocation. It will show you the history of the statuses, identifying the user and timestamp of a change in stage.
VII) Send the Initial Strategy to CERF HQ
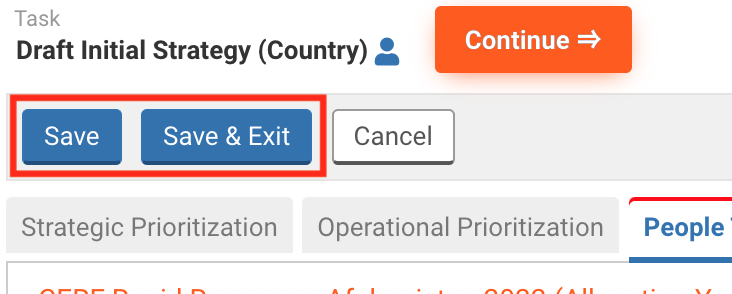
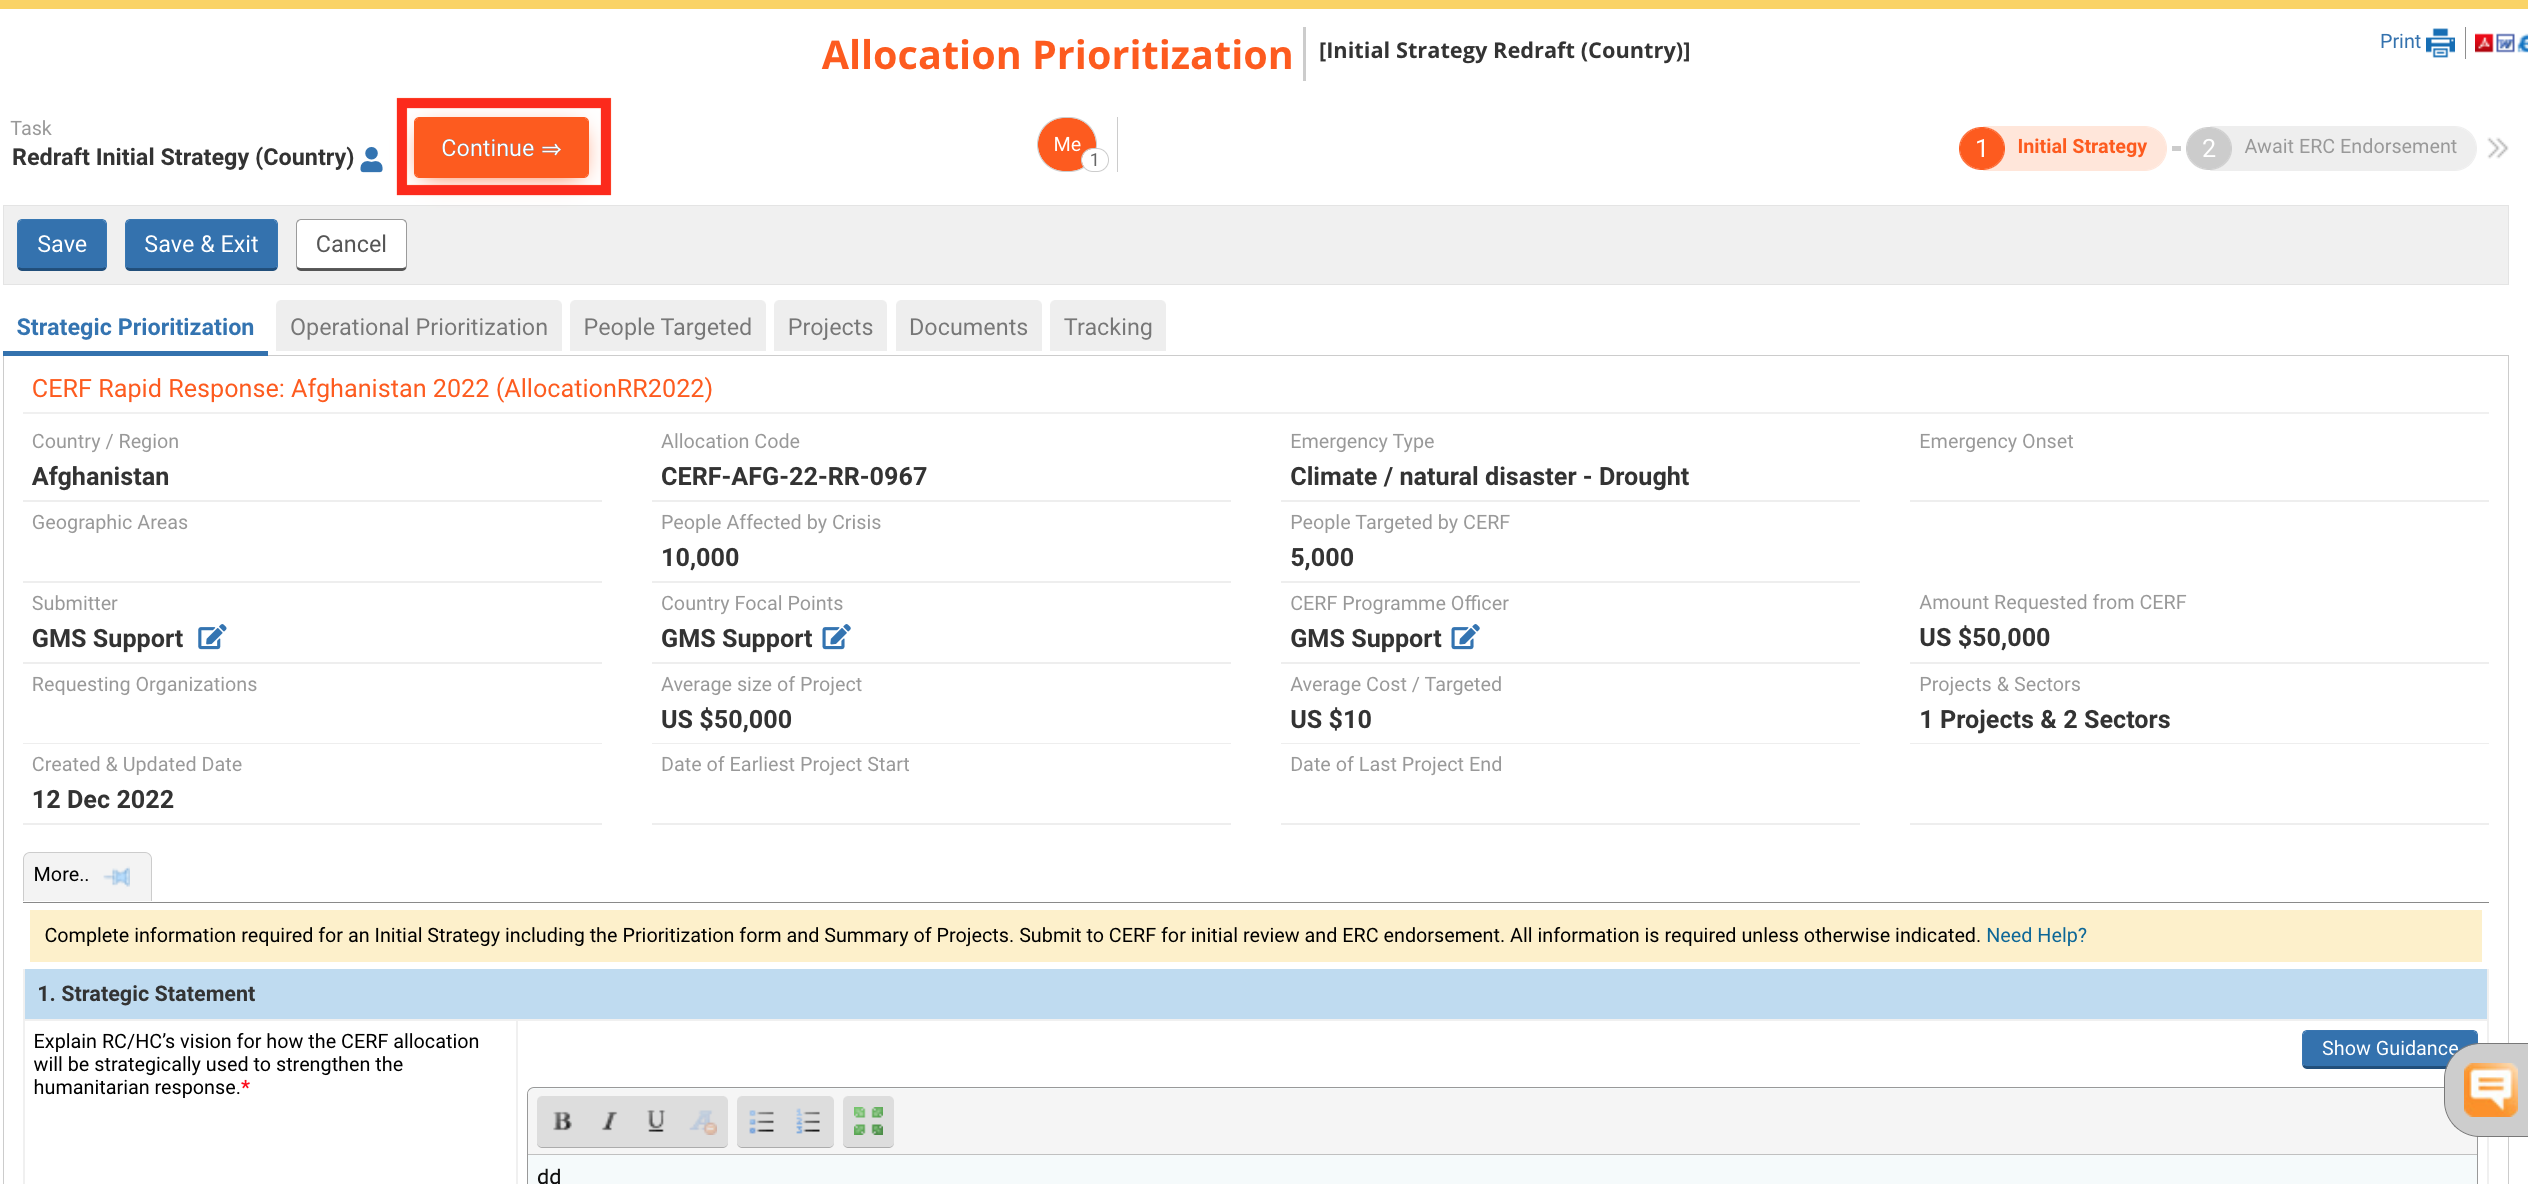
Once the Initial Strategy form is completed, click on [Continue] to open the task page and move forward to the next step.
The task options page displays all the tasks that the Country Office can perform at this stage of the allocation.
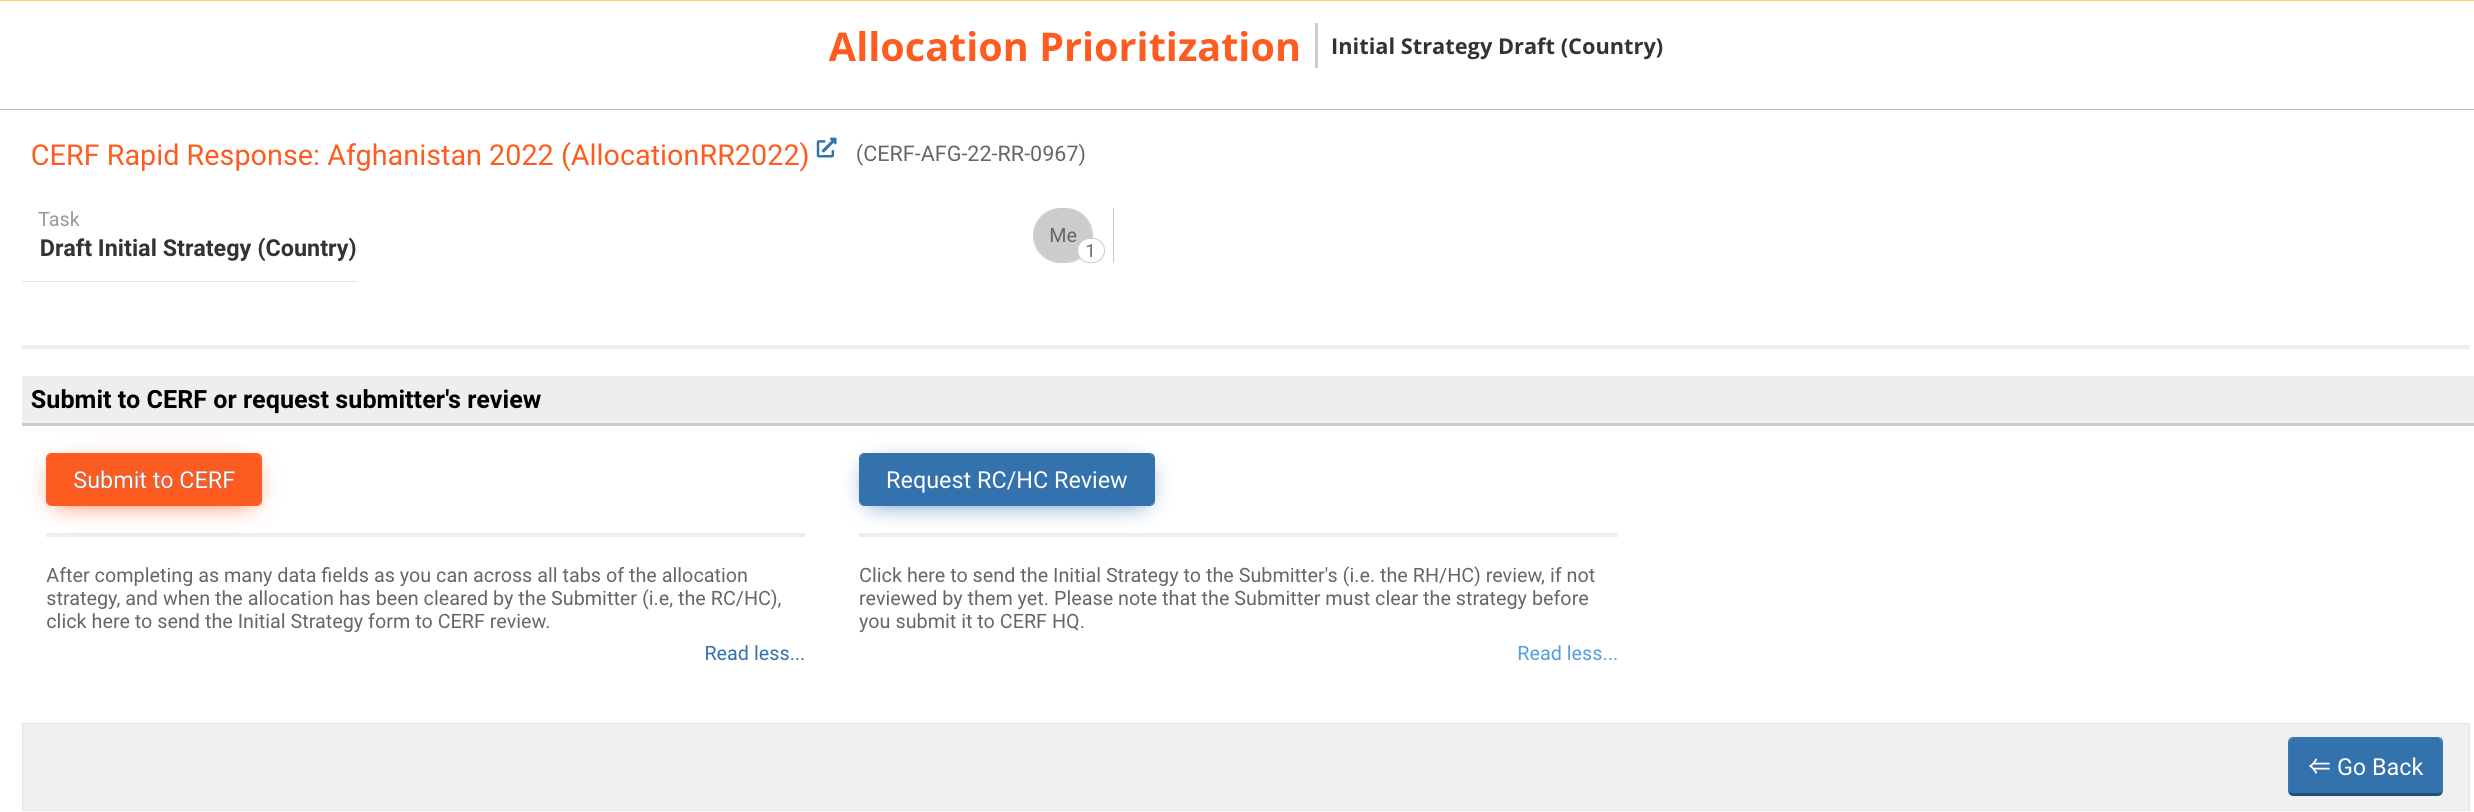
You can click on the name of the task to open its dedicated article in the help portal.
- Submit to CERF: once the Submitter has cleared the allocation (i.e., the RC/HC), click here to send the Initial Strategy form to CERF review. Please ensure that you have completed as many data fields as you can across all tabs of the allocation strategy. A request with missing information will likely be sent back for redrafting and can contribute to processing delays.
- Request RC/HC Review: click here to send the Initial Strategy to the Submitter's (i.e., the HC/RC) review, if not reviewed by them yet. Please note that the Submitter must clear the strategy before you submit it to CERF HQ.
VIII) Redraft the Initial Strategy – the comment section
After review, the Programme Officer may send the Initial Strategy back for correction. Upon receiving the Initial Strategy form for re-draft, the Country Office will receive an email alert indicating that the form has been sent back. The Country Office can then log into OneGMS and open the form from the home page.
An icon will be displayed next to the tab’s name to indicate that the reviewer has left at least one comment. You can view all the comments at the end of the tab.
Please review the comments and make the necessary changes before resubmitting the Initial Strategy.
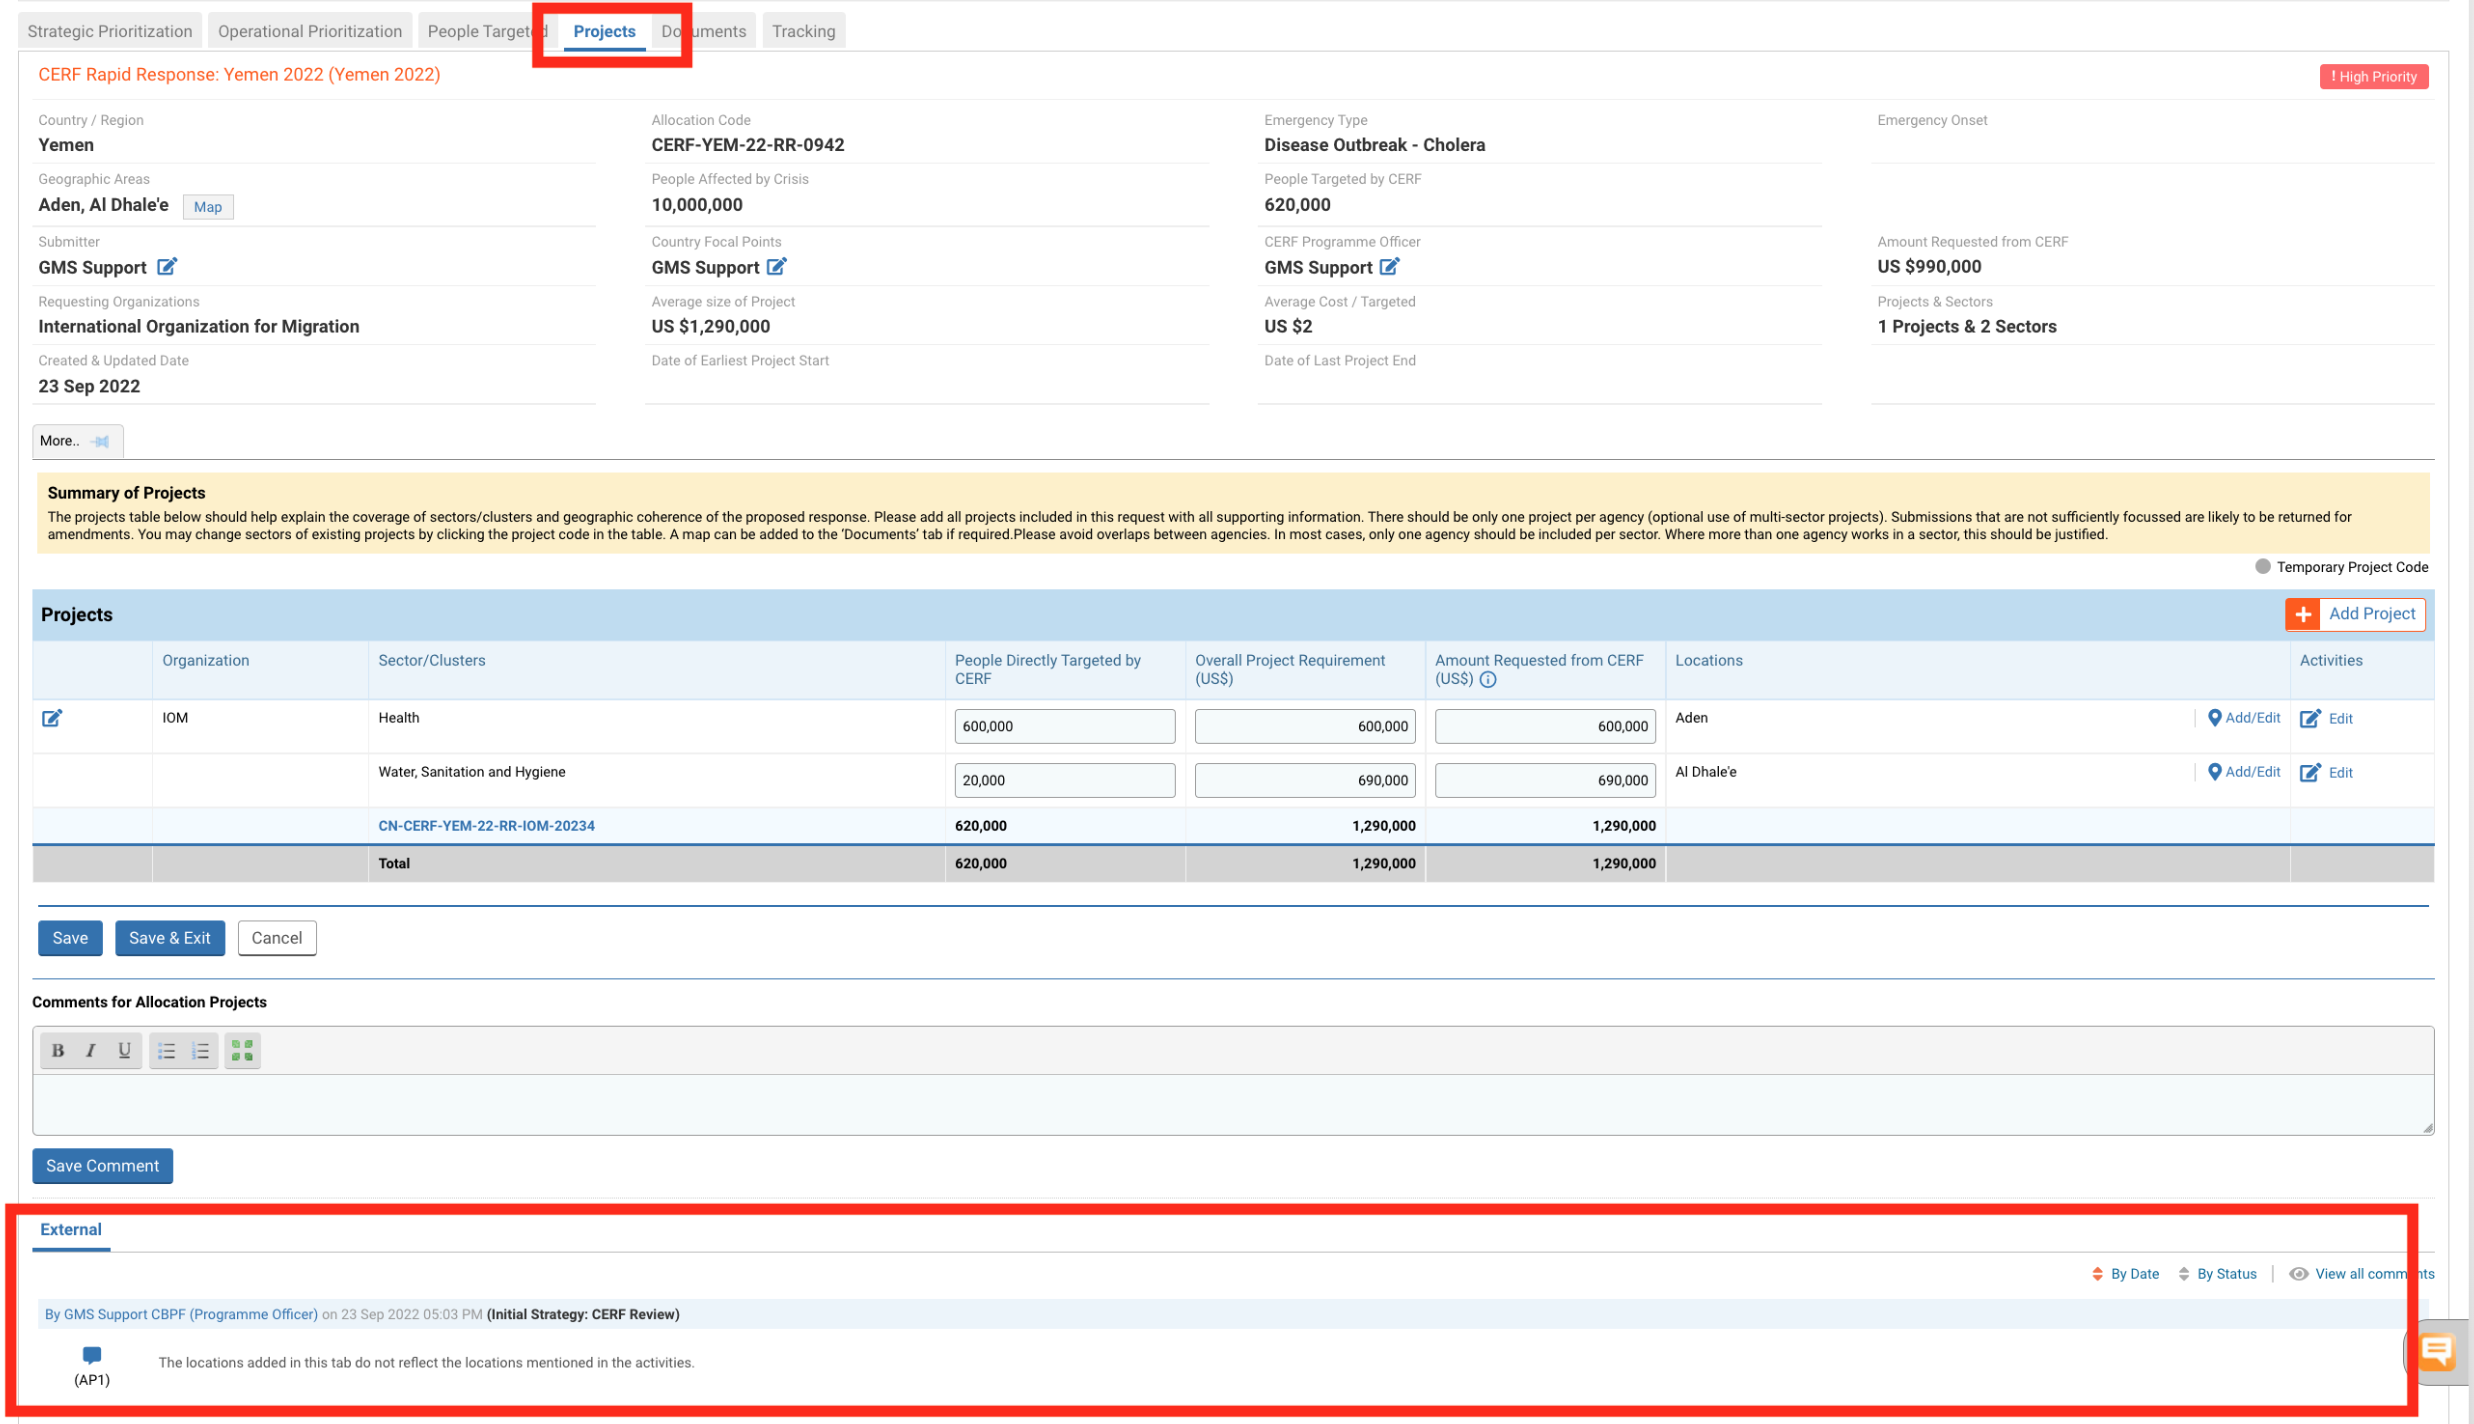
You also have the possibility to open all the comments that were made in one tab by clicking on ‘View all comments’.

It will open a new window from which you will be able to view, edit and print out all the comments. To print the comment(s), click on ‘Print Comments’.
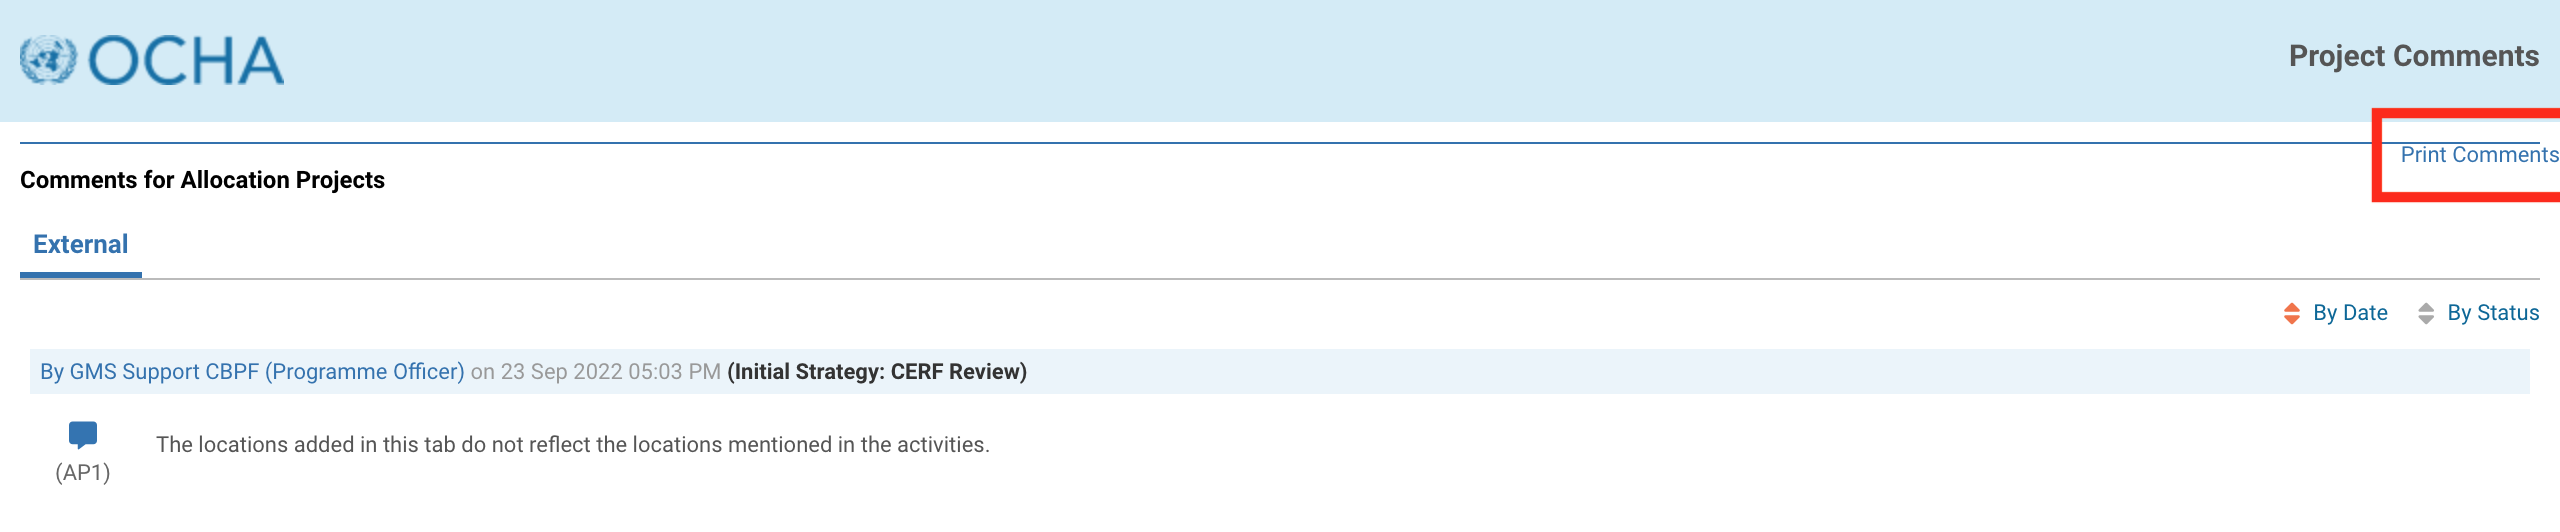
All parties involved in the Initial Strategy draft, review and approval have the possibility to leave comments.
Comments can only be inserted at the tab level and at specific workflow stages, depending on the user role. More specifically, you can only save comments when the Initial Strategy is active under your user role. For instance, the Programme Officer will be able to save comments at the ‘Initial Strategy: CERF Review’ step of the workflow, while the Country Office will be able to leave comments at ‘Initial Strategy: Redraft’ step of the workflow.
To add a comment, you can either click on this icon ![]() located in the lower right margin of the screen or go to the bottom of the tab and enter the comments within the comments section provided. To save and post your comment, click on [Save Comment].
located in the lower right margin of the screen or go to the bottom of the tab and enter the comments within the comments section provided. To save and post your comment, click on [Save Comment].

Once saved, your comments will be displayed at the end of the page. You can click on![]() to edit your comment, or on
to edit your comment, or on ![]() to delete it.
to delete it.

IX) Send the Initial Strategy back to CERF HQ
Once you have addressed all the comments, click on [Continue] to open the task page and move forward to the next step.
The task options page displays all the tasks that the Country Office can perform at this stage of the allocation.
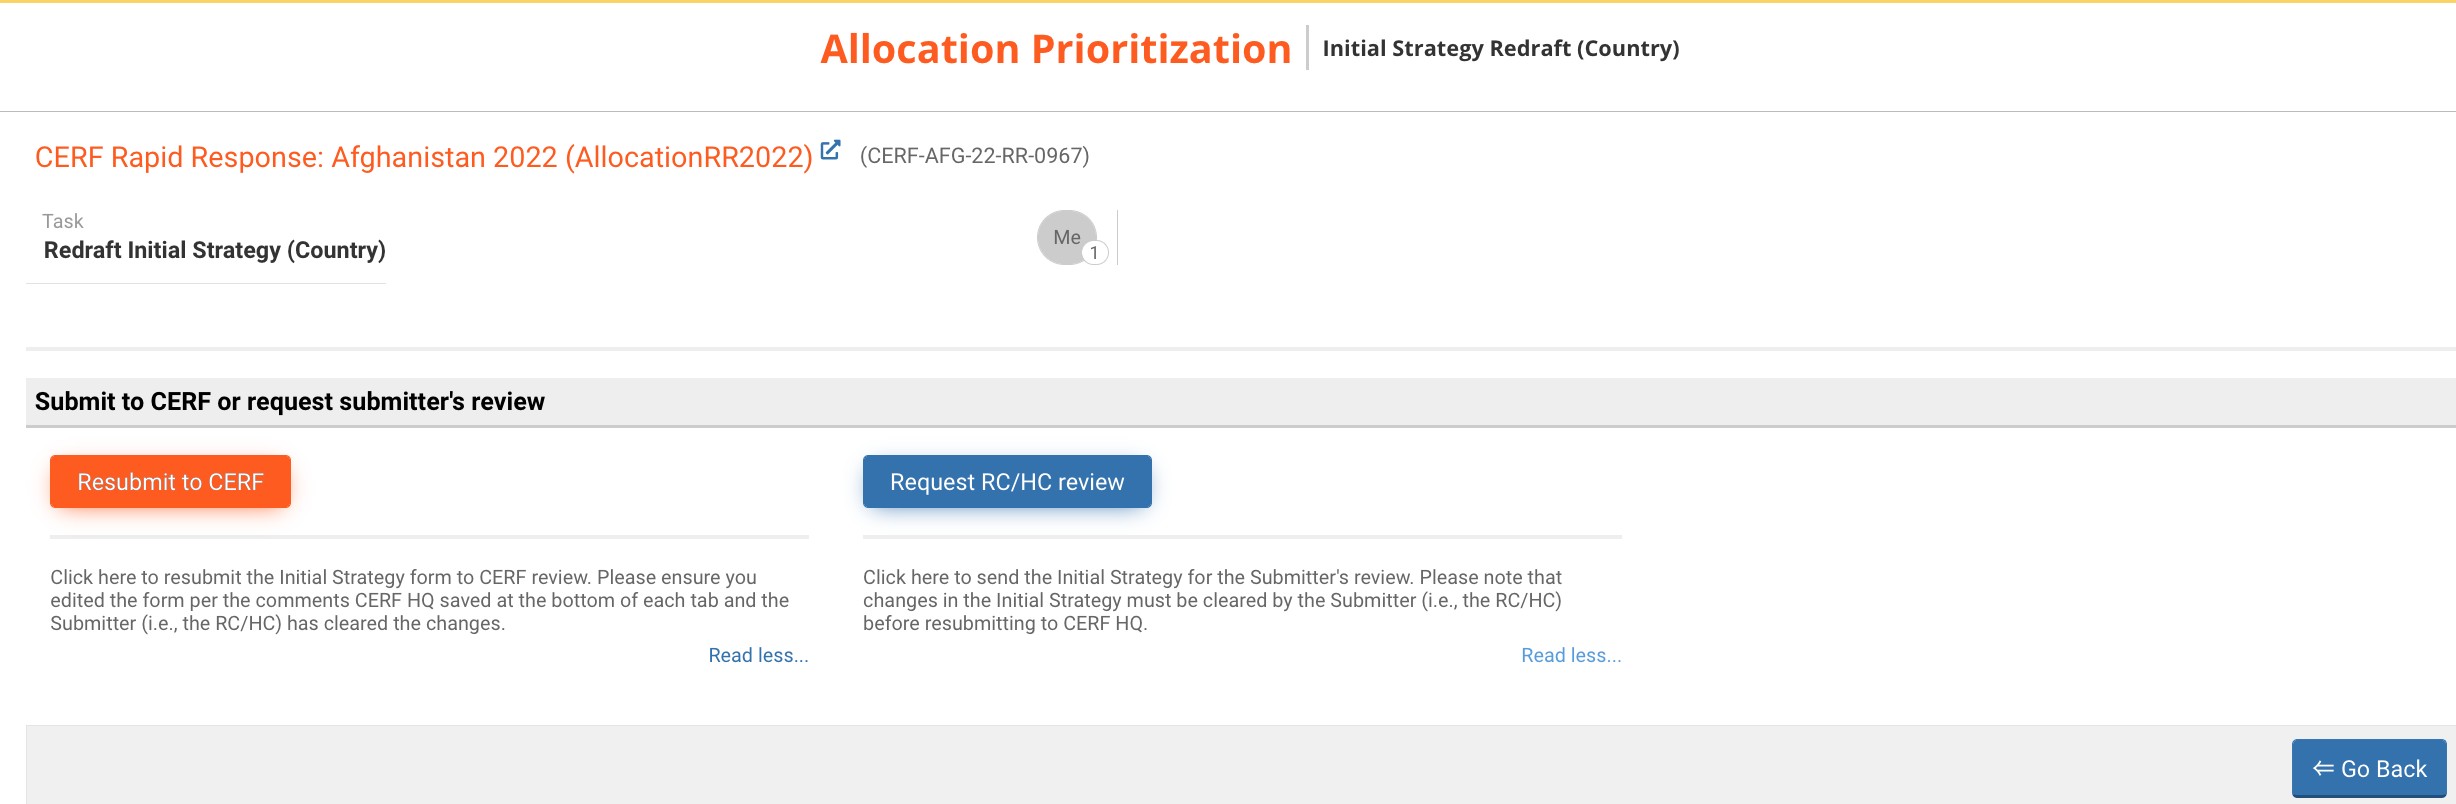
You can click on the name of the task to open its dedicated article in the help portal.
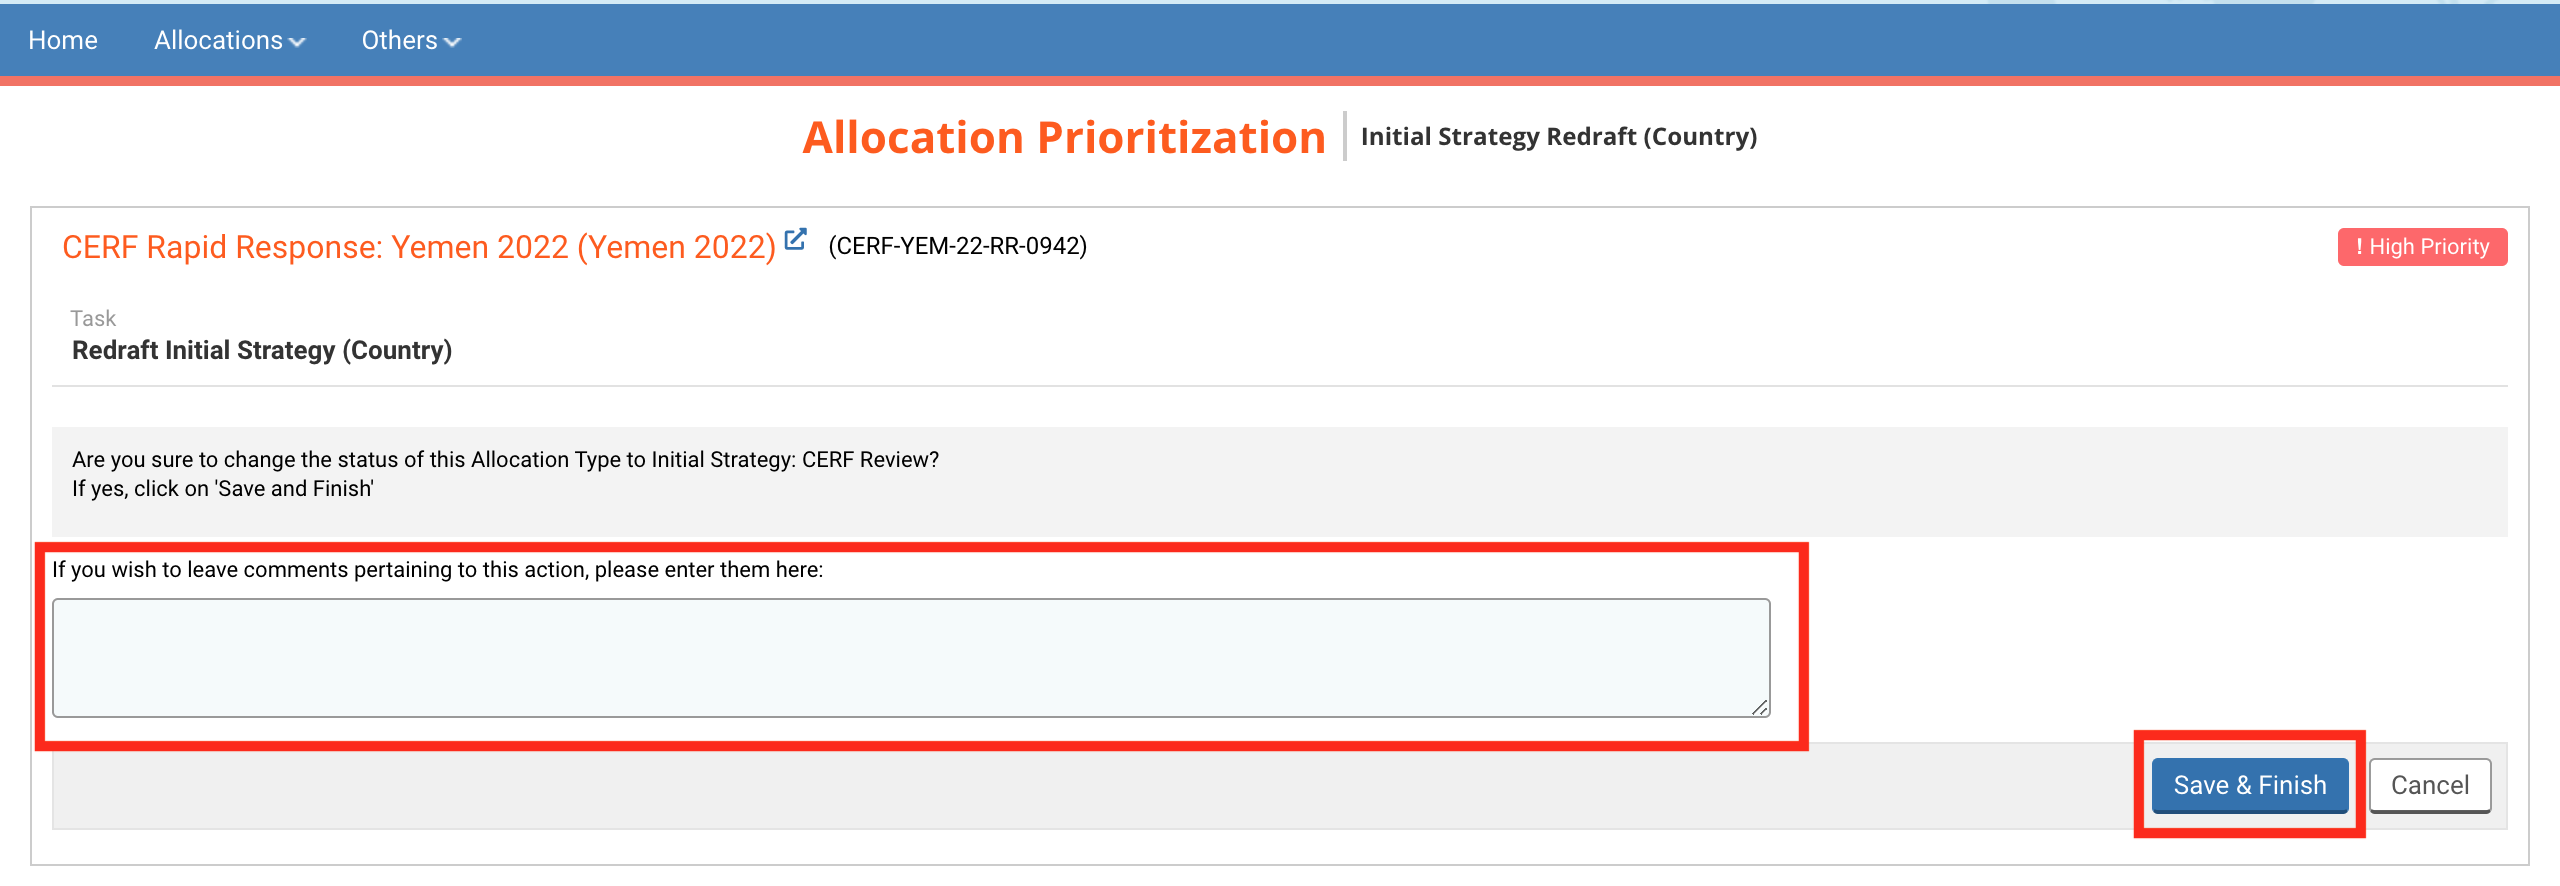
- Resubmit to CERF: click here to resubmit the Initial Strategy form to CERF review. Please ensure you edited the form per the comments CERF HQ saved at the bottom of each tab and the Submitter (i.e., the RC/HC) has cleared the changes.
- Request RC/HC Review: click here to send the Initial Strategy for the Submitter's review. Please note that changes in the Initial Strategy must be cleared by the Submitter (i.e., the RC/HC) before resubmitting to CERF HQ.
Once you have selected an option, a new page will open where you will be able to leave a comment pertaining to this action if needed. To send the Initial Strategy back to CERF HQ, click on [Save & Finish].