Filling the Interim Update: Agency Steps
Fill in the Interim Update – Agency Steps
Before the allocation-level Overview page can be completed by the Country Focal Point,
the implementing Agencies will need to complete their respective project-level Interim Update input page
and submit it to the Country Focal Point.
Each Agency can have one or multiple tabs on the report depending on the number of projects they implement in the allocation
(i.e. an Agency will have one dedicated page per project). These will be distinguished by a number after the Agency acronym on the tab.
While completing the report, it is advised to frequently save where new information is entered, to not lose the information entered on a page.
The Project-level Tab
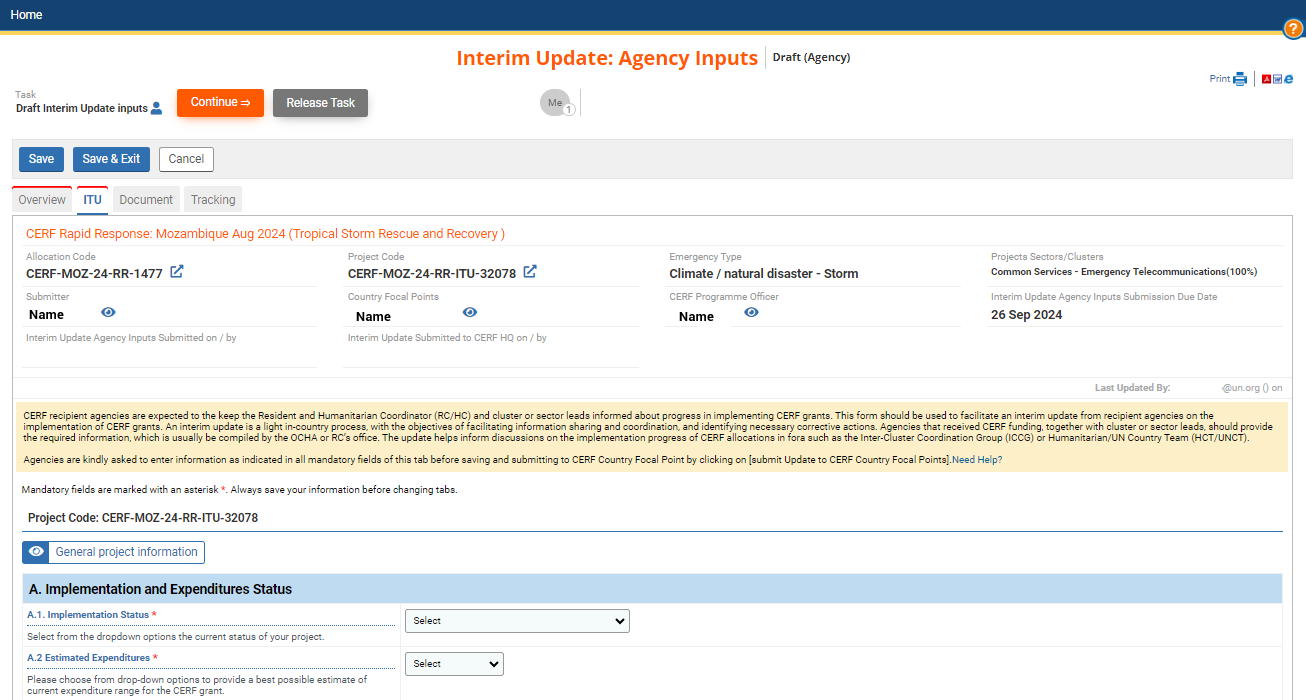
The project-level header is auto-populated by the system and displays the following information about the project:
- Allocation Code
- Project Code
- Emergency Type
- Project Sectors/Clusters and what percentage of the project is dedicated to the each sector
- Submitter name
- Country Focal Point(s) name(s)
- CERF Programme Officer name
- the Interim Update Agency Inputs Submission Due Date
- the date of Submission by Agency to the Country Focal Point
- the Agency officer submitting the Agency’s inputs
- the date of Submission by the Country Focal Point to CERF Secretariat,
the Country Focal Point submitting the Interim Update to CERF HQ
Fields:
Project Code: This field references the CERF project code from the header for easy reference.
[![]() :General project information] button: Clicking the button generates a popup, which features a table with information
:General project information] button: Clicking the button generates a popup, which features a table with information
such as the period of implementation, budget, objective/scope, sector, locations and people targeted of the project.
Along with information about the project, this popup features a redirect button labelled [Go to Project Proposal];
clicking this opens a new browser tab with the Project Proposal of the project.
Section A: Implementation and Expenditure Status
A.1. Implementation Status *: In this mandatory field, provide an update on the current status of the project selected from the drop-down
response-selections. The selection made here will affect the appearance of your Agency’s Implementation Status progress bar on the Overview page.
A.2. Estimated Expenditures *: In this mandatory field provide an update on the current project expenditure, at the midpoint of allocation implementation,
from the drop-down response-selection.
This selection will affect the appearance of your Agency’s Estimated Expenditure progress bar on the Overview page.
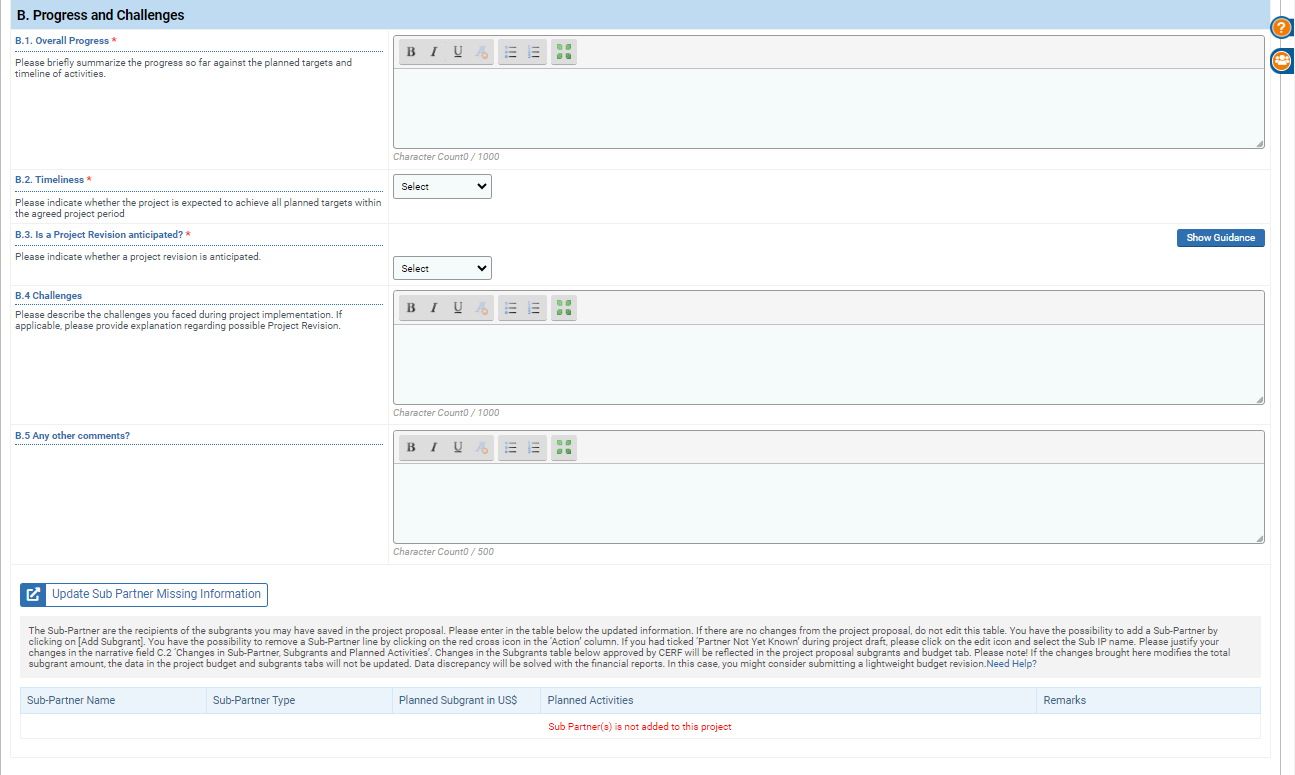
Section B: Progress and Challenges
B.1. Overall Progress *: In this mandatory field summarize the overall progress of the project in relation to the initial, expected targets, and timeline of activities.
B.2. Timeliness *: Indcate from the mandatory drop-down response-selection whether implementation will be timely; indicate whether the project will meet
the scheduled objectives compared to the project implementation period.
There is a [Show Guidance] button, which, when clicked, details the limited, exceptional conditions
under which Project Revisions are permitted.
Select your response based on the anticipated timeliness of implementation.
Will the project meet the scheduled objectives within the expected project implementation period?
B.3. Is a Project Revision Anticipated *: Indicate from the mandatory drop-down response-selection whether a Project Revision is anticipated.
The button marked [Show Guidance] expands to give an explanation on project revisions, detailing the limited and exceptional conditions
under which Project Revisions are permitted.
With few exceptions, a request for a Project Revision needs to be endorsed and submitted by the RC/HC on behalf of the agency.
There is a strict deadline for request submission of ten days prior to project end date.
Please Note: if a Project Revision is active, this field should not be active; instead there will be a table with a redirection icon to project revision.
Sub-sections B4 and B5 may also not be generated.
B.4. Challenges : In this narrative field describe challenges during Project implementation, and further explain if Project Revision is anticipated.
If your response to question B.2. was that you will “probably not” meet the project objectives within the agreed upon project period,
question B.4 will be mandatory, and be indicated as so with a red asterisk.
If your response to question B.3., was that you will “Yes” or that you “Probably” anticipate a Project Revision, question B.4 will also be mandatory,
and be indicated as so with a red asterisk.
B.5. Any other comments? : In this narrative field the user may enter other relevant comments and information.
Section C: Sub Partner Information
The Sub Partner table displays information on Sub Partners that was entered at the Project Proposal stage.
If at the project drafting stage, one or more of the sub-implementing partners names were not provided,
these will be required before submission of the Interim Update.
Clicking on the button [Update Sub partner missing information] will open a new browser tab to the Administrative page of the Project Proposal;
this will allow the update of the sub partner’s name through a light revision.
(More information on Project Revisions can be found by clicking here.)
_________
A list of Sub Partners displays all subgrantees on the project. It includes the following information:
• Sub Partner Name: Sub-Partner names that have been submitted.
• Sub IP type: A description of the Sub-Partner type (International NGO, National NGO, Government, Private Contractor, Red Cross, UN Agency, etc)
• Planned Subgrant in $US: The Planned Subgrant amount in USD
• Planned Activities: Planned project activities to be implemented by the Sub-Partner
• Remarks: An optional narrative field, where the user can describe the Sub-IP’s role and contribution to the project.
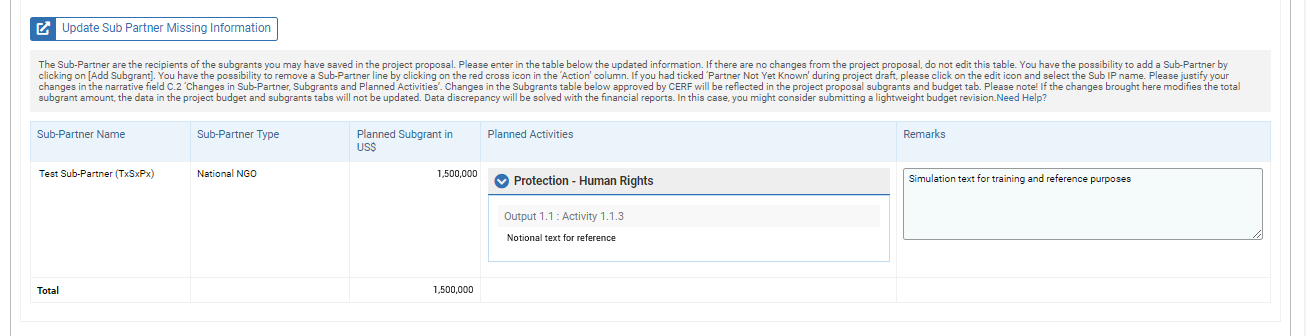
In the table, it is possible to view the Sub Partner activities from the ‘Logframe’ by clicking on the arrow next to the sector, in the Planned Activities column;
this expands the field.
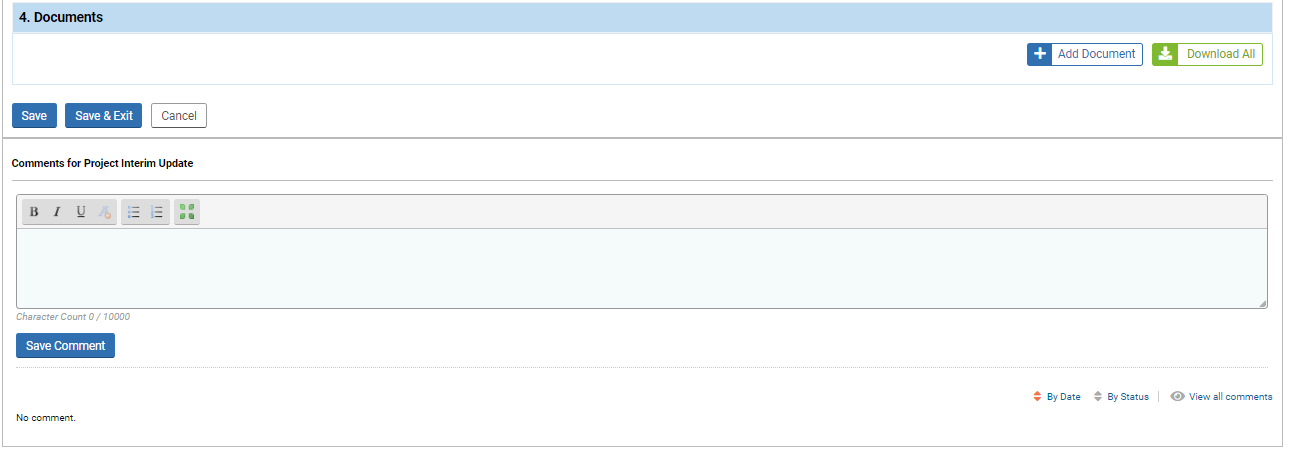
Documents Section
Adding and Downloading Documents:
To add documents, there’s an [+add document] button above to the right side of the table, as well as a [Download All] button to download.
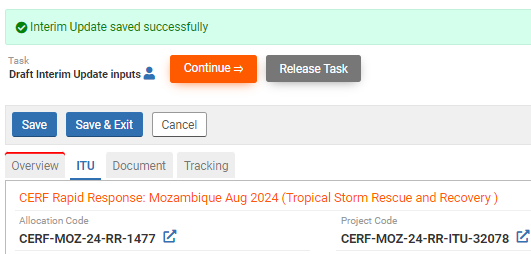
After completing all parts of the Interim Update, Agencies should save again.
If all required information was entered, the Agency’s Interim Updates input tab should no longer display a red mark at the top of the tab.
At the top of the page a green notification should temporarily indicate that the Interim Update was saved successfully.
After completing the drafting process Agencies will be able to submit the Interim Update by clicking on the orange [Continue=>] button at the top of their screen.
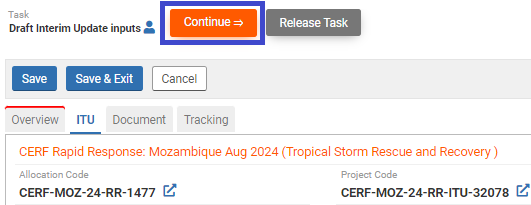
The next page that loads will show a task option. Click the orange button [Submit interim update inputs to OCHA/RCO]
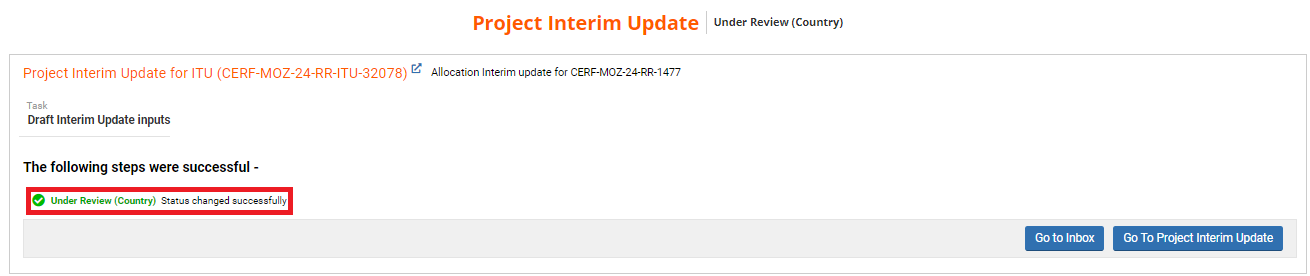
to proceed to submit inputs to Country Focal Points. The system will request that you confirm submission.
Upon clicking [Save & Finish], the submission will be completed as confirmed by a green notification of change in status.
After submission, Agencies will still be able to view the Interim Update as read-only but no edits will be allowed
unless the report is sent back from Country Focal Points for redraft.
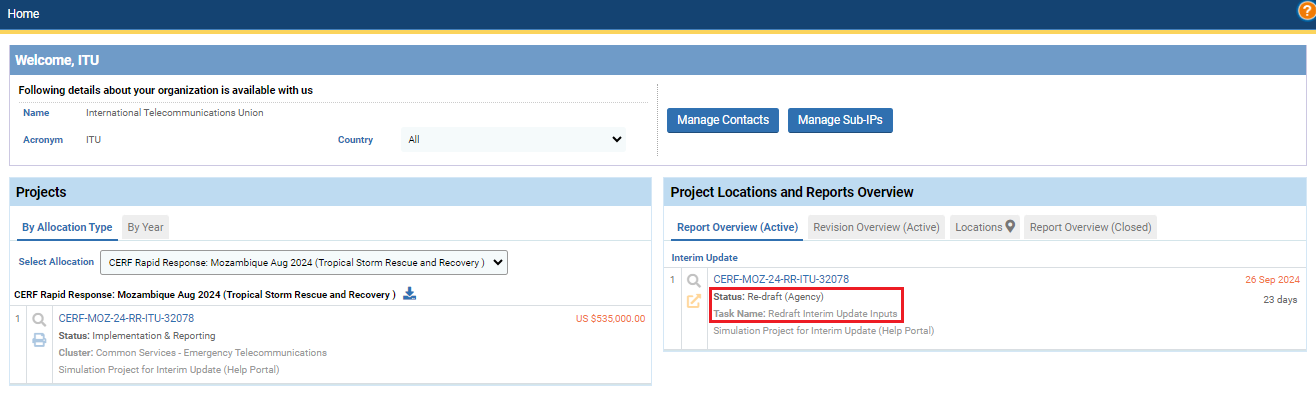
Redrafting Agency inputs
If required by Country Focal Points, Agencies may be requested to consolidate or modify their Interim Update inputs after initial submission.
Agencies will receive a notification informing them to sign in to their homepage and open the Interim Update via the Project code or the tooltip icon.
The report will once again be open to Agency edits.
Upon completion of redraft, Agencies will be able to submit the report by clicking on the orange [Continue=>] button.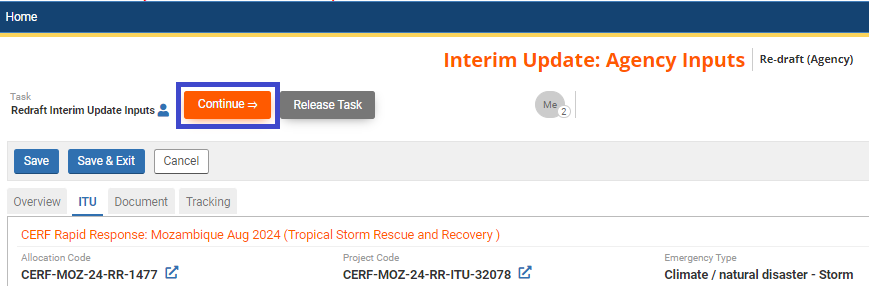
In the following page, click the orange button [Re-Submit to Country Office Focal Points (RC/HC)].
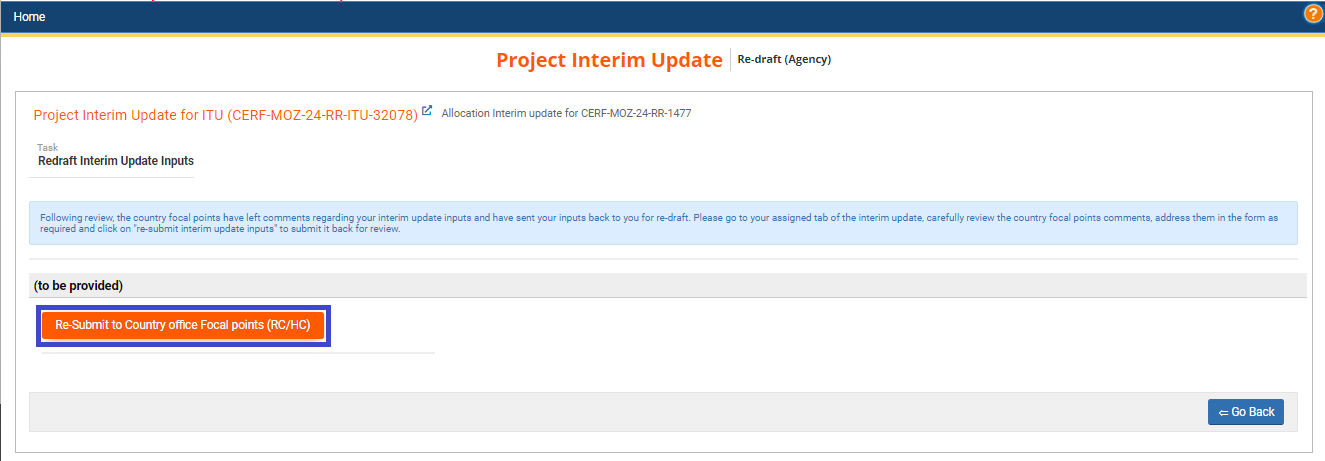
In the next page, click [Save&Finish] to confirm submission.
A confirmation notification will indicate that the submission has been made.