I) Step 1 (OneGMS): export the project's information in a XML format
OneGMS Tip: how to extract the ZIP folder and open the XML file as a Word document
OneGMS Focus: errors preventing from exporting the file
II) Step 2 (UMOJA): import the XML file in UMOJA
III) Step 3 (UMOJA): export the UMOJA project's data
IV) Step 4 (OneGMS): import UNOJA's data into the OneGMS
OneGMS Focus: how to solve the Grantor importation errors in the OneGMS
I) Step 1 (OneGMS): export the project's information in a XML format
Once the BP number, the Grantor Contact Id and the Allocation Grantor Program Code have been entered and saved in their according modules in the OneGMS, you are all set to generate and download the project(s)’ data on your computer.
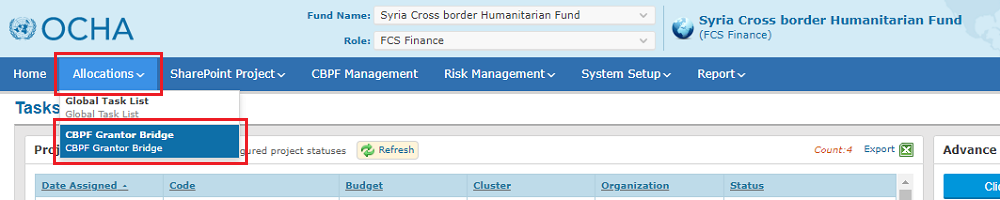
To do so, follow this navigation: Allocations -> CBPF Grantor Bridge
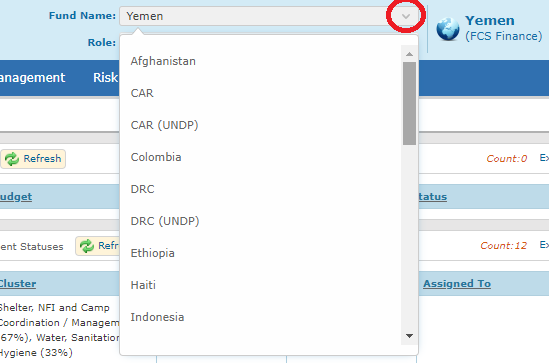
In the CBPF Grantor Bridge page, apply filters to identify the project(s) which data you wish to export, and click on [Search]. Filter options are described below the screenshot.

Fields description
- Allocation year: Select one or multiple year(s) from the drop-down list to filter the list of projects by allocation year.
- Allocation type: Select one or multiple allocation types to filter the list.
- Project Status: Select either [Disbursement], or [Implementation & Reporting]. It is not possible to select another project status as the bridge should only be created for active, approved projects which have funds that are being disbursed.
- Project code: To select a specific project, enter its code in this field. You can enter multiple project codes by separating them by a comma, or by using the space key.
Then, click on [Search].
The list of according projects will be generated below the filters’ section.
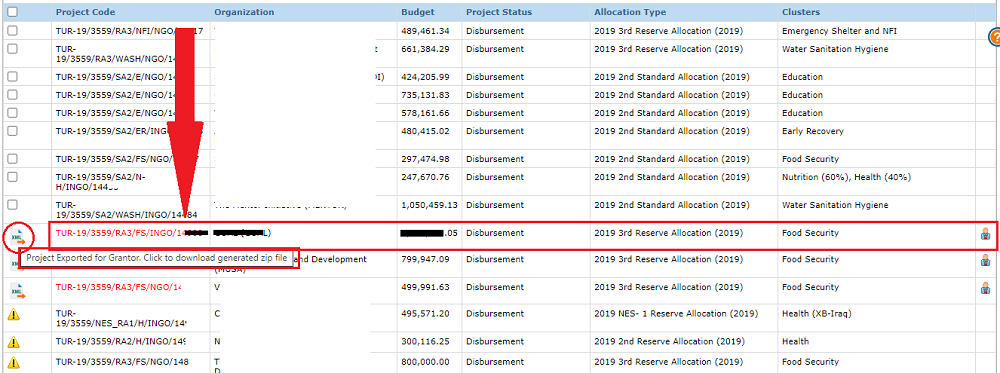
Select a project which data you wish to export by ticking its box on the left-hand side of its line, and click on [Export Projects].
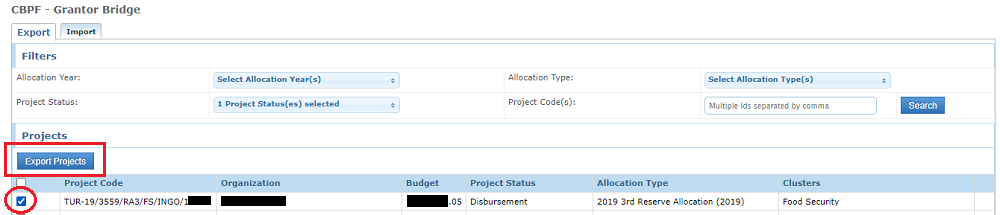
You can select multiple projects. You can also select all projects of the list by ticking the box in the header of the table.

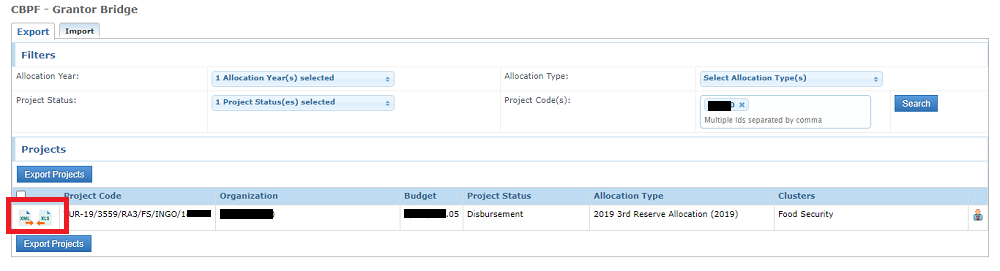
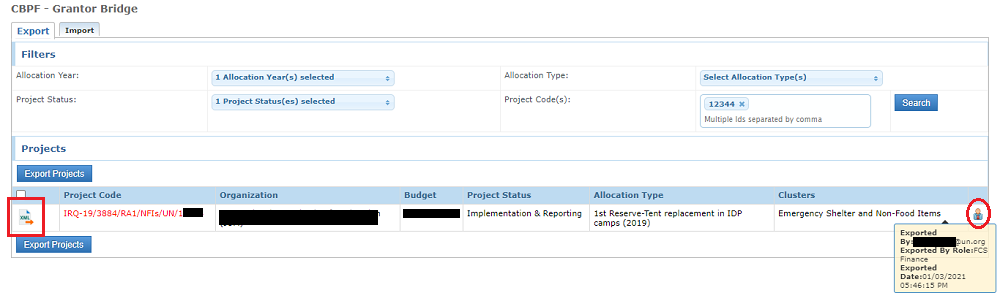
When you click on [export Projects], it will not download the file directly onto your computer, but it will generate a Grantor Application Id, along with an XML document specific to the selected project(s). A new icon  will appear on the left-hand side of the project(s)’ line.
To download the XML document, click on this newly appeared icon. If you selected multiple projects before clicking on [Export Projects], you can click on any of the selected projects’ icons, the downloaded folder will include all projects’ XML documents.
Please note: the list of projects in the CBPF Grantor Bridge page of the OneGMS is divided in three:
- projects’ lines that have a tick-able box,
- projects’ lines that have an XML icon and
- projects’ lines that have an error icons.
This is why, when you tick a project’s box, and you click on [export projects], the project’s line position in the list will change. It will become the first project’s line of the Projects with an XML icon portion of the list.
This means that you need to scroll down to fetch the project’s line, OR use the filter section at the top and enter the project’s code to single its line in the list.
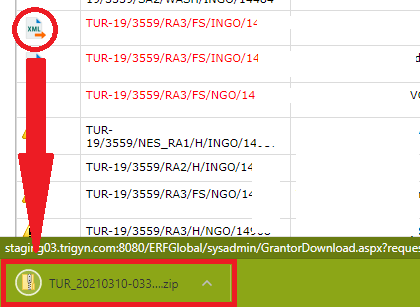
To download the project’s data, click on this new XML icon.
The project’s data will be exported as an XML file within a ZIP folder on your computer, most probably in the ‘Downloads’ folder of your desktop.
Extract the ZIP folder to access the generated document with the project’s data, which you can open by using Word. If you selected multiple projects before extracting, there will be several XML documents in the ZIP folder.
You can find the step-by-step guidance on how to do so below. If you already know how to extract the ZIP file and open the XML as a Word, you can skip the below guidance and go directly to the next section of the article by clicking HERE.
VERY IMPORTANT NOTE: DO NOT EDIT THE WORD DOCUMENT ITSELF.
If you notice a typo, or a discrepancy in the word document, you will need to edit the information in the OneGMS, and not in the word document. Otherwise, it will create a glitch in the bridge between the OneGMS and UMOJA.
|
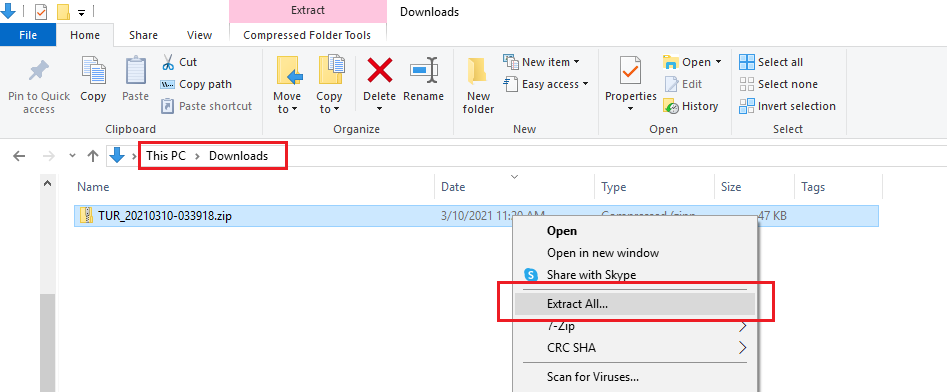
OneGMS Tip : how to extract the ZIP Folder and open the XML file as a Word document 1- Extracting the ZIP folder : Go to the Downloads folder of your desktop, and right-click on the folder’s name, then, click on [extract all].
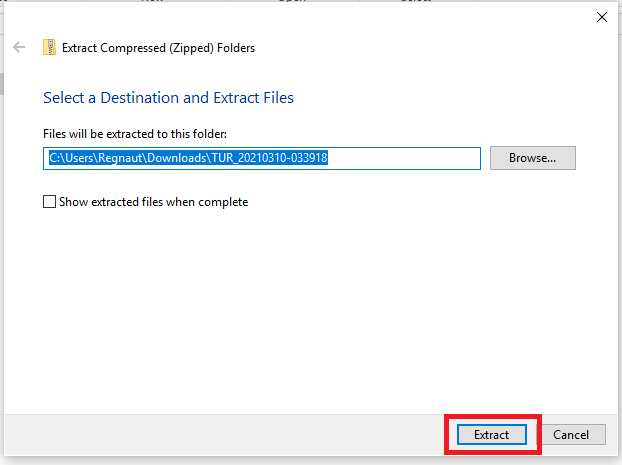
In the new window, click on [extract].
The extracted folder is displayed in the Downloads folder of your desktop. It is the one which icon is a normal yellow folder
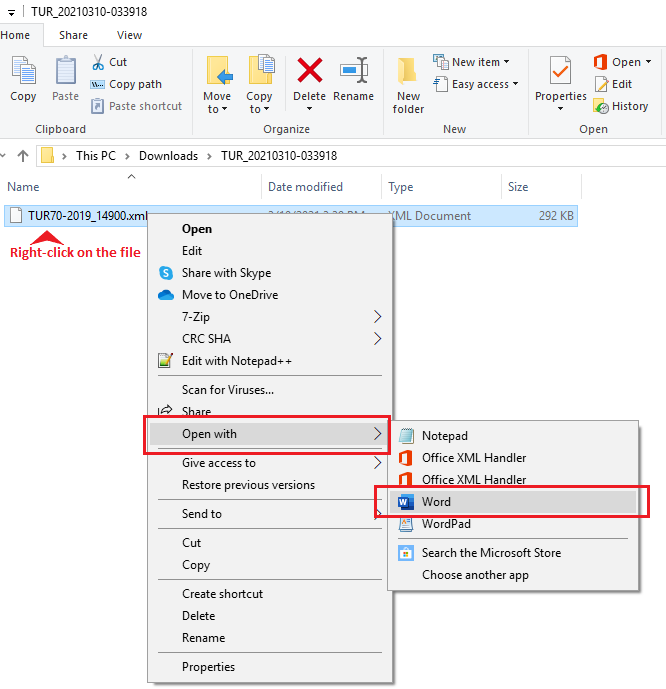
2- Open the XML using word : open the extracted folder by double clicking on it if you have not done so before, and right-click on the XML document. Hover over [open with] and select Word. In case you selected several projects during the export on the OneGMS, you will find in this extracted folder several XML documents, one per project.
VERY IMPORTANT NOTE: DO NOT EDIT THE WORD DOCUMENT ITSELF. |
 , while the ZIP folder has a zipped yellow icon
 . Double click on the normal yellow folder icon to open it and access the XML file.
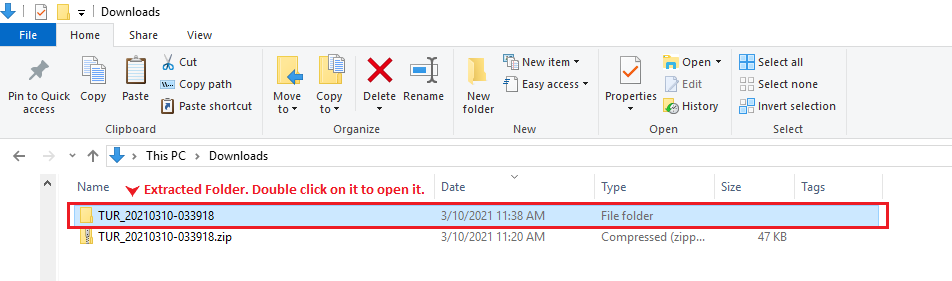
Please note: the OneGMS keeps a history log of user, date and time of the data extraction. To see this information, hover over the user icon  on the right-hand side of the project’s line.
|
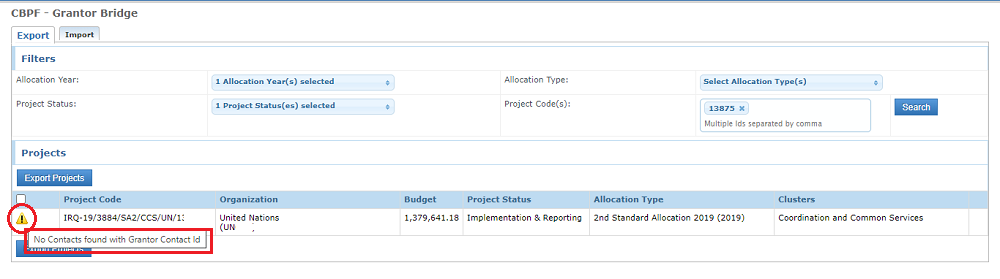
OneGMS Focus: How to solve the error preventing from selecting a project CBPF Finance can be prevented from selecting the project by an error icon
There are two error messages that can prevent you from selecting a project. The issue must be fixed before being able to select the project and export it in XML. To access the guidance on how to solve the errors please click on their respective links below: - No contacts found with Grantor Contact Id (see preliminary step 2 : how to add a Grantor contact Id to legal signatories) - No active Organization Headquarters found (This means that the Organization has no active Headquarter locations saved in its Due Diligence form. |
 .
.
II) Step 2 (UMOJA): import the XML file in UMOJA
After successfully downloading the XML file onto your computer, it is now ready to be uploaded on UMOJA. This process will give you the Application ID number.
First, login to UMOJA, following the specific instructions that were left for you by UMOJA.
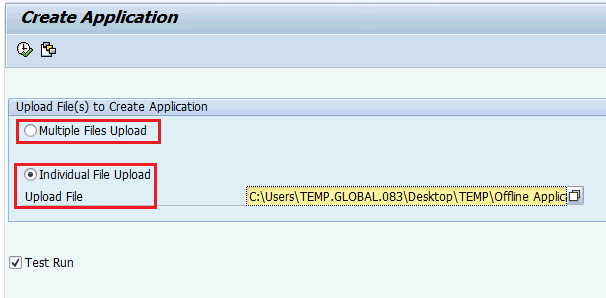
Once on UMOJA production, enter the T-CODE: ZGMAPPLICATION. You will be redirected to a ‘Create Application’ page (see screenshot below).
Please note: UMOJA advises users to do a ‘Test run’ to validate any issues identified before loading the file. The importing process of the XML in UMOJA as a ‘Test run’ is the same as in ‘Update mode’ (real mode), hence the below guidance should be undertaken twice, one for the ‘Test run’, and once for ‘update mode’.
If you wish to do a Test run to identify issues, please tick the box ‘Test run’, at the bottom of your screen. If you wish to upload the XML file in ‘Update mode’, do not tick this box.
![]()
Tick the box ‘Individual file upload’ if you wish to upload one XML document, OR tick the box ‘Multiple Files Upload’ to upload multiple files from the ZIP folder containing the multiple XML documents you exported from the OneGMS.
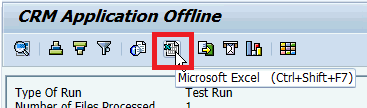
Click on the ‘document upload’ icon to search for the according file(s) on your computer, then click on the ‘check’ icon, at the top of the page.
![]()
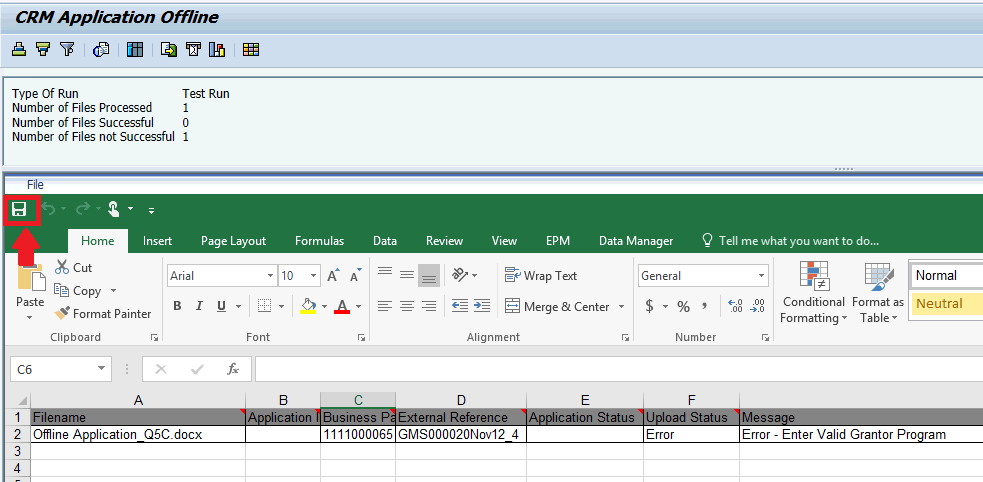
The system will display the results of the action and give the Application ID number. You can extract this information as an Excel document, which we advise you to do right away to complete the process on the OneGMS.

III) Step 3 (UMOJA): export the UMOJA project's data
As soon as the file is selected and executed on UMOJA, the system displays the results of the action and that can be extracted in Excel format for further processing.
To do so, select the Excel icon from the menu path.
The excel option appears right away, you can save it on your computer by clicking on the ‘save’ icon at the top right of the Excel.
After downloading the Excel document, you can complete the Grantor Bridge process and import it in the OneGMS.
IV) Step 4 (OneGMS): import UNOJA's data into the OneGMS
After you exported the UMOJA data as an Excel document, you need to import this excel document in the OneGMS to close the loop and complete the Grantor Bridge process.
To do so, log in the OneGMS and follow this navigation: Allocations -> CBPF Grantor Bridge
Go to the ‘Import’ tab of the CBPF Grantor Bridge page.

Click on [Select a file] button and select the UMOJA excel file from your computer.
Then, click on [Upload and Import].

The Grantor Bridge Process is complete! You can see the Import Process Details displayed below the ‘Upload File’ section. It should display a green checkbox and the following confirmation message: “Project successfully linked with Grantor Application Id.”

You will also notice in the Export tab of the CBPF grantor Bridge page of the OneGMS that a new XLS icon has appeared on the left-hand side of the project’s line. You can download the UMOJA excel file you successfully imported by clicking on this new icon .
.
You will find the ‘Imported’ history log by hovering over the user icon on the right-hand side of the line.

However, if you notice a red exclamation point icon  in the ‘Imported’ column of the Import Process Details section, this means that the Grantor Bridge did not work properly and has not been completed. You will find on the right side an error message identifying the issue. To know how to solve all possible errors displayed by the OneGMS, please refer to the below section of this article: how to solve the Grantor importation error on the OneGMS?

|
OneGMS Focus: how to solve the Grantor importation errors in the OneGMS In case the bridge malfunctioned, you could be having an error message displayed on your screen when you are importing the Excel file back into the OneGMS, after exporting it from UMOJA.
Please find below the possible error messages and the according solution
If you see this error message, it most likely means that you are not logged in the correct pooled fund. For instance, that you are trying to import a Syria project on the OneGMS Iraq Pooled Fund.
And try to import it in the correct Pooled Fund. This error message indicates that there is a data discrepancy between the OneGMS and UMOJA on the Business Partner code. Since it is UMOJA which generates the BP number it is most likely that the problem is that the BP number saved on the OneGMS has a typo or is incorrect. You need to check the Business Partner number in UMOJA and confirm that it is correctly entered and saved in the OneGMS. Make sure it is the same code, without space. To know where to see the BP number of an organization, please refer to the preliminary step described above. After correcting and saving the BP number in the OneGMS, you should be able to import the Excel file from UMOJA in the OneGMS. If you still have this error message and the Organization BP number is correct in both UMOJA and the OneGMS, please contact us at this address: gms-support@un.org
This error message will be displayed when the workflow process has not been fully done, or has been done in the wrong order. It indicates that you may be trying to import an UMOJA excel file into the OneGMS but you did not previously export the OneGMS project XML document.
This message will be displayed in case you are importing a UMOJA file into the OneGMS for a project which bridge has already been created. There is hence no need to importing the file again.
|