
TOOLS FOR A BETTER ALLOCATION SETUP PROCESS
Setting up a new Standard or Reserve Allocation on the GMS can seem challenging. This blog post aims to introduce tips to help smooth and ease the setup process. Links are provided under each section of this post to access the more detailed, complete guidance on the topic available on the Help Portal.
Content:
- Adding HRP Strategic Objectives (HRP SOs)
- Adding Sector Specific Objectives (SSOs)
- Configuring Cluster Indicators
- Configuring Standard Activities (Optional)
- Creating the Strategic Review Scorecard
- Creating the Allocation
- Linking the SOs and SSOs to the Allocation
- Configuring the Allocation Cluster Priorities (Optional)
- Adding Allocation Documents
CONFIGURING THE ALLOCATION'S COMPONENTS
There are several manipulations to perform in the GMS in order to set up an allocation. We strongly advise you to enter and save your allocation details from the Macro to the Micro level, in the following order.
1- Adding HRP Strategic Objectives
Navigation: System Setup -> Allocation Management -> Manage Global HRP SO
Click on [Add HRP SO]: In the pop-up window, select the year, the HRP, the SO number/prefix and add the SO description. Then, click on [Save]. To add several SOs, repeat the process.
Please click here to access more detailed guidance.
2- Adding Sector Specific Objectives
Navigation: System Setup -> Allocation Management -> Manage SSO

Go to the end of the SSO list, enter the SSO, select the year, select the HRP, and click on the ‘+’ icon .
.
To add another SSO, repeat the process.

Please click here to access more detailed guidance.
3- Configuring Cluster Indicators
Navigation: System Setup -> Configuration Set up -> Clusters - > Cluster Indicators
In the Cluster Indicators page, select the HRP year, the HRP, the Cluster to which the indicator pertains, enter a description of the indicator, select the beneficiaries (if applicable), enter information on specific needs (optional), and select the indicator’s unit. You have the option to lock the indicator (optional).
After that, click on [Save Record]. Repeat this process for every cluster indicator you wish to add on GMS.
Please click here to access more detailed guidance.
4- Configuring Standard Activities (Optional)
Navigation: System Setup -> Configuration Set up -> Manage Standard Activities
In the ‘Manage Standard Activities’ page, select the HRP year, the HRP, the cluster, add a tag (if applicable), and insert a description of the standard activity. You have the option to select a specific risk level required to implement the standard activity. After that, click on [Save Record].
Please click here to access more detailed guidance.
5- Creating the Strategic Review Scorecard
Before creating an allocation, it is mandatory to create the SR scorecard that will be used during the Strategic Review of projects. Each allocation should be linked to a UNIQUE Strategic Review Scorecard.
It is not necessary to finish the scorecard at allocation launch, however the scorecard's template must be created on the GMS. It is possible to edit the template and finalize the scorecard after the allocation launch, up until the start of the strategic review process.
To learn how to create a new scorecard, plese refer to this article of the Help Portal.
CREATING AND MANAGING THE ALLOCATION
Navigation: System Setup -> Allocation Management -> Manage Allocation Type
To create a new allocation, fill all the mandatory information which is marked with a red asterisk and click on the [Save& Stay] button. The green asterisk shows the fields that will be published in the Business Intelligence (BI) platform once you click on the small "Publish" tick box.
Please click here to access more detailed guidance.
2- Linking the Allocation with previously created HRP SOs and SSOs
Navigation: System Setup -> Allocation Management -> Allocation Type Configuration
Click on the [Edit] button of your allocation line; then click on [Manage HRP].

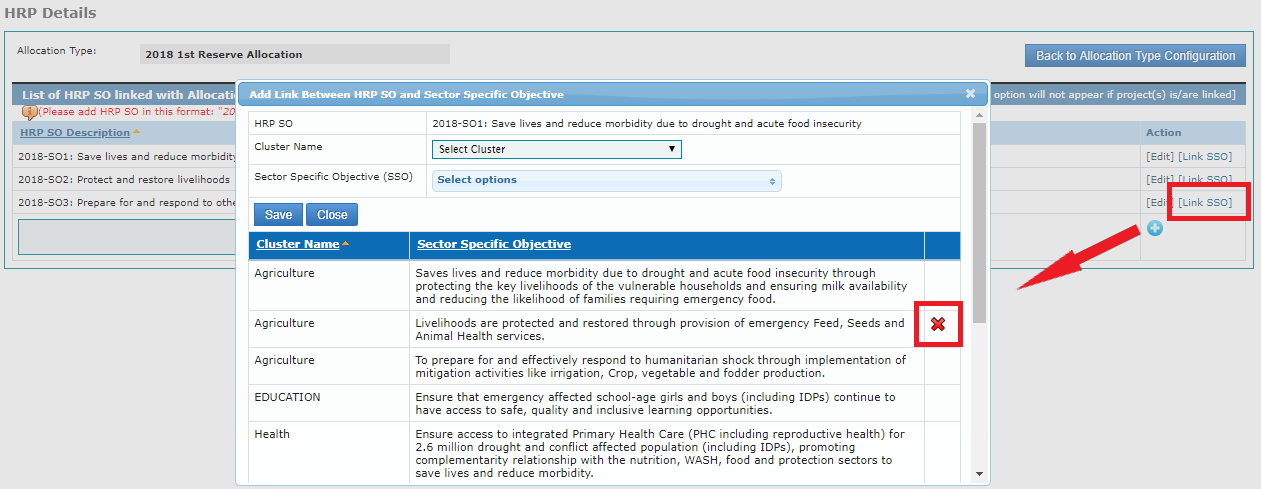
In the HRP details page, add the HRP SO previously created by selecting it in the drop-down list, then click on the ‘+’ icon.
Repeat the process if there are multiple HRP SOs to link to the Allocation.
At the right-hand side of the HRP SO you just added, click on [Link SSO]. In the pop-up window, select the cluster, and its corresponding SSOs that you wish to link to your allocation, then click on [Save]. You can select multiple SSOs at once for each cluster.
To link the HRP SO with another cluster SSOs, repeat the process for the new cluster.
Existing HRP – SSO links can be modified by clicking on the [Edit] link.
Existing HRP – SSO links can be deleted by clicking on the delete icon .
.
Please click here to access more detailed guidance.
3- Configuring the Allocation’s Cluster Priorities
Navigation: System Setup -> Allocation Management -> Allocation type Configuration
Click on the [Edit] button of your allocation line; then click on [Cluster Priorities].
Enter in the according fields the Priority Activities and Geographical area outlined in your Allocation Strategy, and click on the ‘+’ icon .
Please click here to access more detailed guidance.
Navigation: System Setup -> Allocation Management -> Allocation Type Document
In the Allocation Type Documents’ page, select your Allocation from the drop-down list. In the right-hand side box, select the type of document you wish to upload from the drop-down list, upload your document from your computer by clicking on [Search File] and click on [Upload].
You need to upload:
- The Allocation Report
- The Allocation Strategy
- The Timelines
- The Partner Allocation Documents (which are the documents that will be visible to partners on GMS. It is important to upload the Allocation Strategy Paper here)
- The Scorecards
Please click here to access more detailed guidance.