1. Configuration 1: Locations by Percentage of People Targeted
Steps in Configuration 1
Adding and Deleting a Location in Configuration 1
2. Configuration 2: Locations by Number of People Targeted
Steps in Configuration 2
Method a) System Calculation
Method b) Manual Entry
Adding and Deleting a Location in Configuration 2
Potential Errors to Avoid
Useful Features
Map View
The ‘Locations’ page allows the user to express the people targeted per sector, and the per-sector budgets, distributed over project locations (at the city or province levels).
You may find the below video, explaining how to fill the ‘Locations’ page helpful.
If determined at allocation level, the user may need to further refine the 'Locations' page explanation to include the budget distributed over male-female and adult-child breakdowns, as well as directed towards the displacement categories expressed in the ‘People Targeted’ page of the form.
Please note: This more detailed explanatory breakdown that the Agency will need to provide, displays as two distinct configurations in the ‘Locations’ page in the OneGMS, each with a slightly different layout, different steps, and different questions to address. You can access either set of steps via the links below.
Please note: Project locations are selected at the allocation configuration stage, but the Agency user can add or delete locations on the ‘Locations’ page at this stage of drafting the project proposal.
Please note: Before starting this page, it is recommended that you please complete the ‘Log Frame,’ ‘People Targeted,’ and ‘Budget’ pages of the Project Proposal form for optimal completion of the ‘Locations’ page.
- If your project requires percentage values of people targeted, and a percentage of sector budget per location for your ‘Locations’ page, please continue scrolling down a few lines to "19. Configuration 1: Locations by Percentage of People Targeted."
- If your project requires the more detailed breakdown, factoring demographic (man-woman and adult-child) breakdowns per location for your project's ‘Locations’ page, please click here
to read "19. Configuration 2: Locations by Number of People Targeted."
19. Configuration 1: Locations by Percentage of People Targeted
For this configuration, the page displays two sets of tables:
- Targeted People Per Sector
- Budget per Sector

Step 1: Add a percentage of people targeted per location by sector
In the first set of tables (Targeted People per Sector), each project sector has a table. Each sector table lists the people targeted by that sector, expressed numerically in the table header line. Each project location is listed on the left and has a row in each sector table. You will need to input the percentage of the people targeted by that sector for each location in the empty fields assigned to each location. The system calculates and displays the numeric value of people next to each percentage value. The total of the percentages from each table will be displayed at the bottom of each table. Each table should add up to 100% of the people targeted by that sector, for the table to be valid.
When 100% is reflected, the total number of people displayed will be aligned to the number of people displayed in the header.
Step 2: Add a sector budget percentage per location
In the second set of tables, each project sector has a table, but here each sector table represents the budget for each sector, expressed in a USD value in the header line. The project locations are listed to the left, and each location is again assigned a row in each table. You will need to input the percentage of each sector’s budget directed to each location, in the field corresponding to each location. The added percentages will be displayed on the ‘Total’ line of the table. Again, the added percentages of the sector budgets per location need to add up to 100% for the table to be valid.
Click [Save] to save the information you entered.
Adding and Deleting a Location in Configuration 1
Adding and deleting locations in this configuration
Although locations have been added at allocation level, you have the possibility to delete or add a location on the ‘Locations’ page.
Deleting locations in this configuration
To delete a location, click on the ‘delete’ icon (![]() ) next to the location name to the left of the tables.
) next to the location name to the left of the tables.
Adding locations in this configuration
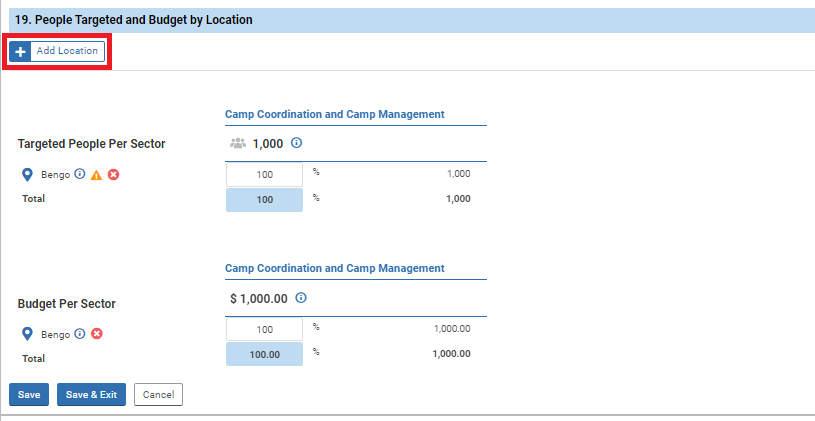
To add a location, click the [+Add Location] button at the top of the category, (outlined in red below).
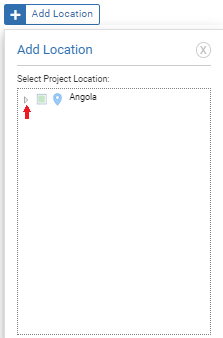
A popup marked “Add Location” should appear. In the box you will see the country name. Click the dropdown arrow icon (shown below) next to the country name.
A dropdown list of locations with check mark boxes next to each location will be revealed. You can checkmark the box(es) next to the location(s) you wish to add.
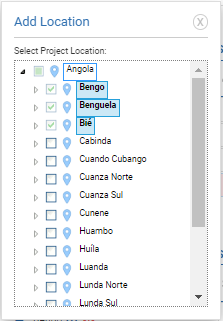
The selected project location(s) will now appear in the tables. Enter the percentages for the project location to validate the table and the ‘Locations’ page under this configuration.
One of the tables and the overall page, will not be validated if the table percentages add up to more or less than 100% as seen below.
If your tables are valid, you may save your page information and proceed to the next page.
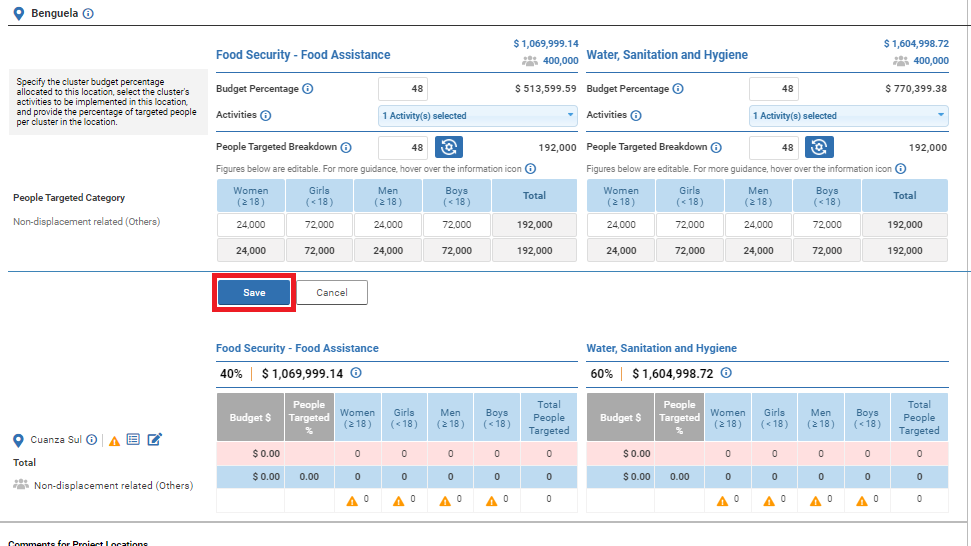
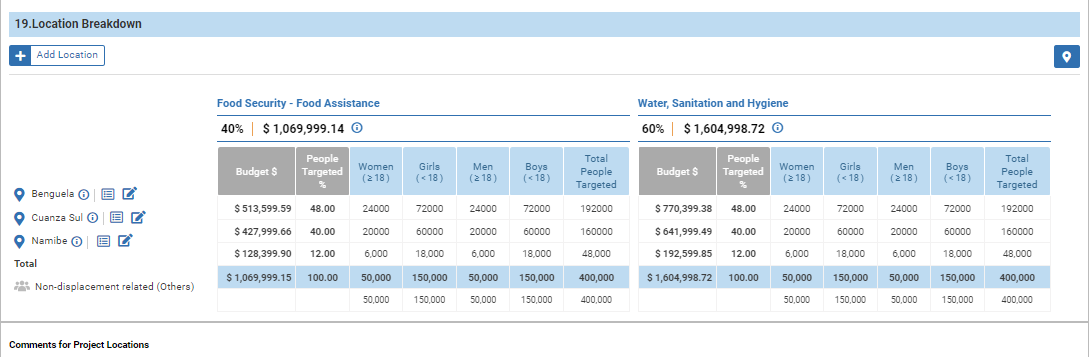
19. Configuration 2: Locations by Number of People Targeted
This configuration is determined at allocation level for certain projects. It requires that the 'Locations' page of your project proposal include people targeted by sector, per location, and sector budget per location, with a further breakdown of demographic types of people targeted.
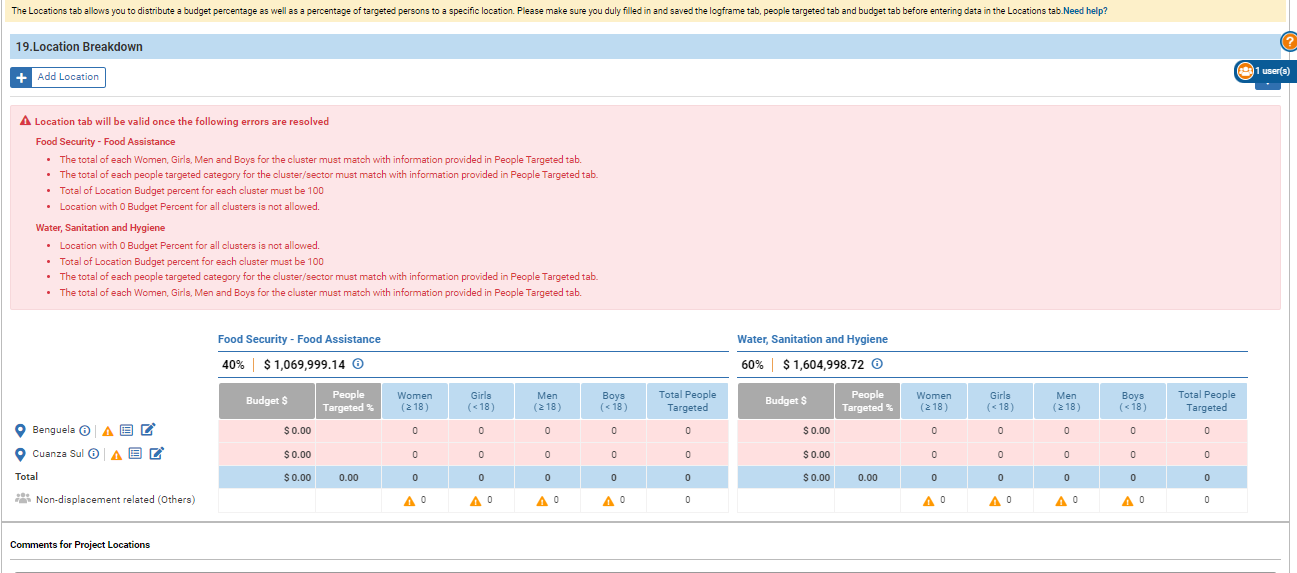
For this configuration of the ‘Locations’ page, the top portion of the category will display a red, dynamically generated system message, with instructions on what information needs to entered to make the sector tables valid for submission.
Below the message, you will find a table for each sector that is targeted as a component of the project. If there are multiple sectors in your project, and some sectors are not visible on the screen, you can click on the right arrow button ![]() to scroll over to any sector tables that are off-screen.
to scroll over to any sector tables that are off-screen.
For each table, the table header displays the sector name, as well as the percentage of the project budget allocated to that sector, and its corresponding USD value.
If you hover over the ‘information’ icon (![]() ) in the header, the total number of people targeted by the sector will display.
) in the header, the total number of people targeted by the sector will display.
The project locations are listed to the left, and each location has a row in each sector-table where that location is targeted by that sector.
Below the location names, you will see displacement-related categories, corresponding to the displacement categories that were entered in the ‘People Targeted’ page.
Percentages will be required to add up to 100%, and the number of people will be required add up to the total number of people expressed in previously completed pages.
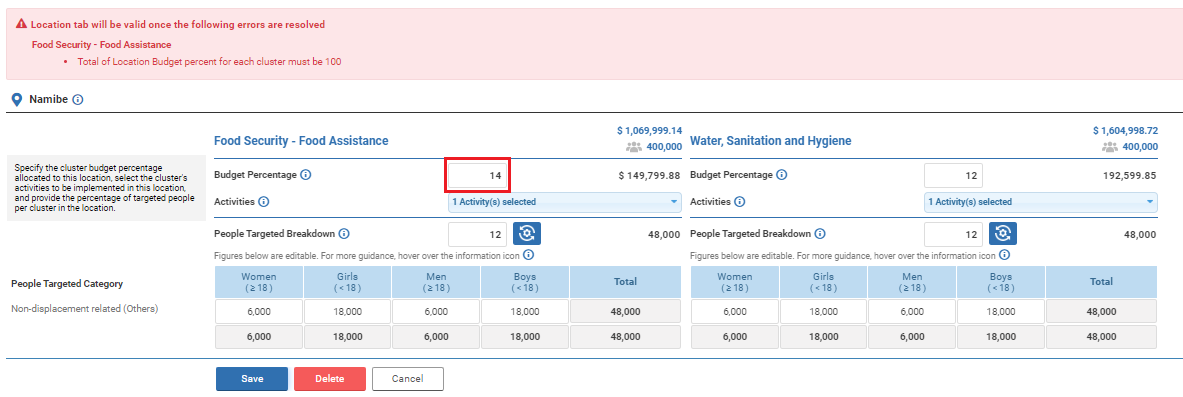
Step 1: Enter the data
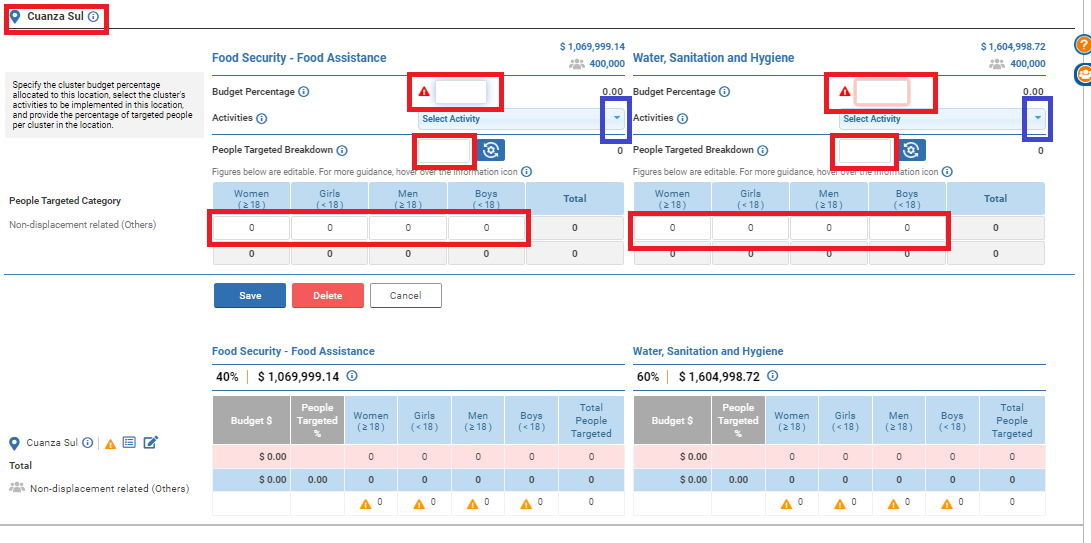
To enter new information, click on the ‘edit’ icon (![]() ) next to the location that you wish to input information on.
) next to the location that you wish to input information on.
A set of tables should appear specific to the chosen location, with each table reflecting sectors that the project targets at that location.
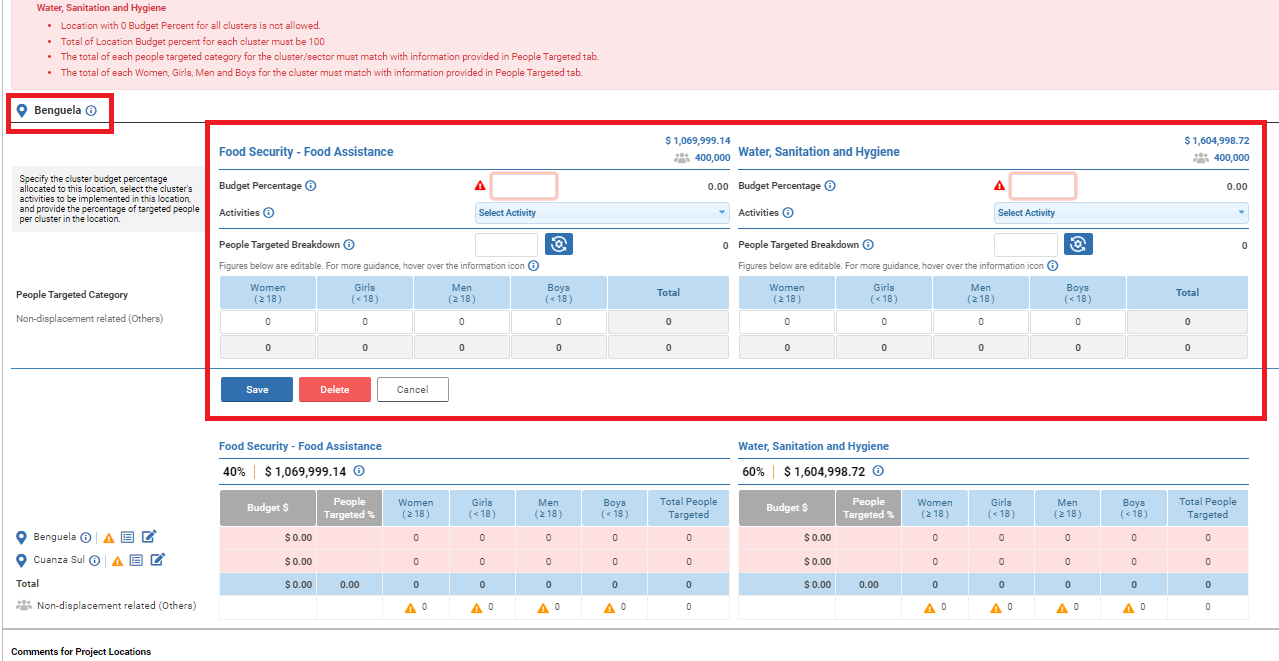
There are two ways to complete the table:
- a) Using a system calculation for the numbers, based on percentage figures that you enter.
- b) Manually entering the population numbers. For this option, please click here.
Method a) Using the system to calculate the ‘People Targeted’:
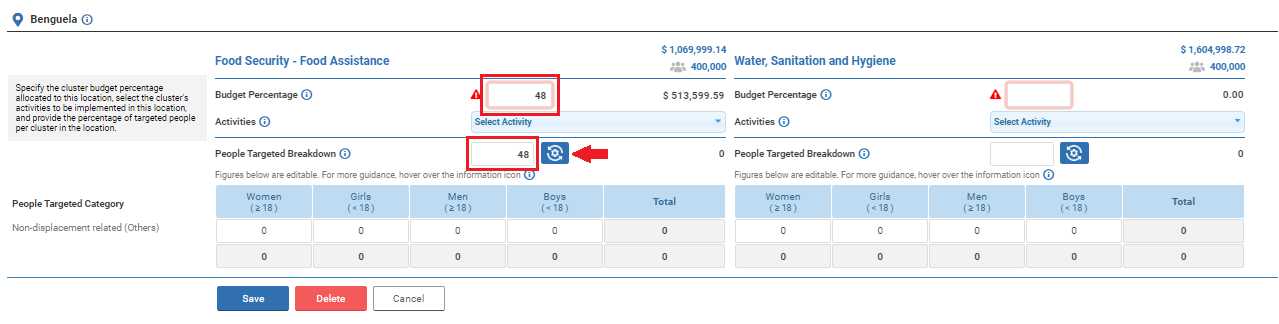
- Enter a percent value from the sector-specific budget, that you estimate will be used at that project location.
- Enter a percent value for the targeted people breakdown.
- Click on the dropdown menu for Activities, and checkmark the activity or activities linked to the location and sector. *This is required for the table and ‘Locations’ page to ultimately be valid.
- Click on the blue ‘rotating-gear’ icon (
 ), indicated with the red arrow in the image above, for the system to calculate, drawing numbers from other pages in the Project Proposal form.
A popup prompt will appear, asking you to verify confirmation of your choice.
The information in the sector-specific table for the location will be calculated, as seen below.
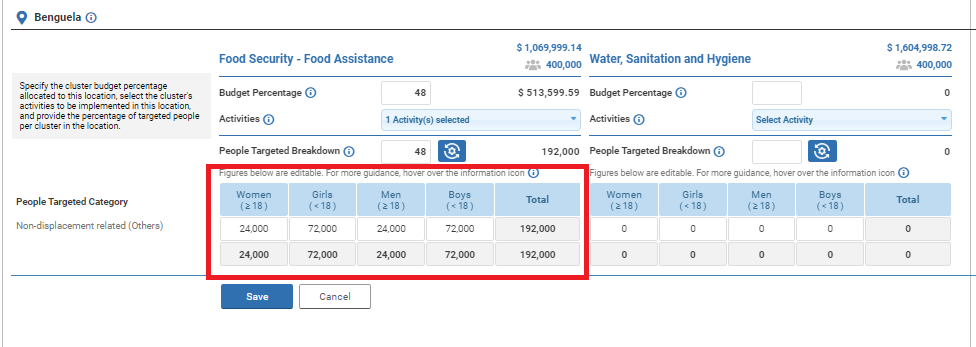
You can still manually edit the information in the cells after the system calculation and repeat the steps for all remaining sector tables for this location.
Click the blue [Save] button (outlined in red below), under the sector tables for the location.
You can repeat the steps as necessary for all project locations.
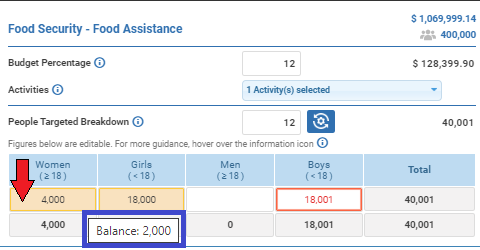
Method b) The alternate way to fill in the ‘People Targeted’ numbers, is by manually entering the Data.
To manually enter the data:
Enter new information by clicking on the ‘edit’ icon (![]() ) next to the location that you wish to input information on.
) next to the location that you wish to input information on.

A set of tables should appear specific to the location, with each table reflecting project sectors that target the location. Here you will manually enter your percentages and manually fill all the information in the cells.
- Enter the budget percentage for each sector (outlined in red above)
- Select the activities from the dropdown menus (outlined in blue above). This step is required.
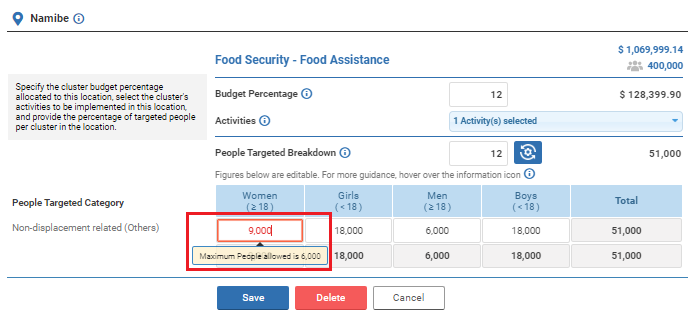
- Manually enter the breakdown of the People Targeted Categories cells (outlined in red above).
As you mouse hover-over over a cell (empty or filled out), a hover box displays the remainder of people that fall under that category. (See below: the mouse hover-over of cell indicated with the red arrow displays the balance for that category in the hover box, outlined in blue below). Clicking on the cell produces a similar result.
If the number you input is greater than the total balance of people for that category, the cell will indicate an error state. You will be able to save the table at this time with errors, but the ‘Locations’ page will not be able to validate until errors are addressed.
Ensure all the values you manually enter for all locations combined, correspond to the information in the ‘Log Frame,’ ‘People Targeted,’ and ‘Budget’ pages to successfully validate the page.
Click the [Save] button when completed.
When the tables are validated for the location, you can repeat the steps for all project locations.
Adding and Deleting a Location in Configuration 2
Although locations have been added at allocation level, you have the possibility to delete or add a location.
To delete a location under this configuration, click on the ‘edit’ icon (![]() ) next to the location name.
) next to the location name.

Once in edit mode, to delete the location, click on the red [Delete] button below the first table.
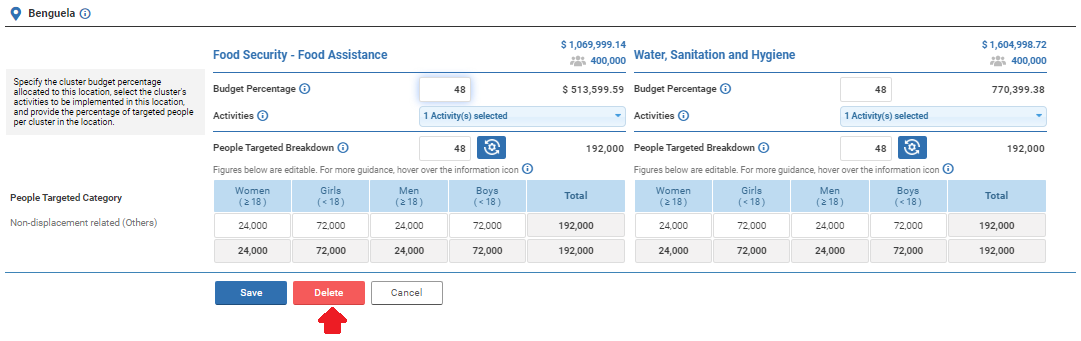
A popup prompt will ask you to confirm your decision to delete the location. Click the [OK] button to proceed with deletion.
Adding locations in this configuration
To add a location, click the button [+Add Location] at the top of the category, outlined in red below.
![OneGMS - CERF Project Proposal – Locations Tab - [+Add location] button](/sites/default/files/inline-images/2024_June_CERF-PPForm_Tab010_014%2019%20Add%20location%20button%20on%20the%20page.png)
A popup marked with “Add Location” should appear.
In the popup you will see the country name, with a dropdown arrow icon (outlined in red), by a ‘list’ icon, and a pinpoint icon (shown below).
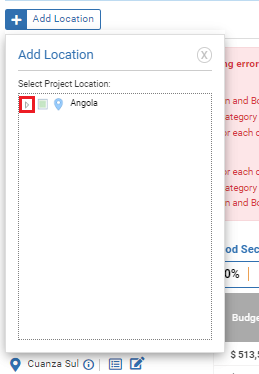
Click the arrow icon to expand the dropdown list of available locations.
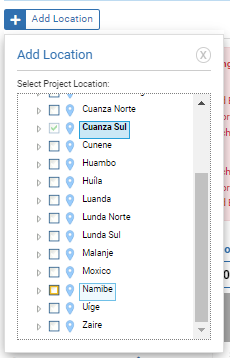
Checkmark the box next to the desired location to add.
Only one location can be added at a time, but the step can be repeated.
To validate a first new location in this configuration, a set of tables, one per sector, will appear for this new location, identical to the edit setup, for when adding new information for a location.
For adding a location in this configuration, the location will not be saved unless you save the information you enter in the sector tables for the location.
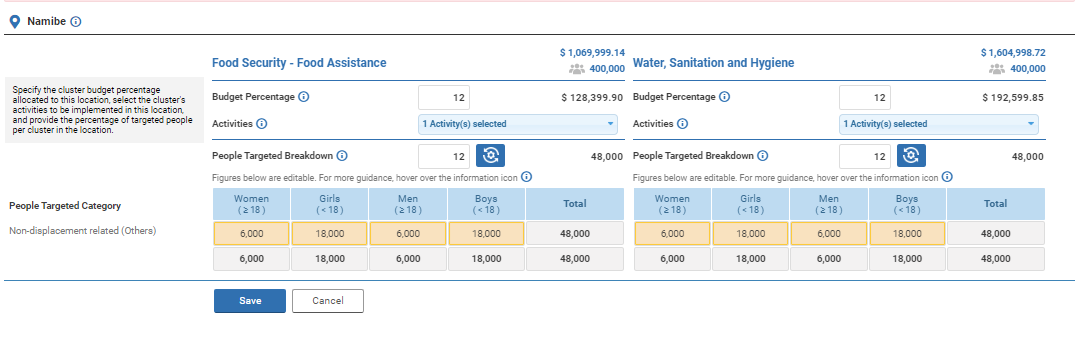
Here you can input project percentages by sector and calculate in the tables with the ‘rotating gear’ icon, or manually input the values and save, following either of the methods listed above.
You will be required to enter a budget percentage, activity, and people targeted for the location and save, before the new location is saved to the final table.
You may repeat the process of adding locations as needed.
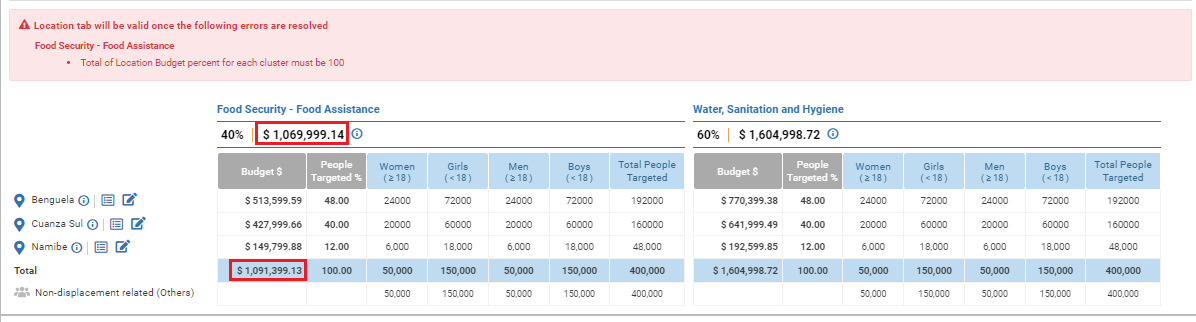
Potential Errors to Avoid
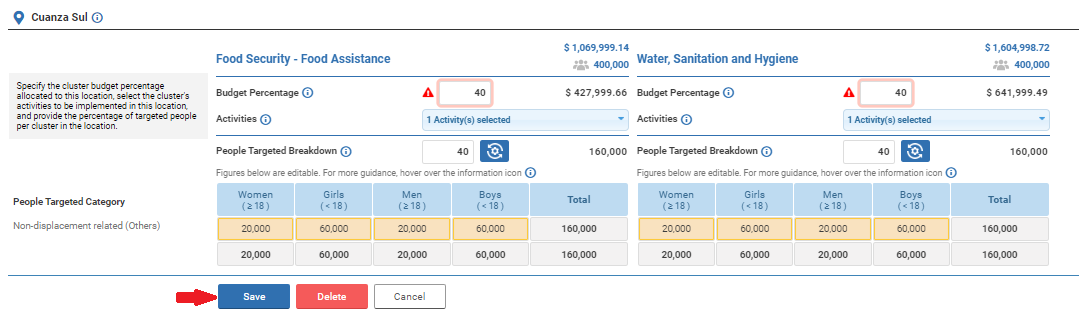
Manual entry in the people targeted by demographic configuration, may lead to a few potential errors. Here are a few pointers which could help you:
- The total of the budget percentage per location, for each sector must be 100%.
- If the percentages per location don’t add up to 100%, the response will not be validated.
- Similarly, the sum total of each location budget per sector must equal the total budget allocated to the sector.
- If the budgets per location don’t add up to 100%, the response will not be validated.
In the above image, an incorrect budget percentage while in the location-editing mode, (as shown in the the figure, outlined in red above), can lead to errors in total percentages (as shown in the outlined figured below). This type of error will not allow you to validate the page, until the issue is resolved.
If you input more people than the maximum allowed for a given category of people, the cell will indicate an error state, and if you mouse hover-over (or click on the cell), a popup display (or hover box) will indicate the maximum number of people allowed for that category.
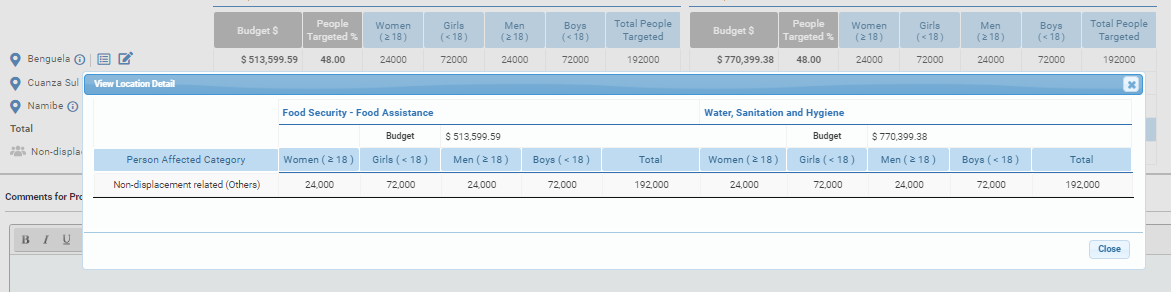
View Single Location Detail
If you wish to view detail for a single location, you can click on the ‘list’ icon by a location name.
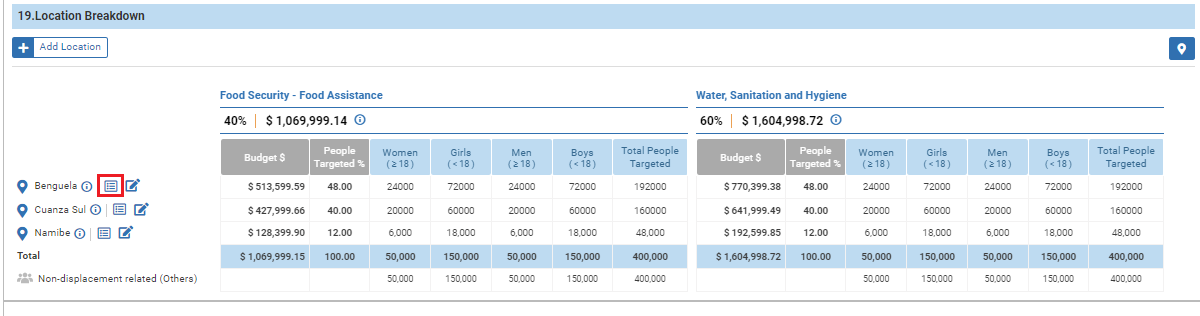
A popup should appear with details for that project location.
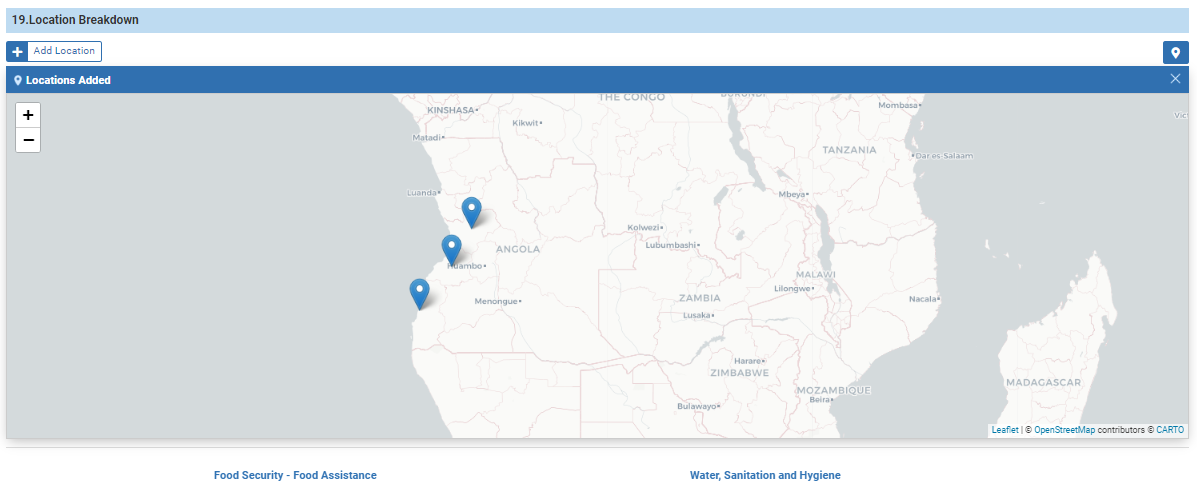
Map View
After adding locations and saving the information entered on the page, you can view your project locations on a map.
At the top right side of the category, on the right side, you can click on the ‘pinpoint’ icon (![]() ).
).

This opens up a map view of the world, with pinpoints on all your project's locations. You can zoom in or out of the map to view the level of detail desired.